
Key Takeaways
- Halloween is a plastic-heavy holiday: one UK study found the costumes sold in a single year hold about 2,079 tonnes of plastic, and store-bought decorations pile on more.
- DIY Halloween decorations made from paper, wood, fabric, and foraged natural finds give you all the spooky style with far less plastic.
- Homemade decor costs less, looks one of a kind, and turns Halloween into a creative, eco-friendly tradition the whole family can share.
DIY Halloween decorations bring more character to the holiday than anything off a store shelf, and they head off a quiet waste problem too. One UK study found the Halloween costumes sold in a single year hold about 2,079 tonnes of plastic, and mass-produced decorations only add to that pile. Rows of identical plastic skeletons and glitter-coated bats also make the holiday look more commercial than creative. Making your own from paper, wood, fabric, and natural finds gives you a spooky display with almost no plastic.
There’s another way to decorate that brings back the warmth and character of Halloween. DIY Halloween decorations made from natural or recyclable materials have a personal touch that mass-produced décor can’t match. They carry the satisfaction of crafting something yourself and the joy of knowing it reflects your style.
This guide is filled with simple, eye-catching DIY Halloween decorations you can make without plastic. Whether you want a hauntingly beautiful tablescape or an outdoor display that wows trick-or-treaters, these projects will help you set the scene for a celebration that is stylish, memorable, and eco-friendly.
Why Go Plastic-Free This Halloween?
Going plastic-free at Halloween keeps oil-based decorations out of landfills, where plastic can take 20 to 500 years to break down and never fully disappears. DIY Halloween decorations made from paper, wood, and fabric skip that footprint while still looking spooky.
Halloween is supposed to be spooky fun, not spooky for the planet. Most store-bought decorations are made from plastic, which can take hundreds of years to break down. Along the way, they can shed tiny bits called microplastics that end up in our air, water, and soil. That means a fake spider web you use for one night could still be haunting the planet long after the holiday is over.
Kinder to Your Home’s Air
Choosing plastic-free DIY Halloween decorations can also be kinder to the air in your home. Many cheap decorations are made from PVC and other soft plastics that can carry additives like phthalates, and heat in a garage or attic can help those chemicals off-gas over time. Natural materials like paper, wood, and dried gourds skip those additives entirely.
Cheaper, One-of-a-Kind, and Fun for Kids
There’s also the bonus of saving money and making something no one else has. DIY Halloween decorations can be created from items you already own, like cardboard, scrap fabric, or branches from your yard. Instead of buying the same décor as everyone else, you can craft one-of-a-kind pieces.
And if you have kids, making decorations together is a fun way to teach them about sustainability without it feeling like a lecture. It can become part of your Halloween tradition, right alongside carving pumpkins and roasting pumpkin seeds, while showing them that small changes can make a big difference.
Save These DIY Halloween Decorations for Later 📌
21 Frightfully Fantastic DIY Halloween Decorations
These 21 DIY Halloween decorations use paper, cardboard, reclaimed wood, fabric, and foraged natural materials, so you can build a full spooky display without a single plastic skeleton or bag of synthetic cobwebs.
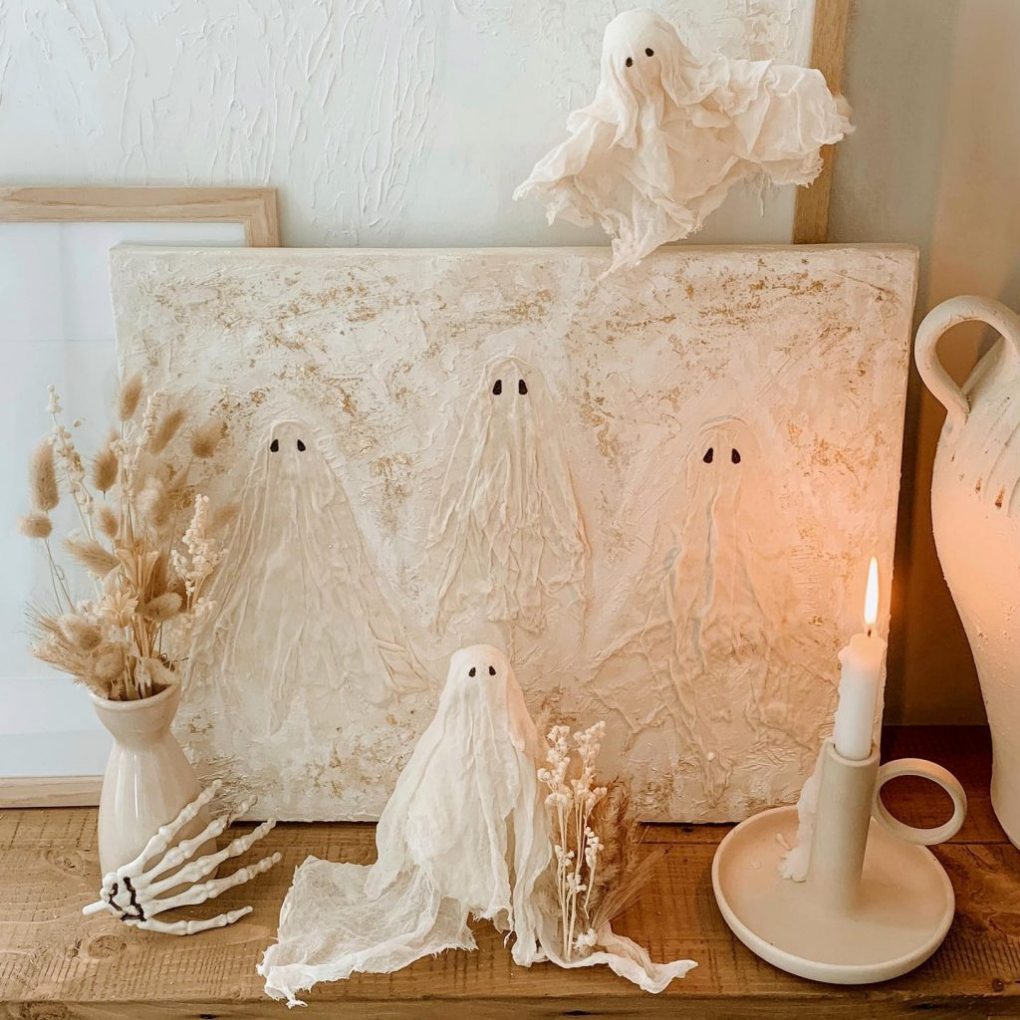
1. Charming Ghosts on Canvas
Tutorial: Place Ideal
Craft night just leveled up. You drape cheesecloth over little balls of cotton or tissue to shape the ghosts, glue them onto a canvas, and paint on tiny black eyes.
The fabric adds real dimension, so they look way pricier than flat painted ghosts. Beginner-friendly and weirdly addictive.
2. A Moody DIY Halloween Tablescape
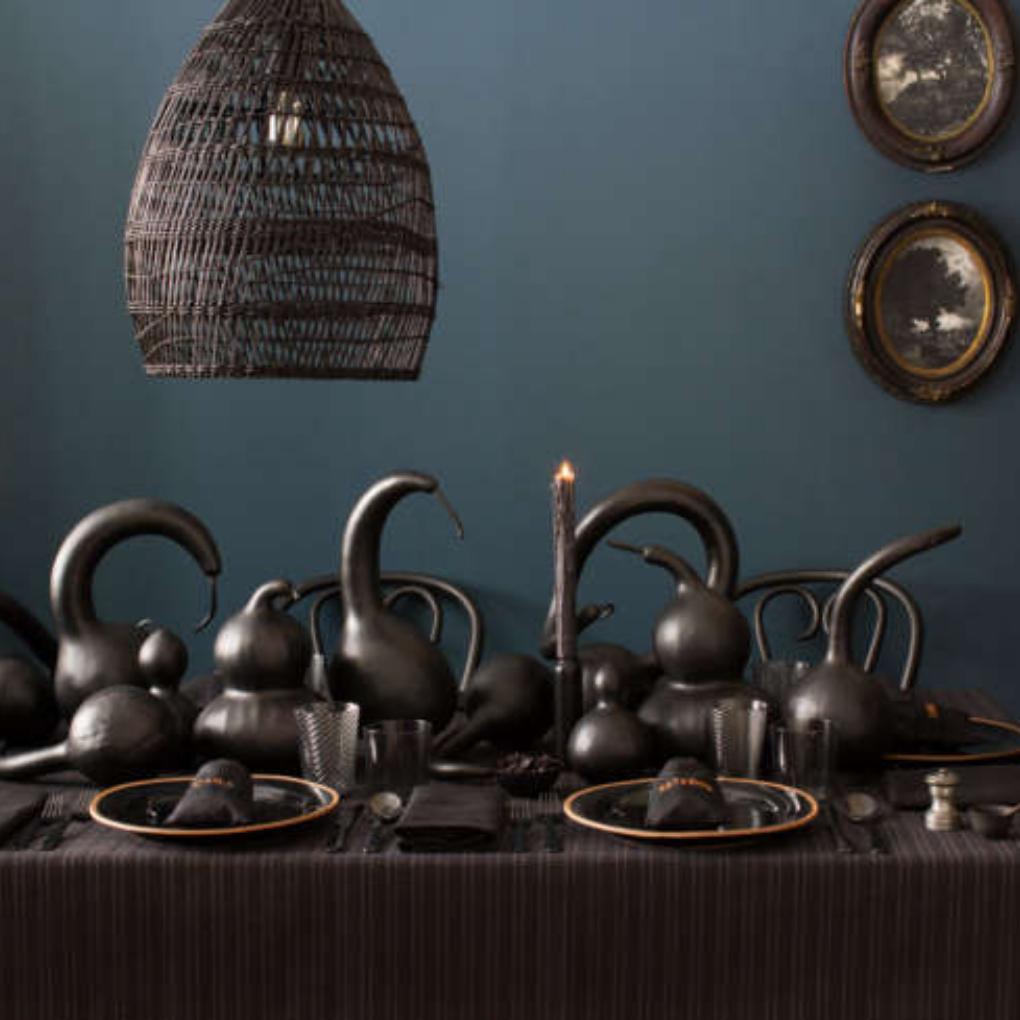
Tutorial: Remodelista
For the black-on-black girlies, this table is everything. Designer David Stark spray-paints dried gourds matte black until their curvy necks look like little ghost sculptures.
Layer in glossy and matte black plates, glassware, and flatware and it reads high-end haunted. Not a speck of orange plastic in sight.
3. Cardboard Haunted House Luminaries
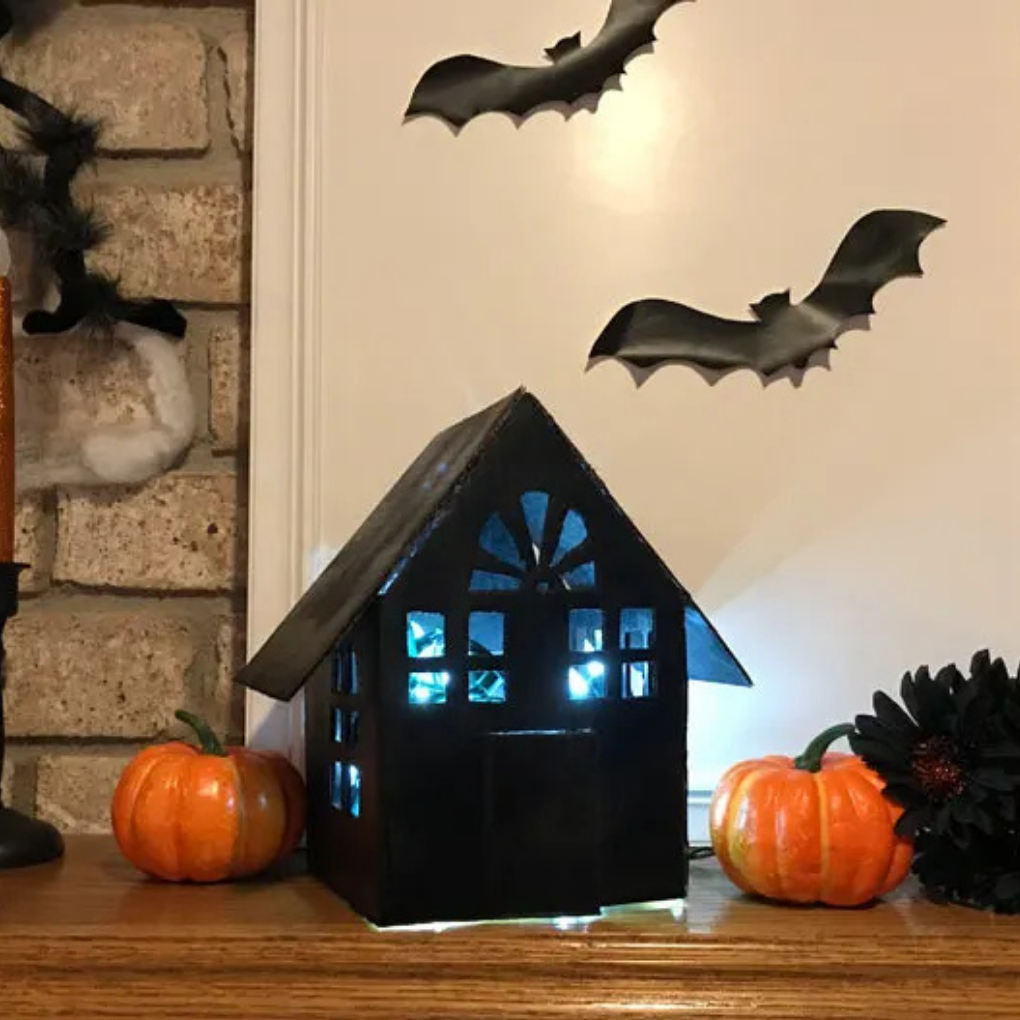
Tutorial: Non-Toy Gifts
Raid the recycling bin, because this one is a whole mood. Plain cardboard becomes tiny haunted houses that throw the best spooky shadows once you tuck a light inside.
Kids can design their own, so it is a craft and a decoration in one. And it composts flat when the season ends.
4. Cardboard Seed Mosaic Ghosts
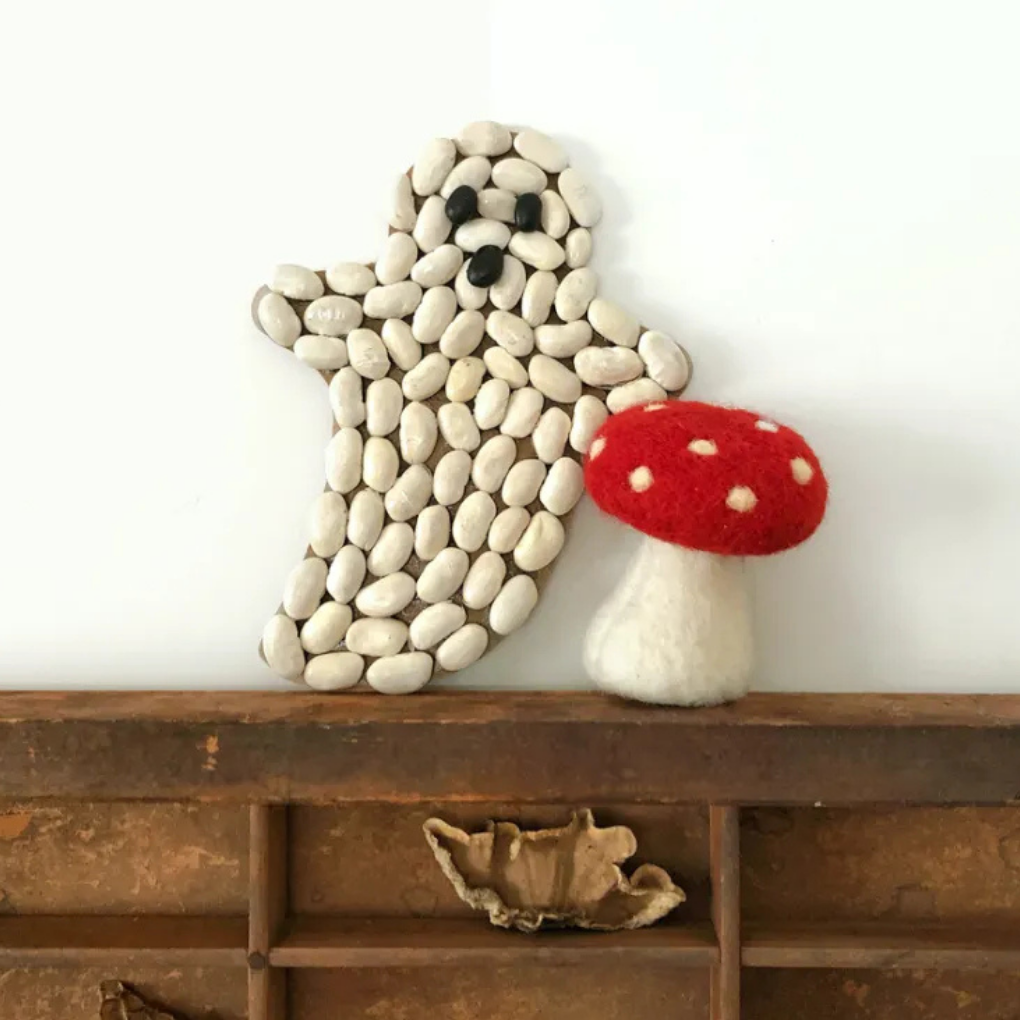
Tutorial: Woodlark
Pantry-raid decor, and yes it is adorable. You glue dried white beans onto recycled cardboard ghost shapes and use black beans for the little faces.
The texture photographs so well, and you can string them into bunting or glue them to sticks for ghost wands. Zero plastic, all charm.
5. Punched Tin Can Halloween Lanterns
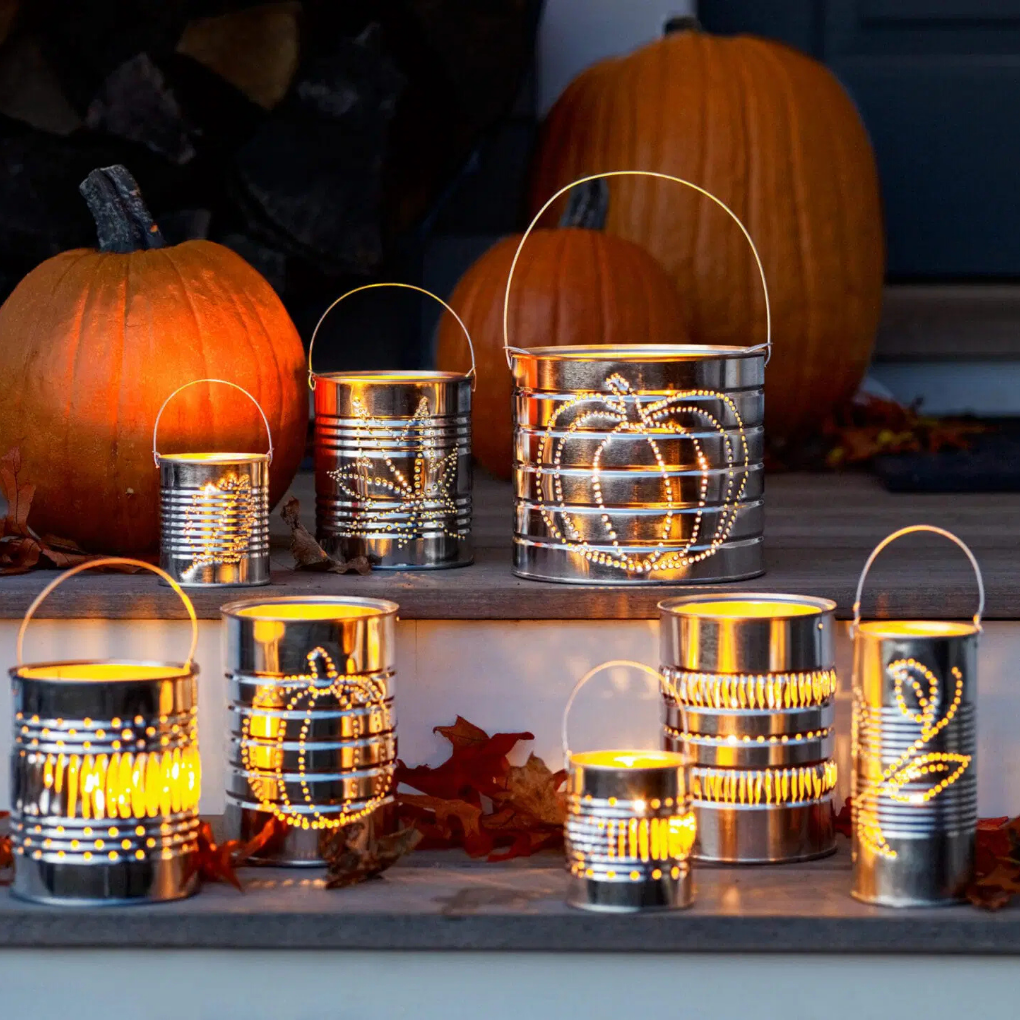
Tutorial: This Old House
Do not toss those empty food cans. With just a hammer and nails you punch bats, spiders, or jack-o’-lantern faces into the metal, and lit from inside the patterns glow through like tiny constellations.
Think of the holes as reverse stencils. Moody, rustic, and basically free.
6. Wicked Witch Silhouette Cut-Outs
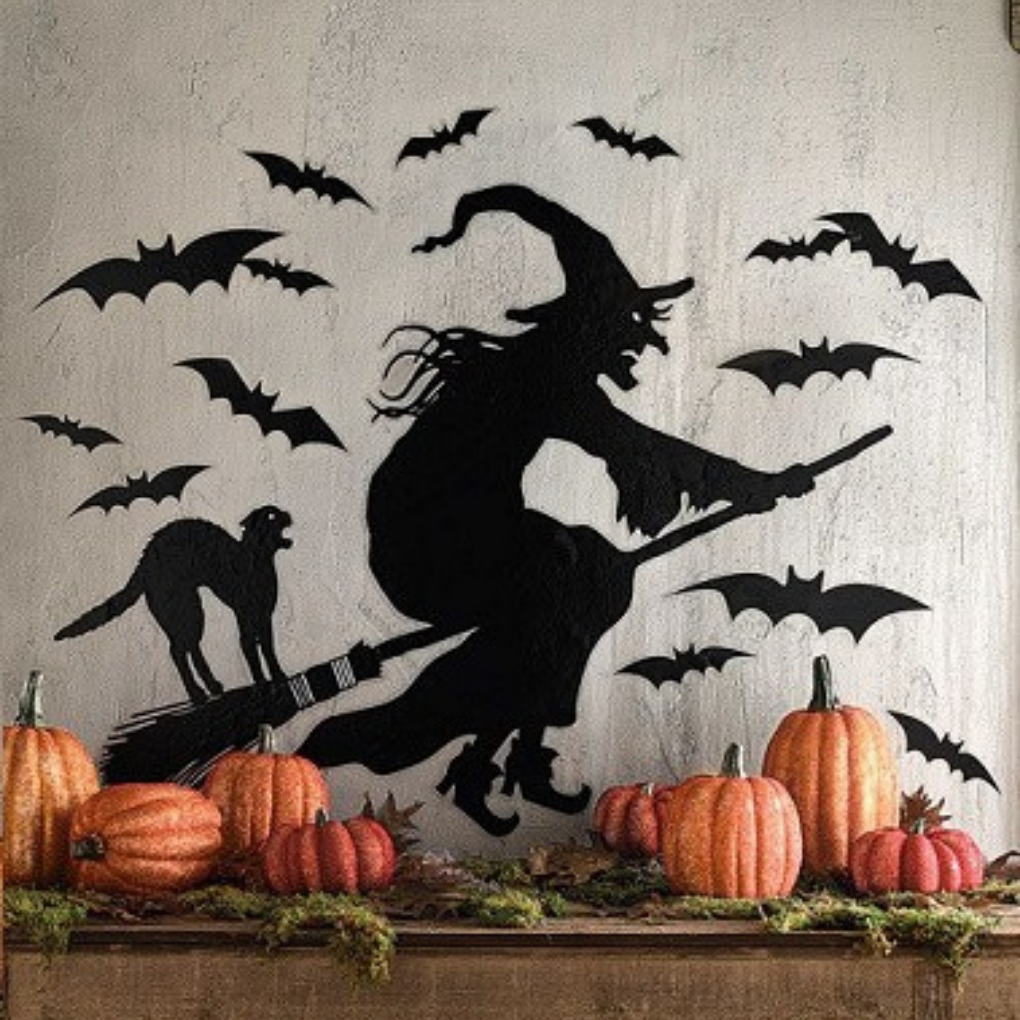
Tutorial: Love Paper
Your windows are about to steal the whole show. Cut classic witches and cats from black cardstock or construction paper and let them cast those instant-spooky shadows.
There are free templates at lovepaper.org if your freehand is shaky. Ten minutes, huge payoff.
7. Stump Pumpkin
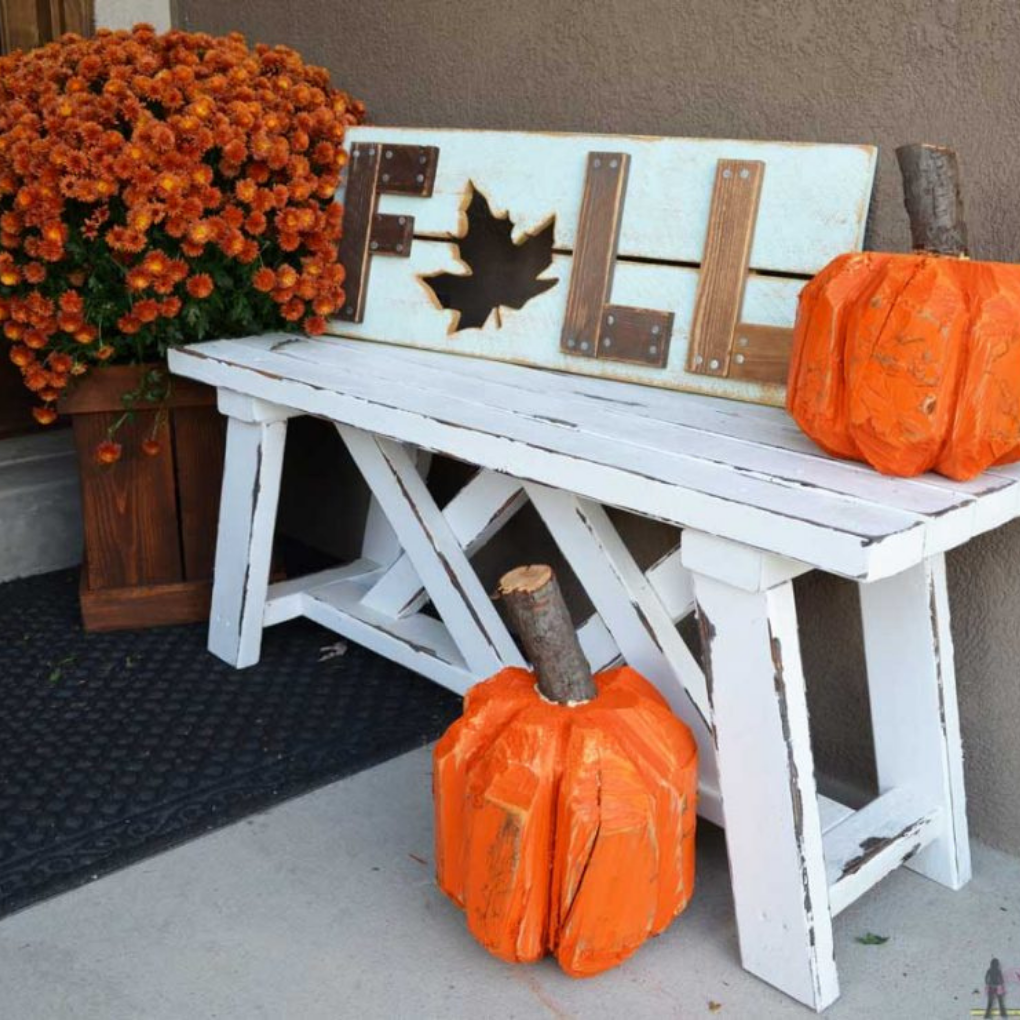
Tutorial: Her Tool Belt
Outdoor decor that laughs at porch pirates. You carve tree stumps or logs into chunky pumpkins that will not rot in the rain or get smashed.
Keep it simple with angled cuts, or go extra with ribbed vertical lines all the way around. Peak farmhouse energy.
8. The Witches’ House
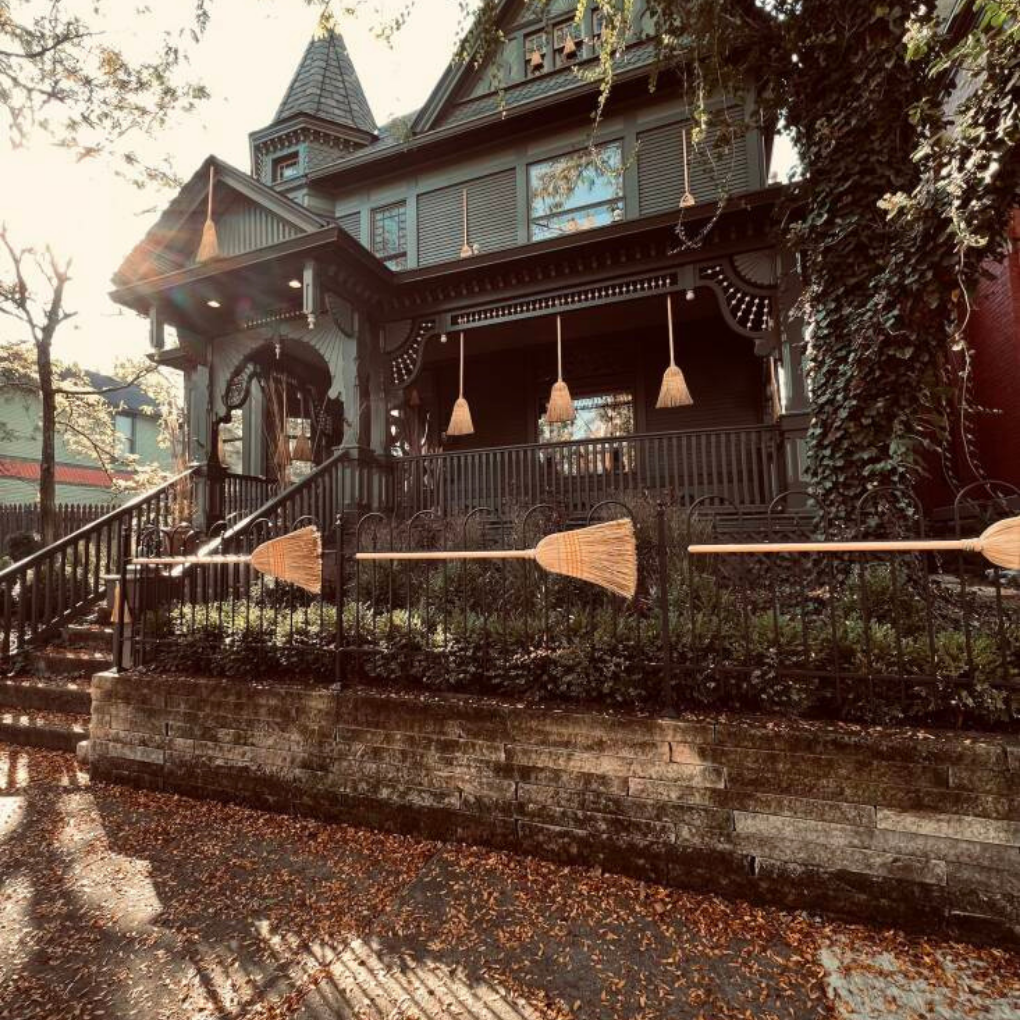
Tutorial: Gardenista
This is the display that stops traffic. The homeowners screw real brooms right onto their Victorian so it looks like a whole coven parked and popped inside.
Full-size brooms on the house, mini ones on the window boxes and even the birdhouse. So clever, and it costs almost nothing.
9. Paper Mice Halloween Decorations
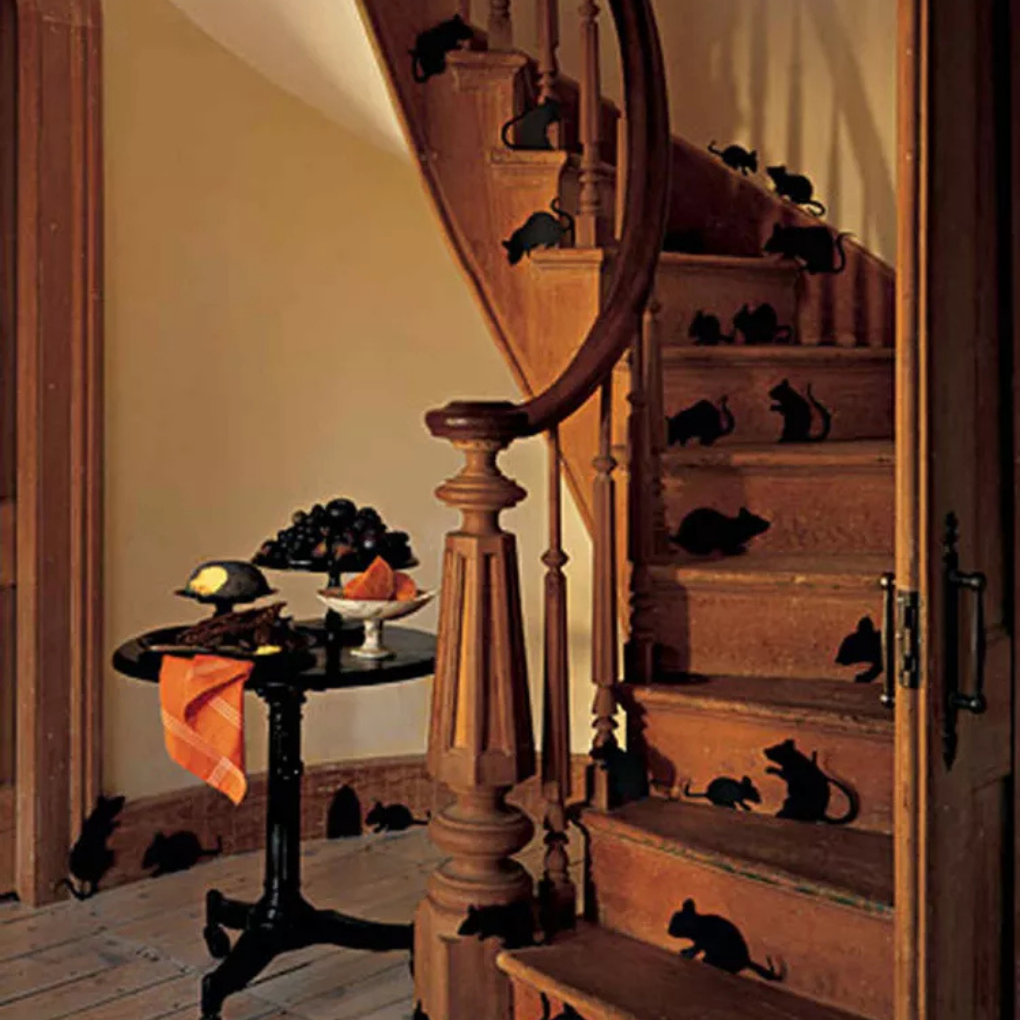
Tutorial: Martha Stewart
Consider this your jump-scare starter pack. Little paper mice tuck onto stair risers, baseboards, and random corners to make guests do a double take.
They are tiny, so scatter them everywhere, and you can tweak the size and color. Way cuter than the plastic ones, and they cost pennies.
10. Spooky-Elegant Halloween Table Setting
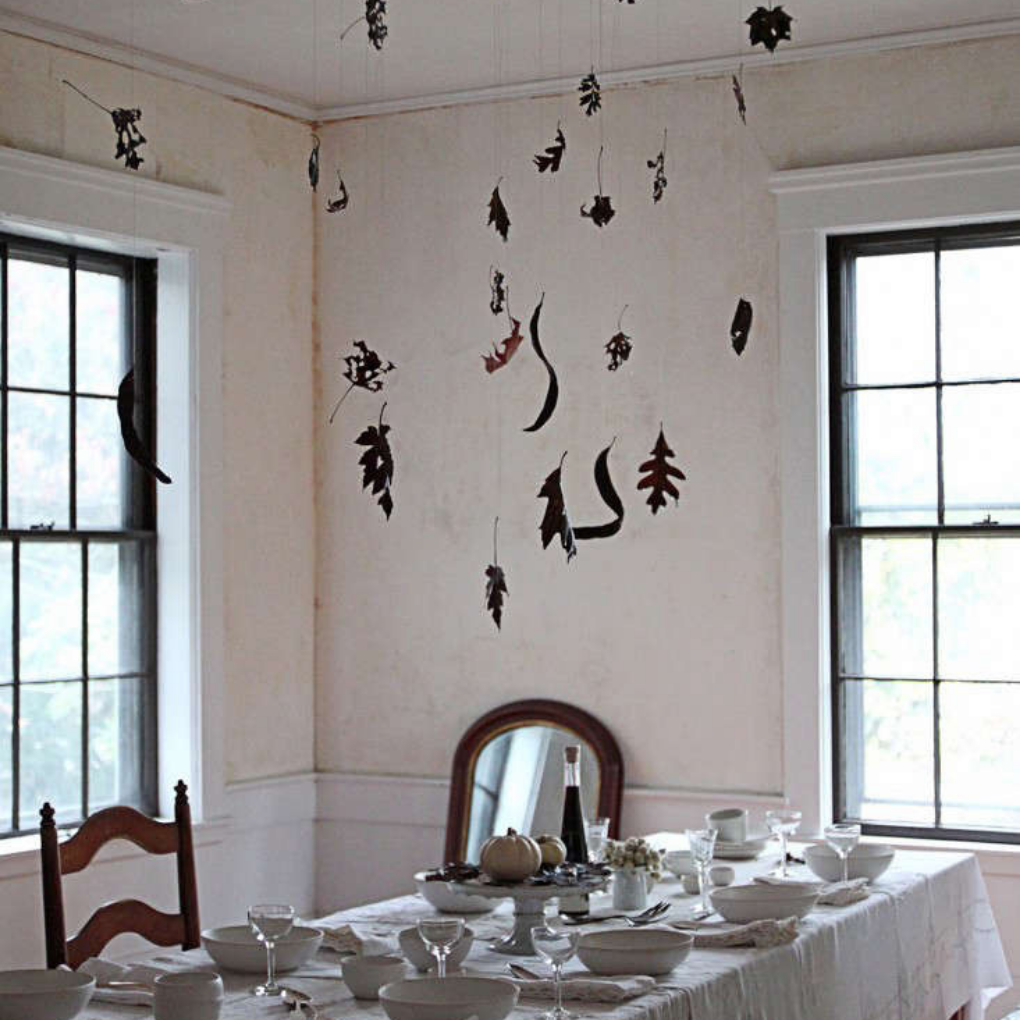
Tutorial: Gardenista
For the haunted-dinner-party dream, save this one. Justine Hand dips real autumn leaves in black beeswax and floats them over the table at different heights, so dinner feels like you are eating under a spell.
Style it with white bone china, pale gourds, and rumpled linen for full moody-elegant. Nothing plastic, all atmosphere.
11. Halloween Countdown Pallet Sign
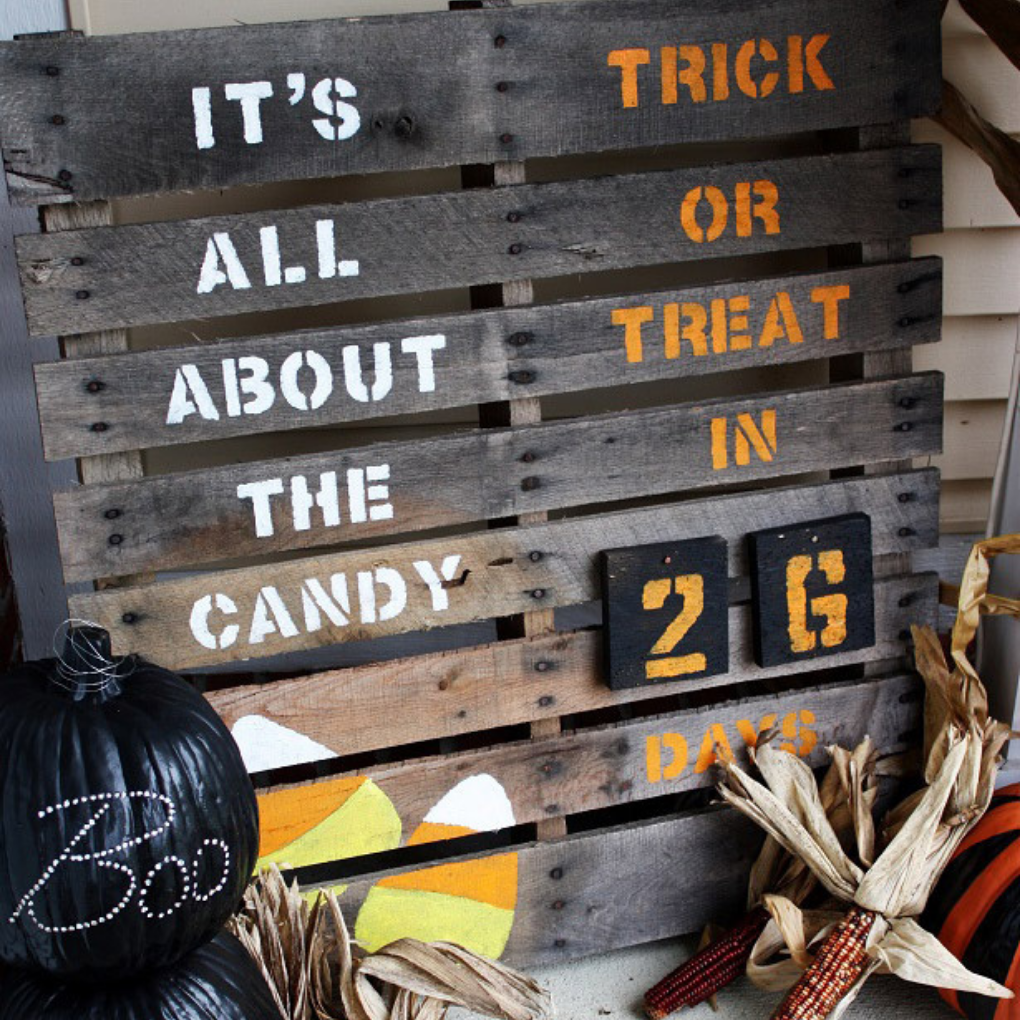
Tutorial: Celebration Shoppe
Countdown culture, but make it wood. This reclaimed-pallet sign has swappable number blocks your kids flip each morning to count down to the big night, painted up like candy corn.
It comes together with orange and white paint and 14 little blocks on nails. Interactive decor that actually builds the hype.
12. Reclaimed Wood Candy Corn
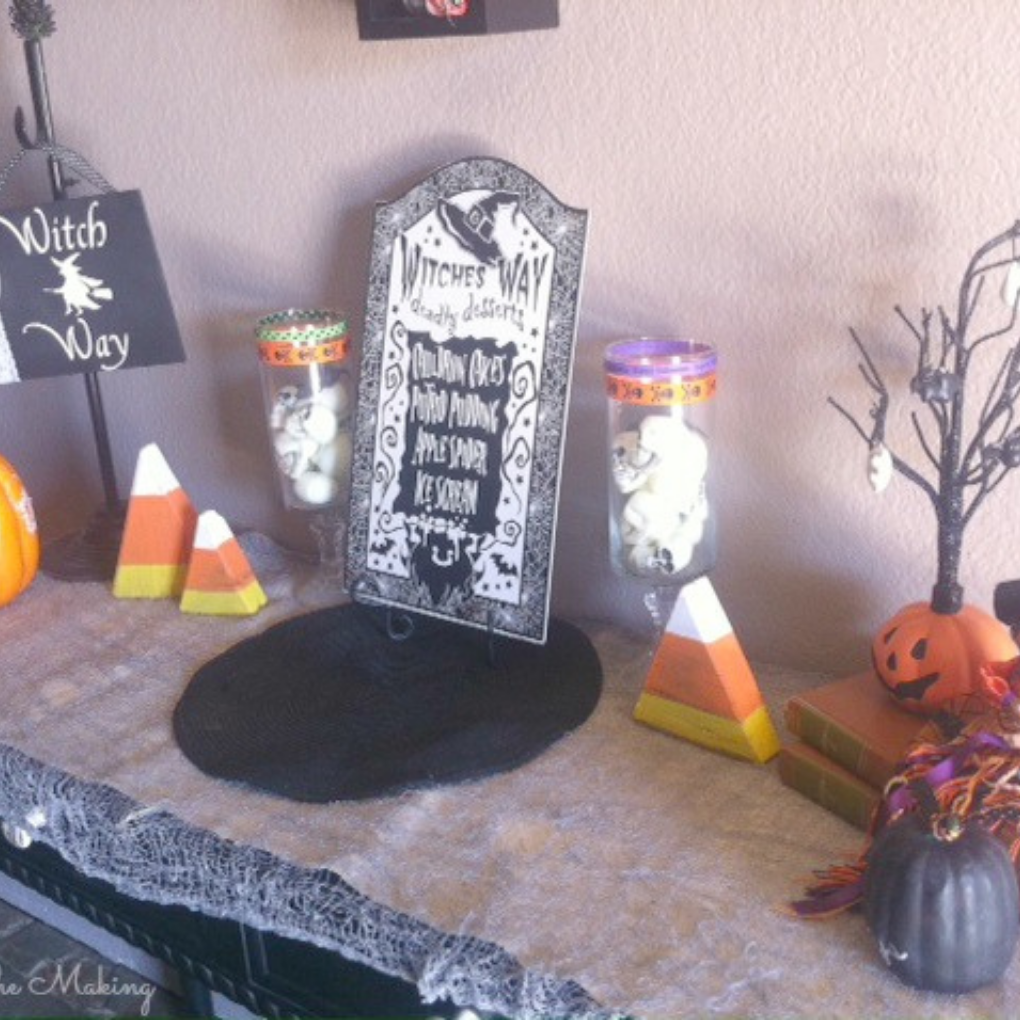
Tutorial: Mine For the Making
Candy corn discourse aside, these are undeniably cute. You cut salvaged 2×6 lumber into stackable candy-corn triangles, then distress them with a little sandpaper and ink for that vintage look.
Group them on a mantel or entry table and done. Farmhouse-season approved.
13. Rustic Pallet Jack-O’-Lantern
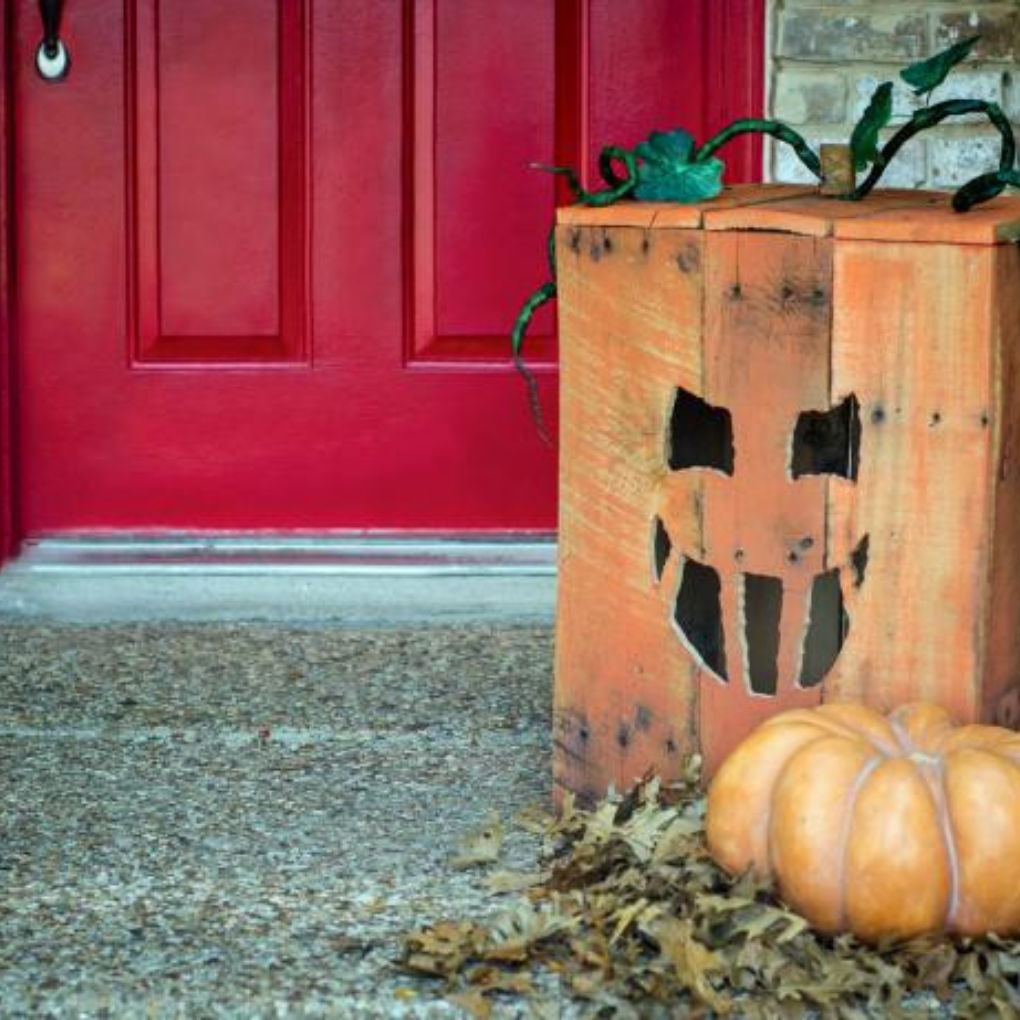
Tutorial: HGTV
If your vibe is cozy, not cartoonish, meet your new porch piece. Reclaimed pallet wood becomes a chunky, primitive jack-o’-lantern that survives season after season.
A dry-brush of orange paint lets the wood grain peek through for that perfectly imperfect finish. Sturdy, charming, done.
14. Spookily Ghosts
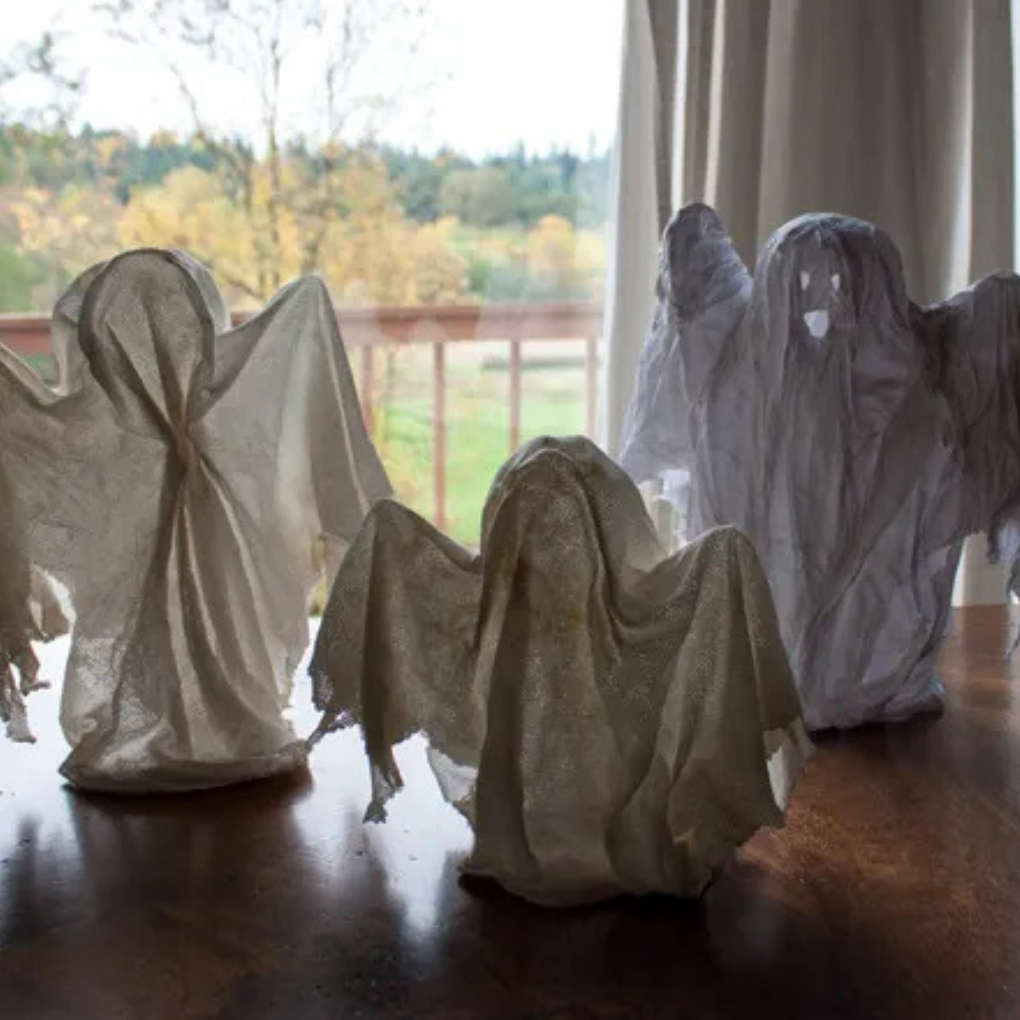
Tutorial: And So There
Old bedsheet, meet your villain era. You stiffen torn fabric with a simple flour-and-water paste over a wire-and-bottle form, and it dries standing on its own.
The frayed edges and draped folds give each ghost its own personality. Backlight them and they glow. Budget-friendly and genuinely eerie.
15. Hanging Paper Bats
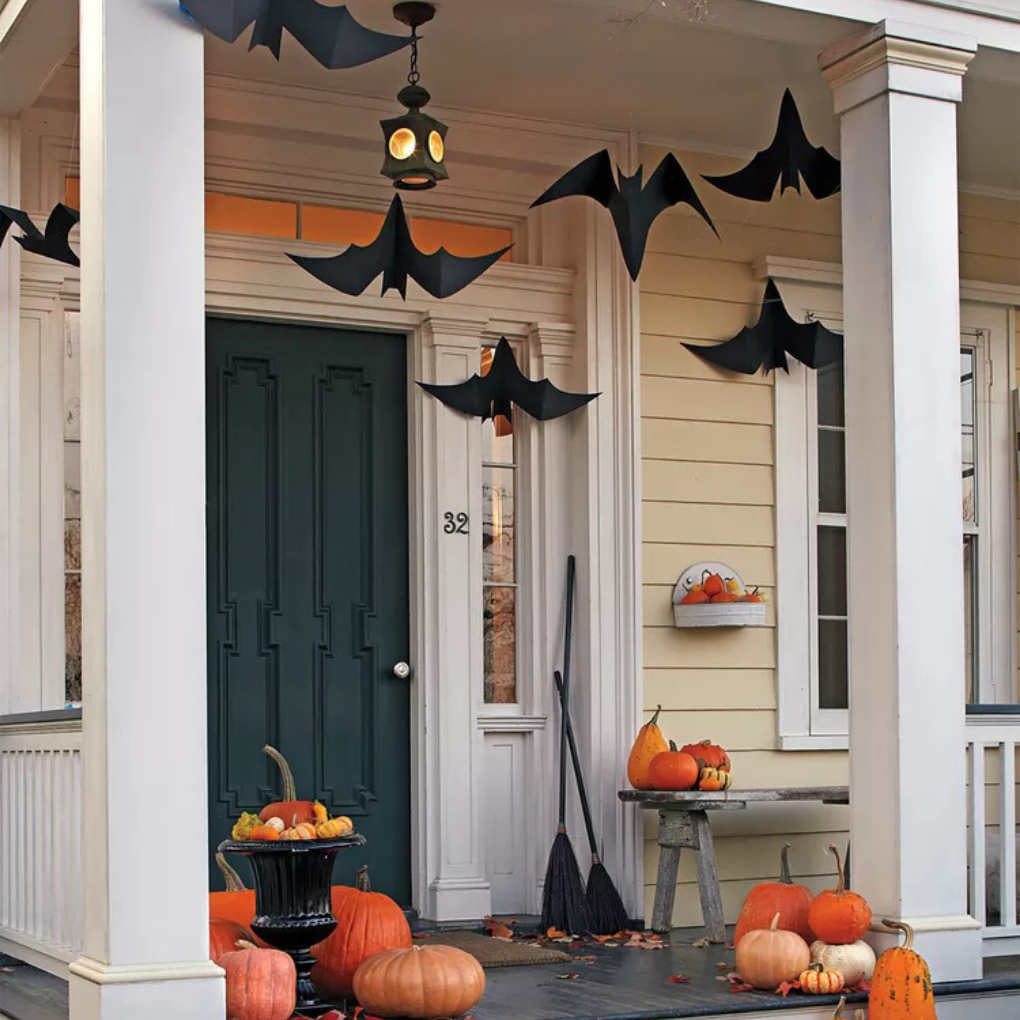
Tutorial: Martha Stewart
Turn your porch into a bat cave. With black paper and a free template you fold dimensional wings that catch the light, then hang them at different angles so they look mid-flight.
Some dangle upside down, some swoop, and the porch light brings the whole colony to life. Nothing to buy, nothing plastic.
16. Ghost Window Silhouettes
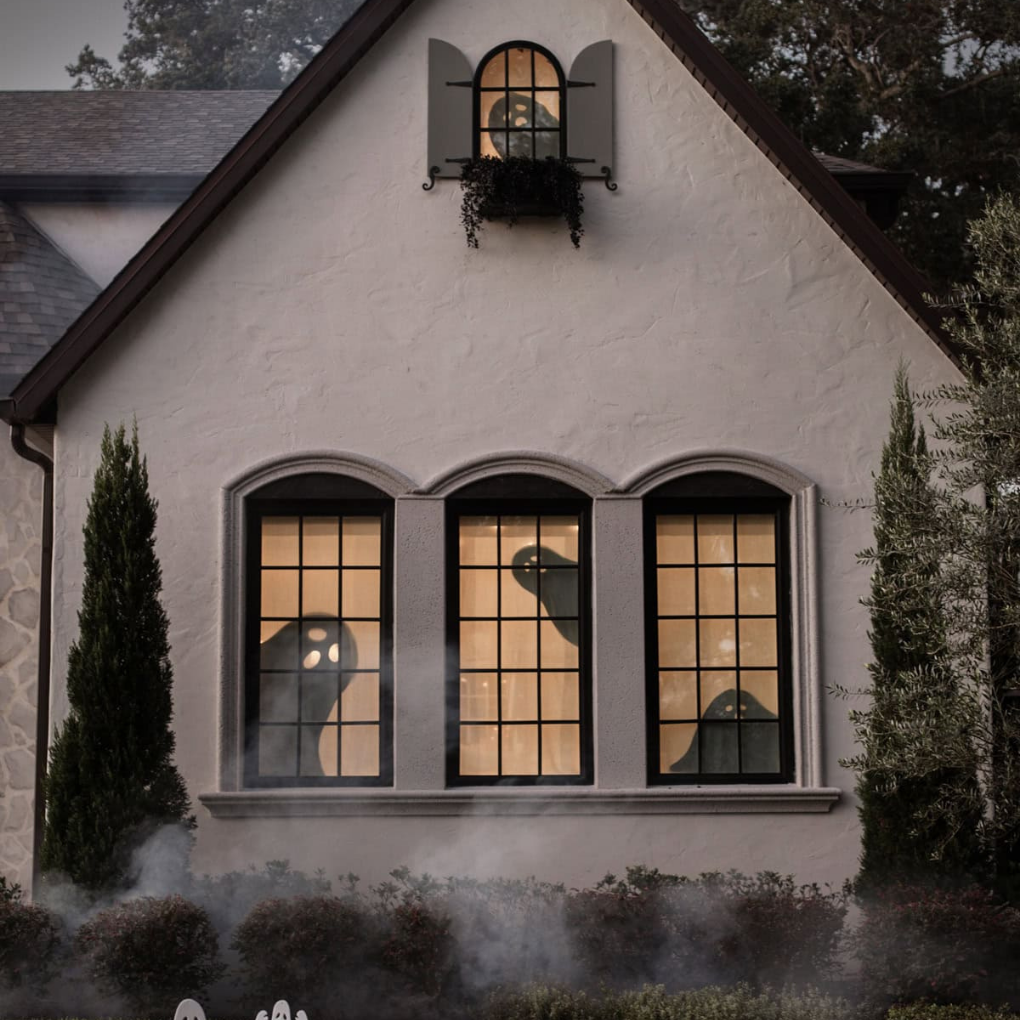
Tutorial: Jenna Sue Design
Nighttime curb appeal, unlocked. Cut freehand ghost shapes from black poster board, tape them behind sheer curtains, and let your indoor lights do the haunting.
From the street they glow into little ghostly portals after dark. Placing them behind the fabric keeps the shadows soft and mysterious.
17. Book Page Pumpkins
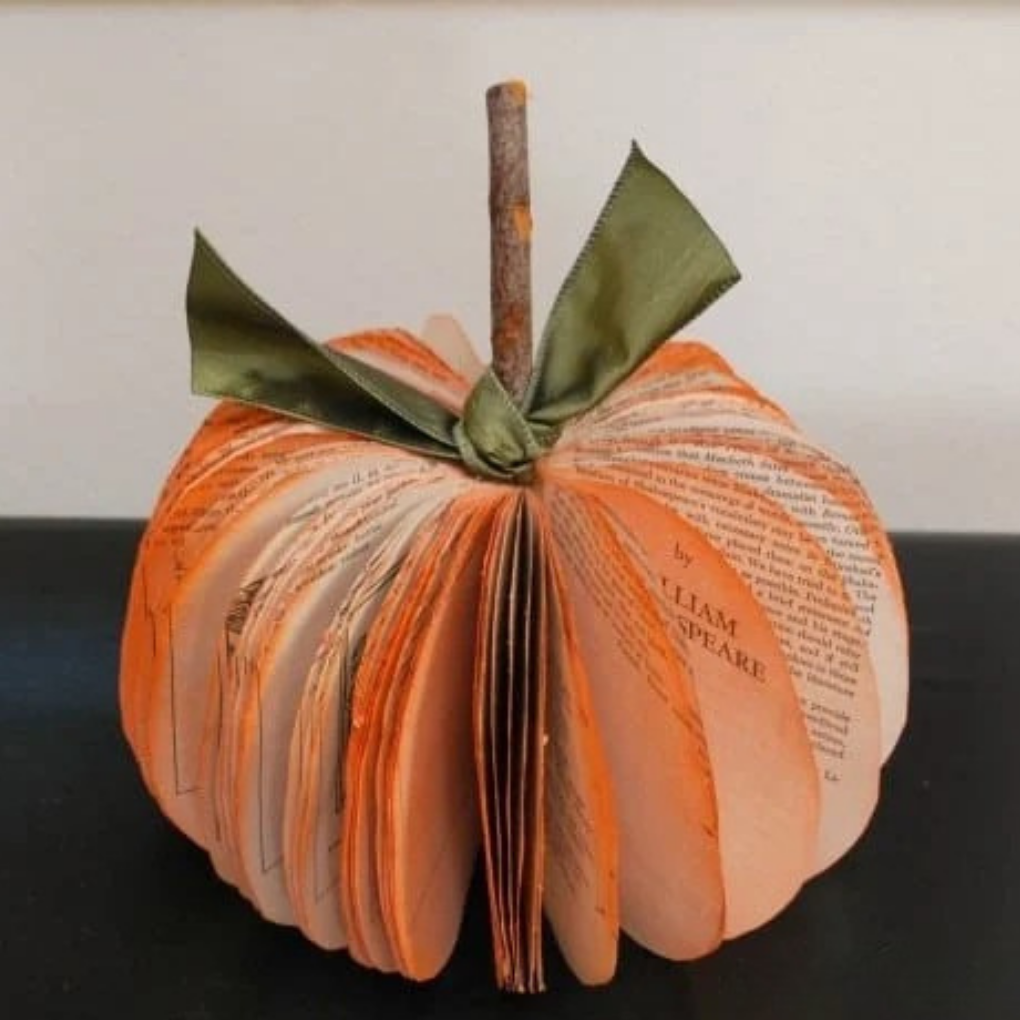
Tutorial: Creations by Kara
Book girlies, this one is calling your name. You cut pumpkin shapes through the pages of a thrifted paperback, fan and glue the edges, then hit it with a light spray of orange.
It rescues a beat-up book from the landfill and turns it into the prettiest fall centerpiece. Cozy literary energy for real.
18. Dip-Dyed Corn Husk Wreath
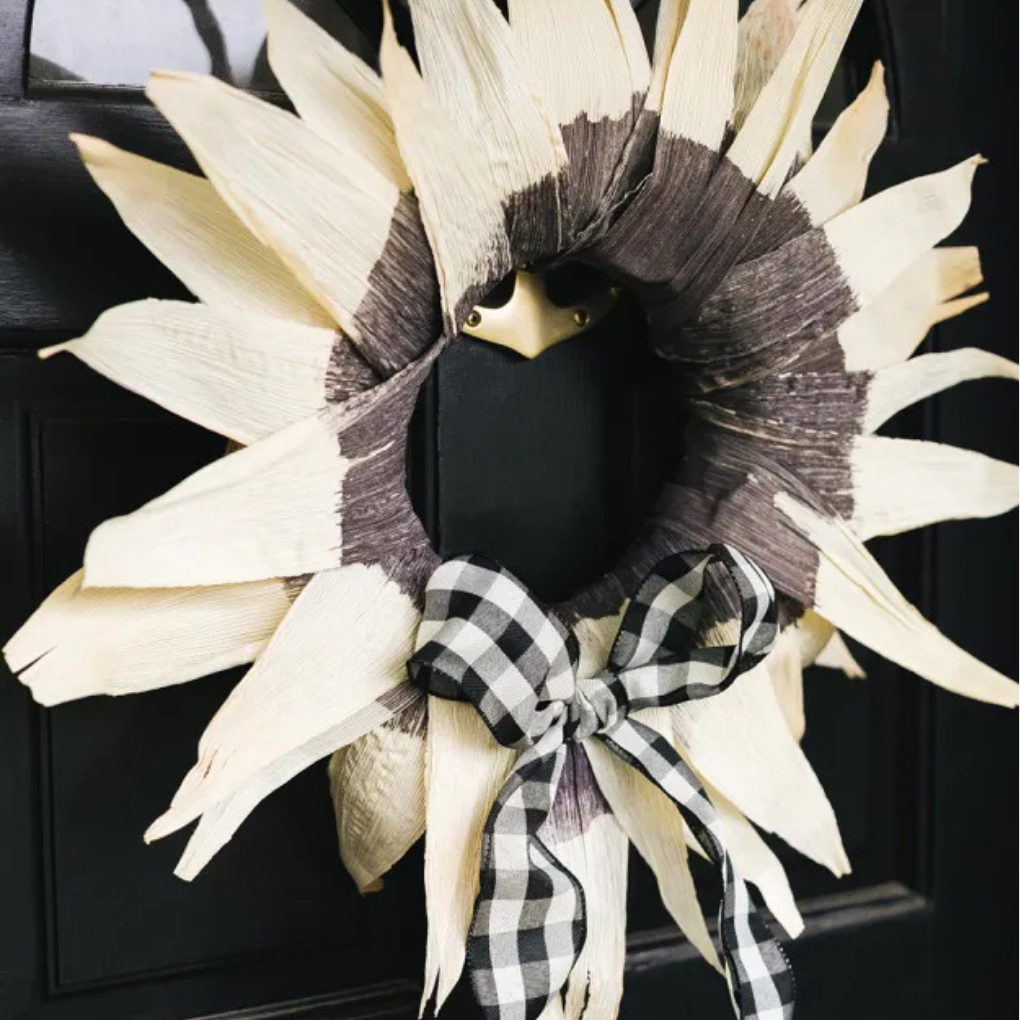
Tutorial: Jojotastic
Proof that fall wreaths can be chic. Dried corn husks get partially dipped in black dye for a moody ombre, then layered in three tiers around a straw form so they fan out like petals.
Finish with a ribbon bow for spooky-sophisticated instead of cartoon-spooky. Natural materials only.
19. DIY Fabric Pumpkin
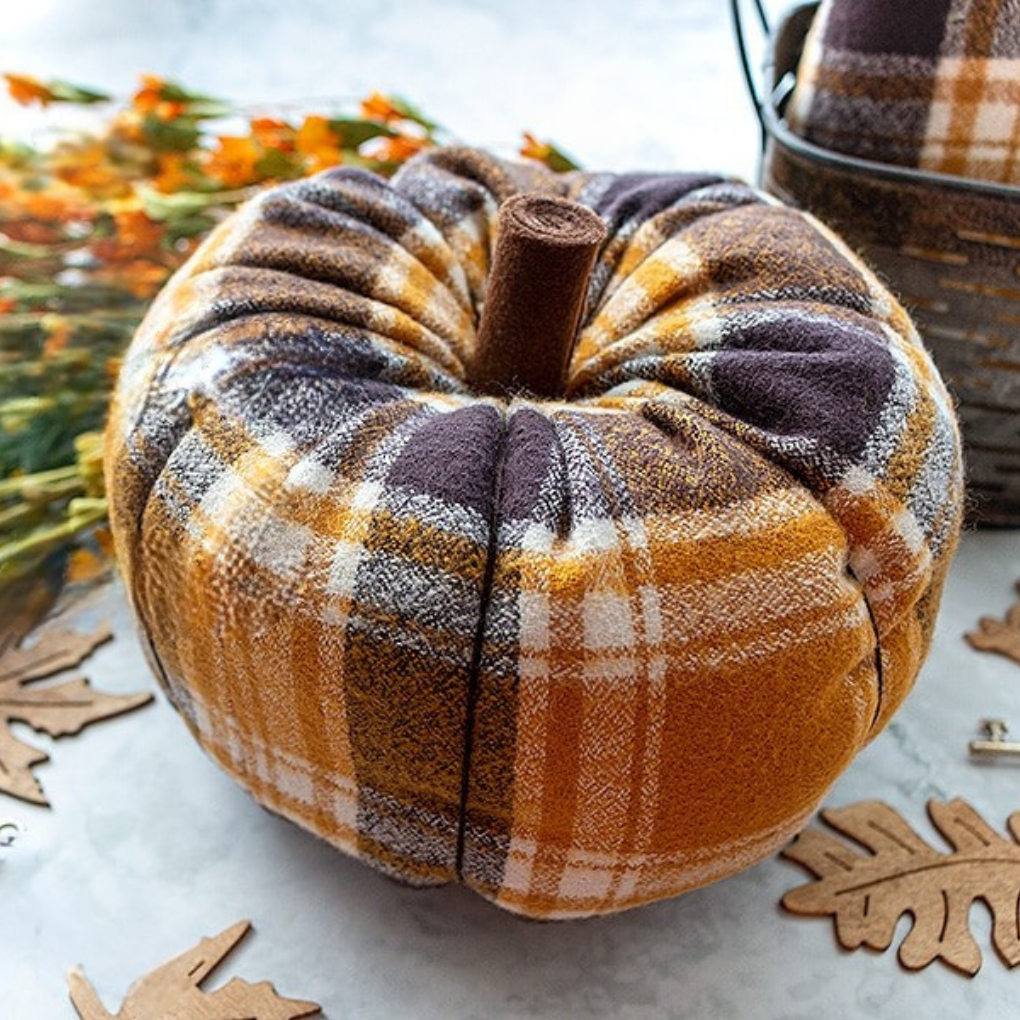
Tutorial: The Jolly Jabber
Soft-decor season is officially here. These plump pumpkins come together from fat quarters, with embroidery floss wrapped around for those classic ridged segments and a rolled felt stem on top.
They are huggable, kid-safe, and store flat for years. The coziest pick on this list.
20. Haunted Mirror with Ghost Hands
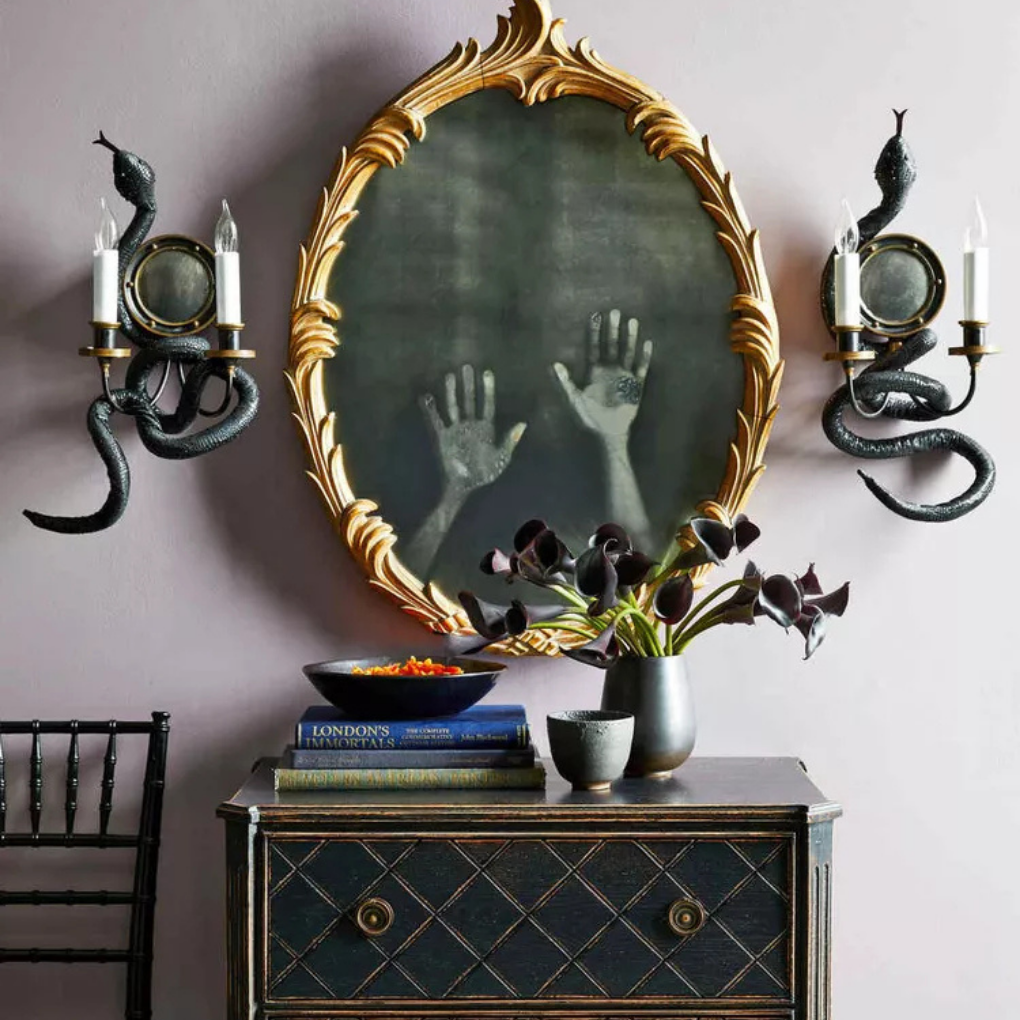
Tutorial: Martha Stewart
Want to freak out your guests? This one makes ghostly hands look like they are pressing through the glass from the other side.
Skip the vinyl and use clear water-slide transfer paper to keep it plastic-free, then set it on any mirror in an entryway or bathroom. The reflection still works and the scare lands every time.
21. Creepy Crawly Pumpkin
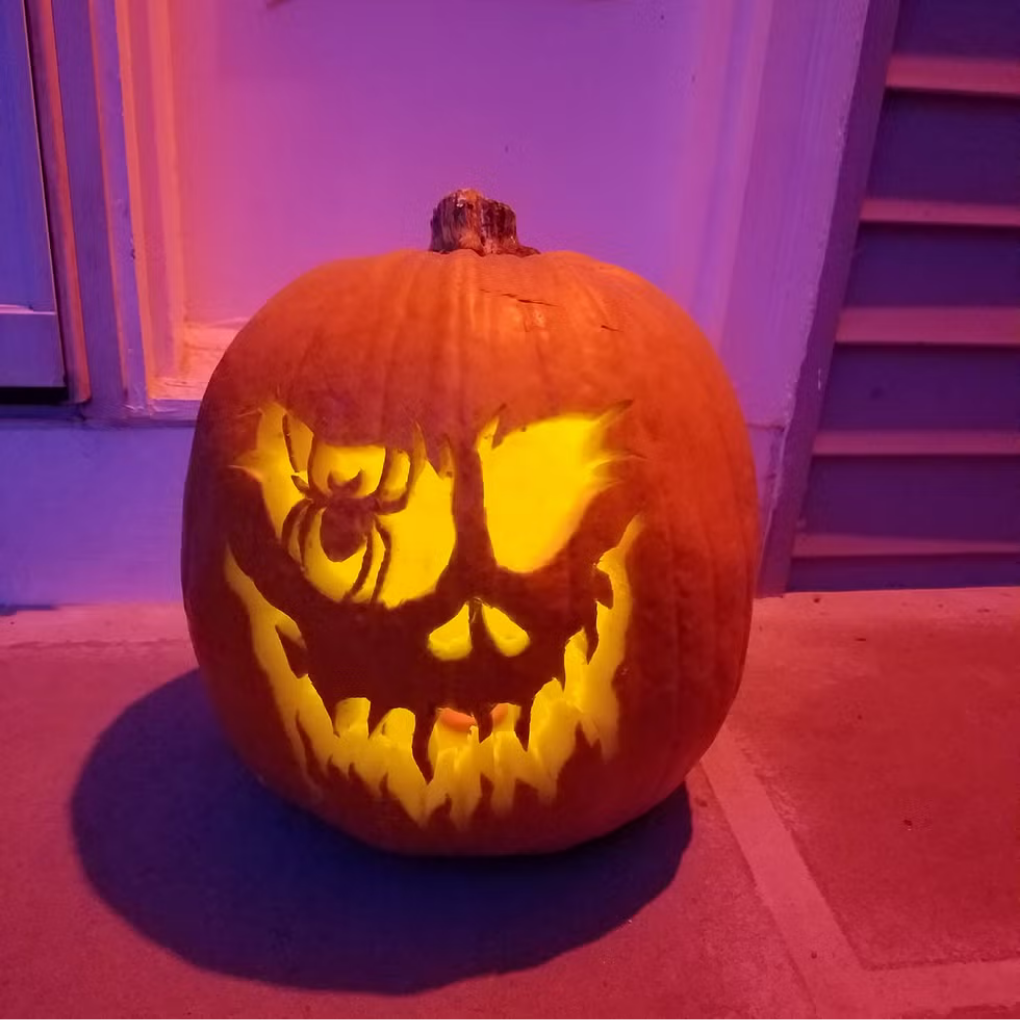
Tutorial: House Beautiful
For the advanced carvers flexing this year. Instead of basic triangle eyes, you carve a spider crawling out of one eye socket for a genuinely creepy optical illusion.
It takes patience and steady knife work, but lit from within those spider legs throw the eeriest shadows. The classic pumpkin, leveled all the way up.
FAQs on DIY Halloween Decorations
Paper bats, ghosts, and window silhouettes are quick and foolproof. You need black paper, scissors, and tape, and no fancy supplies are required. For an extra touch, try stringing the cutouts into a garland or mixing in glow-in-the-dark stickers for nighttime fun. These beginner crafts are perfect if you’re short on time but still want a festive, spooky vibe.
Absolutely! Children love getting hands-on with simple crafts like painting pumpkins, stuffing old clothes into a scarecrow, or hanging tissue-paper ghosts. Just swap out sharp carving tools for paint markers, and use LED tea lights instead of real candles for a safer glow. Involving kids turns Halloween prep into a family tradition that sparks creativity and builds lasting memories.
Durability depends on the material. Paper and cardboard can be stored flat in a dry folder, while fabric ghosts and banners should be folded neatly into a storage box. If you’re painting pumpkins, use non-toxic paint and keep them indoors to avoid mold. Labeling your storage bins and keeping them cool helps ensure you’ll be able to reuse your decorations year after year.
Autumn is full of free materials you can collect on a walk. Twigs can be arranged into mini “witch brooms” or eerie centerpieces, while pinecones and acorns make rustic table scatter. Pressed leaves can become garlands, and even apples can be carved into shrunken “monster heads.” Using nature not only reduces plastic waste, but it also ties your decorations into the season itself.
Final Thoughts on DIY Halloween Decorations
There you have it, a whole graveyard’s worth of DIY Halloween decorations that prove you do not need plastic to create a spine-tingling atmosphere. From ghostly fabric spirits and wicked paper silhouettes to haunted mirrors and creepy crawly pumpkins, these natural and recyclable materials deliver all the fright factor without the environmental guilt.
Grab those old books, dig into your fabric stash, and collect some fallen leaves. It is time to turn your home into the most hauntingly beautiful house on the block with DIY Halloween decorations that are creative, budget-friendly, and plastic-free. Your trick-or-treaters will be talking about your spook-tacular setup long after the candy is gone, and the planet will thank you for keeping Halloween both scary and sustainable.
Now get out there and create some eco-friendly nightmares! 🎃👻
📚 References
- Fairyland Trust & Hubbub. (2019). Halloween clothing and costumes survey 2019. Fairyland Trust. http://www.fairylandtrust.org/wp-content/uploads/2019/10/Halloween-Plastics-Clothing-and-Costumes-Report-2019.pdf
- United Nations. (n.d.). In images: Plastic is forever. United Nations. https://www.un.org/en/exhibits/exhibit/in-images-plastic-forever
More Plastic-Free Home & Holiday Reads
- 10 Plastic-Free Easter Egg Ideas That Are Fun, Creative, and Low-Waste
- Decorating with Garland Ideas: Simple DIY Thanksgiving Garlands
- 9 Easy Earth Day Activities for Kids Without Plastic
- How to Reduce Plastic Use: 21 Easy Ways That Actually Work
- How to Remove Microplastics: 7 Fixes That Actually Work