Key Takeaways
- Exfoliating your face at home removes dead skin cells and boosts natural glow.
- Choose between physical exfoliation (scrubs, tools) and chemical exfoliation (AHAs, BHAs).
- Gentle, natural methods like oatmeal, honey, or sugar scrubs can be just as effective as store-bought products.
Exfoliation is one of the most effective ways to support your skin’s natural renewal process. Over time, dead skin cells accumulate on the surface, leaving your skin looking dull, rough, or uneven. This buildup can also block moisturizers, serums, and oils from properly absorbing, making even the best products less effective.
Regular exfoliation helps unclog pores, smooth texture, and encourage brighter, healthier-looking skin. It also prepares the skin to absorb nutrients more effectively and retain moisture, which is especially beneficial for individuals dealing with dryness, breakouts, or signs of aging. Whether you’re focused on glow, hydration, or balance, exfoliating is a foundational step that can elevate your entire skincare routine.
Why Exfoliating Matters for Facial Skin
Your skin naturally sheds about 30,000–40,000 dead cells every day. In healthy, younger skin, this renewal cycle takes around 28 days. But with age, stress, or environmental damage, the process can slow to 45–60 days, leaving more buildup on the surface. That buildup shows up as dullness, rough patches, clogged pores, and uneven tone.
Exfoliation gives your skin a gentle nudge to stay on track. By lifting away those dead cells, you:
- Unclog pores → helping reduce blackheads and breakouts.
- Even out texture → fading rough spots and dry patches.
- Boost radiance → fresh cells reflect light better for a natural glow.
- Improve absorption → serums, oils, and moisturizers penetrate more effectively.
- Support circulation → the massage effect brings more nutrients to the skin’s surface.
Because facial skin is thinner and more delicate than the rest of your body, it’s important to choose gentle, natural methods — especially when exfoliating at home. Done correctly, exfoliation becomes the foundation of a brighter, healthier skincare routine at any age.
Types of Exfoliation: Physical vs. Chemical
When it comes to exfoliating your face at home, there are two main approaches: physical (using texture or tools) and chemical (using natural acids or enzymes). Both can be effective, but the right choice depends on your skin type and sensitivity.
Physical Exfoliation (Scrubs & Tools)
Physical exfoliation uses small particles or gentle tools to lift away dead skin cells. Common DIY scrubs include oatmeal, sugar, or ground coffee mixed with a base like honey or yogurt. Tools such as a soft washcloth or a konjac sponge can also provide light exfoliation without needing extra products.
Pros
- Immediate smoothing effect
- Simple, natural ingredients available in your kitchen
- Easy to adjust pressure for sensitivity
Cons
- Too much scrubbing can irritate or scratch skin
- Not ideal for very sensitive or acne-prone skin
Chemical Exfoliation (AHAs & BHAs)
Chemical exfoliation sounds intense, but many natural sources make it gentle and effective. Ingredients like yogurt (rich in lactic acid), papaya or pineapple (with fruit enzymes), and store-bought products containing glycolic or salicylic acid work by dissolving the bonds that hold dead cells together.
Pros
- Even exfoliation without scrubbing
- Can target deeper concerns like uneven tone or clogged pores
- Often gentler over time when used correctly
Cons
- Requires patch testing for sensitivity
- Overuse can cause redness or dryness
- Some acids may increase sun sensitivity (always follow with sunscreen)
How to Exfoliate Face at Home: Step-by-Step
Exfoliating at home should feel like a mini self-care ritual — not a chore. Here’s how to do it safely and effectively, with tips to get the best results.
Step 1: Cleanse your face thoroughly
Always start with clean skin. Use a gentle, sulfate-free cleanser to wash away dirt, makeup, and sunscreen. This prevents debris from being pushed deeper into your pores during exfoliation. Think of it as giving your skin a fresh canvas.
Step 2 (optional): Open pores with gentle steam
Steaming isn’t required, but it can boost results. Holding a warm washcloth over your face for 1–2 minutes softens dead cells and helps your exfoliant work more evenly. If you have sensitive or rosacea-prone skin, skip this step to avoid flushing.
Step 3: Apply your chosen exfoliant
- For a scrub: Use a small amount and spread evenly across damp skin.
- For a fruit-enzyme or AHA mask: Apply a thin layer and let it sit per instructions.
- For a konjac sponge or cloth: Move gently across skin with light pressure.
Always test new ingredients on a patch of skin first — especially if you’re trying acids or stronger enzymes.
Step 4: Massage gently, less is more
If using a scrub, move your fingertips in small, circular motions for 30–60 seconds. Focus on oil-prone areas (nose, chin, forehead) but avoid fragile spots like under the eyes. Remember: exfoliation should never hurt or leave your skin raw.
Step 5: Rinse with lukewarm water
Water that’s too hot can strip your natural oils, while cold water won’t rinse thoroughly. Lukewarm water keeps your skin calm while washing away the product. Pat dry with a soft towel — no rubbing.
Step 6: Restore and protect with moisturizer
Exfoliation removes dead cells but also temporarily thins your protective barrier. Lock in hydration with a moisturizer rich in ceramides, aloe, or hyaluronic acid. If exfoliating in the morning, finish with a broad-spectrum sunscreen (SPF 30+) — fresh skin is more sun-sensitive.
✨tip
Start Slow
Exfoliate just once a week, and only increase to 2–3 times if your skin feels comfortable. More is not always better.
Best Natural Ingredients & DIY Exfoliating Recipes
🌾 Oatmeal & Yogurt Soothing Scrub
- Mix 1 tbsp ground oatmeal with 1 tbsp plain yogurt.
- Massage onto damp skin, leave for 2–3 minutes, then rinse.
Use for: Calming sensitive or dry skin.
🍯 Honey & Sugar Glow Polish
- Stir together 1 tsp honey and 1 tsp fine sugar.
- Rub lightly in circular motions for 30 seconds, then rinse with lukewarm water.
Use for: A quick glow boost before heading out.
🥭 Papaya Enzyme Mask
- Mash 2 tbsp ripe papaya into a smooth paste.
- Apply a thin layer, leave on for 5–7 minutes, then rinse.
Use for: Brightening skin naturally without scrubbing.
🍚 Rice Powder & Aloe Refresh Scrub
- Combine 1 tsp rice powder with 1 tsp aloe vera gel.
- Gently massage onto skin, then rinse with water.
Use for: Leaving skin smooth, refreshed, and less irritated.
🥛 Yogurt & Honey Gentle Peel
- Blend 1 tbsp plain yogurt with 1 tsp honey.
- Apply evenly, wait 5 minutes, then rinse off.
Use for: Gentle exfoliation with hydration and balance.
🍌 Banana & Oat Hydration Mask
- Mash ½ ripe banana with 1 tbsp ground oats.
- Apply as a creamy mask, leave for 10 minutes, then rinse.
Use for: Deep hydration while gently polishing skin.
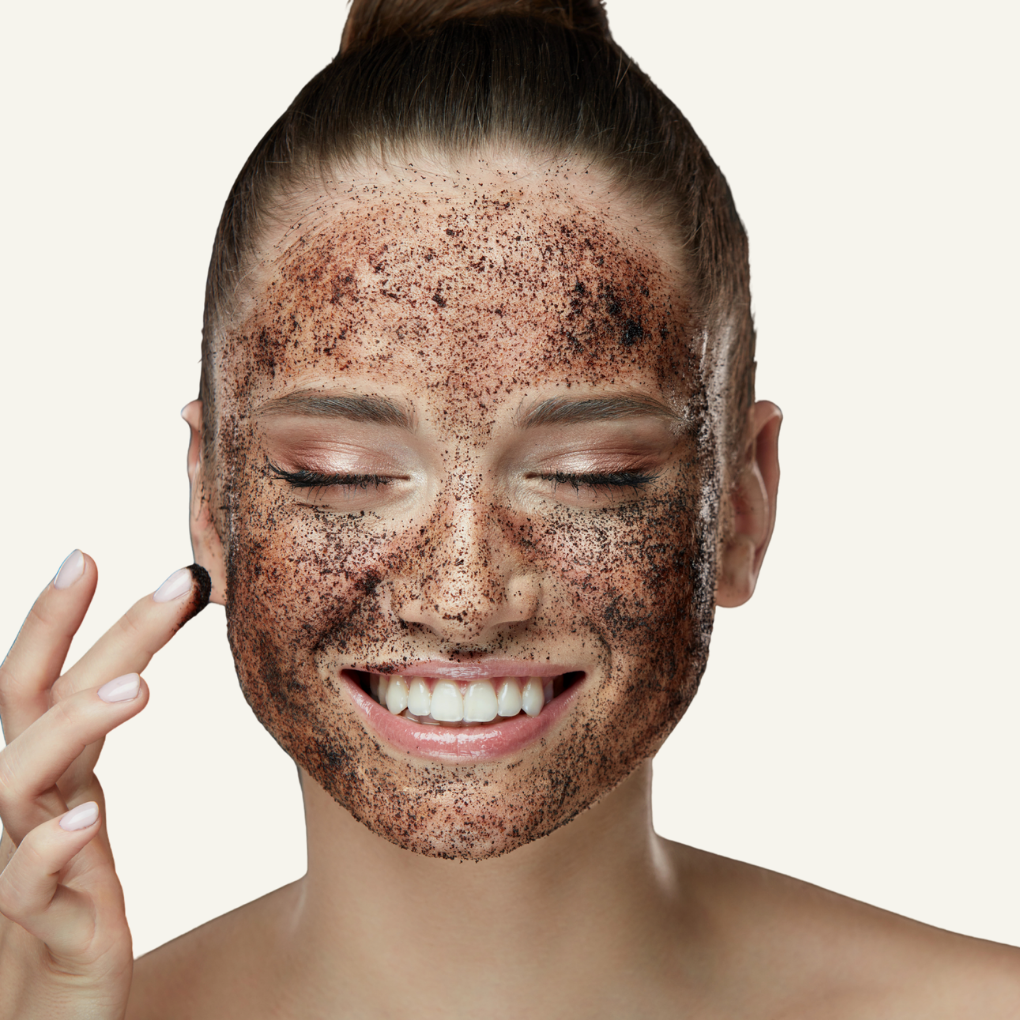
🥥 Coconut & Coffee Reviving Scrub
- Mix 1 tsp ground coffee with 1 tsp coconut oil.
- Massage gently for 30 seconds, then rinse thoroughly.
Use for: Invigorating dull skin and boosting circulation.
🍋 Lemon & Sugar Brightening Scrub (for non-sensitive skin)
- Mix 1 tsp lemon juice with 1 tsp fine sugar.
- Gently scrub for 20–30 seconds, then rinse well.
Use for: Brightening uneven tone — avoid if your skin is sensitive.
The Hidden Microplastic Problem in Exfoliants
Exfoliating scrubs used to be loaded with tiny plastic beads that felt smooth on the skin but were terrible for the planet. These microbeads washed straight down the drain, polluting rivers, lakes, and oceans. In response, the U.S. passed the Microbead-Free Waters Act in 2015, banning plastic microbeads in rinse-off personal care products.
That sounds like the end of the story — but it isn’t.
The Loopholes (Aren’t there always one?)
- The law only applies to rinse-off products (like face scrubs and body washes). Leave-on products such as creams, gels, and makeup can still contain microplastic ingredients.
- Imported cosmetics aren’t always regulated the same way.
- Not all microplastics look like beads; some are powders or gels hidden under technical ingredient names.
What to Look For in Scrubs and Skincare
Exfoliating scrubs used to rely on plastic microbeads — tiny particles that washed down drains and polluted waterways. While the Microbead-Free Waters Act (2015) banned microbeads in rinse-off scrubs, not all plastics disappeared from skincare. Many products still sneak in synthetic particles under different names.
That’s where red flags 🚩 come in. These are ingredients that either:
- Are solid plastics (like polyethylene and polypropylene) that act like microbeads, or
- Are synthetic polymers (like nylon or acrylates copolymer) that may behave like microplastics depending on their form.
❌ Microplastic Ingredients to Avoid in Skincare & Scrubs
The Microbead-Free Waters Act bans plastic microbeads in rinse-off products, but many synthetic polymers still appear in skincare. These ingredients are added for texture or stability, but they behave like microplastics once washed down the drain. Here are the most common ones to watch out for:
- Polyethylene (PE): solid plastic microbeads once common in scrubs; added for exfoliating texture.
- Polypropylene (PP): plastic beads or powders; used as exfoliants or to thicken products.
- Polymethyl methacrylate (PMMA): acrylic plastic spheres; added for a “soft focus” or blurring effect in makeup and skincare.
- Nylon-12 / Nylon-6: plastic micro-powders; give creams a silky slip and absorb oil.
- Polyethylene terephthalate (PET): polyester-based plastic; used for film-forming and shimmer effects (sometimes in glitter products).
- Polyurethane: synthetic plastic polymers; often used to create flexible films or coatings in cosmetics.
- Polyacrylate(s): petroleum-derived plastics; used as thickeners or binding agents in gels and creams.
- Acrylates copolymer / Acrylates crosspolymer: plastic powders or gels; added for hold, texture, or as binders. Some forms are water-insoluble and act like microplastics.
- Styrene/Acrylates copolymer: synthetic plastic film-former; commonly used in waterproof makeup and sunscreens.
- VP/VA copolymer: vinyl-based plastic polymer; provides hold in hair gels and flexibility in skincare films.
Label tip: These ingredients often appear near the end of labels, but even small amounts add up. Look for products marked “plastic-free” or stick with natural alternatives like oats, rice powder, jojoba beads, or fruit enzymes.
*Acrylates can be either water-soluble or water-insoluble. Labels rarely specify, so it’s safest to avoid them entirely.
Safe & Unsafe Ingredients in DIY Exfoliating Scrubs
| ✅ Safe Bases (Face) | ❌ Unsafe DIYs (Avoid on Face) |
|---|---|
| Oatmeal (finely ground): soothing, gentle polish | Baking soda: high pH disrupts skin barrier |
| Honey: antibacterial, hydrates while exfoliating partners work | Undiluted lemon juice: very acidic; photosensitizing |
| Yogurt (plain): mild lactic acid “peel” | Coarse salt: sharp edges, micro-tears on facial skin |
| Fruit enzymes (papaya, pineapple): no scrub needed | Nut shells / fruit pits: jagged particles can scratch |
| Rice powder (fine): traditional, ultra-gentle polish | Essential oils (undiluted): irritation/sensitization risk |
| Aloe vera gel: calming base to mix with powders | Dry sugar on dry skin: too much friction (use damp skin + a base) |
| Fine sugar in a base (honey/oil/yogurt): melts as you massage | Hydrogen peroxide / harsh acids: barrier damage risk |
| Coffee grounds (very fine): brief, gentle massage only | Cinnamon/clove “spice” scrubs: high irritation potential |
Notes: Use gentle pressure and keep physical exfoliation less than 60 seconds. Always patch test first. If using essential oils, dilute (1–2 drops per tablespoon of carrier oil). Citrus should be heavily diluted and avoided before sun exposure. Salt scrubs are better for body (elbows/knees), not face.
How to Exfoliate Safely Without Damaging Your Skin
Exfoliation can be tricky, but these simple practices help keep your skin healthy, balanced, and glowing.
🧪 The 24-Hour Patch Test
This simple step prevents irritation and long-lasting damage. Apply a small amount of your chosen scrub to the inside of your wrist or behind your ear—both mimic facial sensitivity. Wait 24 hours and check for redness, itching, or swelling. Even natural ingredients can trigger reactions, especially if you have sensitive skin or unknown allergies. If any reaction occurs, skip that product entirely.
🧼 Hygiene Habits That Matter
Clean hands mean fewer breakouts and faster healing. Wash your hands with soap for at least 20 seconds before exfoliating, and use a dedicated set of soft, clean washcloths for this step only. Regular towels can harbor bacteria or feel too rough on freshly polished skin. Launder them after each use to keep things hygienic.
⏱️ The One-Minute Rule
Gentleness is the goal. Massage your exfoliant in light, circular motions for no more than 60 seconds. Think of it as buffing, not scrubbing. Going longer or harder can cause micro-tears, redness, or dryness. If your skin stings or flushes right away, rinse and stop.
💧 Lukewarm Water Only
Hot water strips away natural oils and can inflame newly exfoliated skin. Always rinse with lukewarm water; it’s warm enough to remove residue but gentle enough to protect your skin barrier.
🪞 The Three-Minute Moisturizer Window
Right after exfoliating, your skin is most receptive to moisture. Within three minutes of rinsing, apply a gentle, fragrance-free moisturizer to lock in hydration and calm your skin. Look for formulas with ceramides or hyaluronic acid to support barrier repair.
🌙 Time It Right
Evening exfoliation works best when your skin enters repair mode overnight, reducing the risk of sun sensitivity and giving it time to recover before facing makeup or pollution.
🚫 When to Stop
Pause exfoliating if you notice persistent redness, burning, tenderness, or flaking. These are signs of over-exfoliation or ingredient irritation. Give your skin a week to recover, then you can reintroduce a gentler method or less frequent routine.
Creating Your Personalized Exfoliation Routine
The key to successful natural exfoliation isn’t following someone else’s routine, it’s discovering what works specifically for your unique skin type, lifestyle, and concerns. Your skin’s needs are as unique as your fingerprint, influenced by factors such as genetics, hormones, climate, age, and even stress levels. Here’s how to systematically build a routine that delivers real results without causing damage.
Week 1-2: The Foundation Assessment Phase
Start Conservative: Begin with the gentlest possible approach—a simple oatmeal and honey scrub used just once per week. This baseline helps you understand your skin’s basic tolerance level without overwhelming it. Apply the scrub for no more than 30 seconds using light, circular motions. Then, rinse with lukewarm water.
Document Everything: Keep a simple skin journal noting the date, product used, application time, and your skin’s response 24 and 48 hours later. Look for positive changes, such as a smoother texture, reduced roughness, or a healthy glow. Also, watch for adverse reactions, such as persistent redness, increased sensitivity, breakouts, or tightness that lasts more than an hour after application.
Establish Your Baseline: By the end of week two, you should have a clear picture of how your skin responds to minimal exfoliation. Some people notice immediate smoothness and radiance, while others may see little change—both responses are normal and informative.
Week 3-4: Strategic Adjustment Phase
Increase Frequency Carefully: If your skin responds well to weekly exfoliation, try twice per week with at least 2-3 days between sessions. If you saw minimal improvement and no irritation, consider switching to a slightly more active ingredient, such as fine sugar mixed with oil.
Test Different Formulations: This involves experimenting with variations. Try adding a teaspoon of yogurt for lactic acid benefits, or switch from honey to coconut oil for different moisturizing properties. Only change one variable at a time so you can identify what works.
Monitor Cumulative Effects: Pay attention to how your skin behaves over the whole week, not just immediately after exfoliation. Healthy exfoliation should leave your skin looking consistently better, not cycling between improvement and irritation.
Month 2 and Beyond: Your Optimized Maintenance Routine
Lock in Your Sweet Spot: Most people find their ideal routine involves 2-3 exfoliation sessions per week, but your perfect Frequency might be different. Some people with sensitive skin thrive on once-weekly gentle exfoliation, while others with oily, resilient skin can handle daily light exfoliation.
Develop Your Signature Blend: By now, you should have identified two to three recipes that work consistently well for your skin. Rotate between them to address different needs—perhaps a gentler oatmeal scrub for sensitive days and a more active sugar scrub when your skin needs more profound renewal.
Seasonal Adjustments: Plan to reassess your routine every 3-4 months. Your skin’s needs change with seasons, hormones, age, and life circumstances. What works perfectly in humid summer weather might be too harsh during dry winter months.
The Frequency Formula
- Sensitive skin: Once per week maximum
- Normal skin: 2-3 times per week
- Oily skin: 3-4 times per week (but watch for over-drying)
- Mature skin: 2-3 times per week, focusing on gentler methods
Advanced Tips for Maximum Results
Creating Treatment Combinations
When working with mature skin, consider pairing your physical exfoliation routine with complementary treatments to enhance its benefits. After completing your scrub routine, apply a gentle, natural acid treatment, such as properly diluted apple cider vinegar, once a week. This combination approach can help address multiple skin concerns while maintaining a balanced routine.
Adapting to Climate Change
Your skin responds differently throughout the year, so it’s essential to adjust your exfoliation approach accordingly. During colder months, focus on richer, more nourishing scrub formulations that provide extra moisture while removing dead skin cells. In warmer, more humid conditions, you can typically increase the Frequency of treatments while using lighter formulations that won’t feel heavy on your skin.
Tailoring Intensity by Body Area
Different areas of your body have varying sensitivity levels and thickness. Your facial skin requires the gentlest approach with fine-textured scrubs and light pressure. Your body, however, can typically tolerate more intensive treatments. Areas like elbows, knees, and feet often benefit from coarser textures and firmer application, as these zones tend to develop thicker, more stubborn dead skin buildup.
Smart Ingredient Selection
Making thoughtful choices about your ingredients can significantly impact your results. Organic options help minimize exposure to potentially irritating pesticide residues, though they may cost more upfront. Purchase ingredients in smaller quantities to maintain freshness, as natural components can lose potency over time. Glass storage containers are ideal for your finished products, as they prevent potential reactions with plastic that could alter the scrub’s effectiveness or introduce unwanted chemicals into your skincare routine.
Why Plastic-Free Storage Matters for Your DIY Scrubs
The container you choose for storing your homemade exfoliating scrubs isn’t just about aesthetics; it directly impacts the safety and effectiveness of your skincare products. Plastic containers can leach harmful chemicals into your scrubs, especially when exposed to natural acids, oils, and temperature changes common in bathroom environments.
The Hidden Dangers of Plastic Storage
Many plastics contain BPA (bisphenol A), phthalates, and other endocrine-disrupting chemicals that can migrate into your skincare products over time. These compounds become more active when exposed to the acidic ingredients commonly found in DIY scrubs, such as citrus oils, vinegar-based ingredients, or fruit acids. Essential oils are particularly problematic in plastic containers because their natural solvents can break down plastic polymers, releasing toxic compounds directly into your scrub.
Temperature fluctuations in bathrooms accelerate this chemical migration. The steam from hot showers, combined with superb air conditioning, creates an environment where plastic containers expand and contract, making them more likely to release chemicals. Additionally, many natural ingredients, such as coconut oil, can become rancid more quickly when stored in plastic due to increased oxygen permeability.
Three Ideal Plastic-Free Container Options
Glass Jars with Tight-Fitting Lids: Mason jars or repurposed glass food containers offer the best protection for your scrubs. Glass is completely non-reactive, meaning it won’t interact with acidic ingredients or essential oils. Look for jars with rubber gasket seals to prevent air exposure, which can cause oils to go rancid. The wide mouth design makes it easy to scoop out scrub with clean hands or a wooden spoon. Choose amber or cobalt blue glass if your scrubs contain light-sensitive ingredients, such as certain essential oils.
Stainless Steel Containers: Food-grade stainless steel containers provide excellent durability and are naturally antimicrobial. They’re perfect for salt-based scrubs since salt can sometimes cause microscopic etching in Glass over extended periods. Stainless steel won’t absorb odors or stains, and it’s easy to sterilize between batches. Look for containers with silicone gasket lids for an airtight seal.
Ceramic Canisters with Rubber Gaskets: High-quality ceramic containers offer a beautiful, spa-like appearance while providing excellent protection for your scrubs. Like Glass, ceramic is non-reactive and won’t leach chemicals. The dense material provides good temperature stability, protecting your scrubs from fluctuations in bathroom temperature. Choose containers with rubber or silicone gasket seals rather than cork, which can harbor bacteria and absorb moisture.
Don’t Miss: Plastic-Free Living Ready to go beyond skincare? See why plastic alternatives matter. Read more →When to Hit Pause and Call a Pro
Natural exfoliation is gentle and safe for most people, but your skin will sometimes wave red flags that mean it’s time to get professional help. Don’t ignore these warning signs—they’re your skin’s way of asking for expert intervention.
Skip DIY and See a Dermatologist If You Have:
- Active skin conditions flaring up: If you’re dealing with eczema, psoriasis, rosacea, or dermatitis that’s currently angry and inflamed, any exfoliation can make things dramatically worse. Wait until your skin calms down or get professional treatment first.
- Persistent severe acne: If you’ve tried gentle, natural approaches for 6-8 weeks and your acne is worsening or remaining unchanged, you may need stronger intervention than DIY scrubs can provide. Severe cystic acne, in particular, requires professional treatment.
- Unusual reactions to everything: If you’re reacting badly to multiple gentle, natural ingredients that most people tolerate well, you might have underlying sensitivities or conditions that need professional diagnosis.
- Open wounds, cuts, or infections: Never exfoliate over broken skin, active cold sores, or any area that looks infected. This can spread bacteria and delay healing.
- Rapid changes in moles or skin texture: Any sudden changes in existing moles, new growths, or unexplained texture changes should be evaluated by a dermatologist before you do any at-home treatments.
FAQs on How to Exfoliate Face at Home
You might notice dullness, rough texture, or that skincare products aren’t absorbing well. If your skin looks uneven, feels flaky, or gets buildup — those are signs it’s time. Learning how to exfoliate face at home means recognizing these early signals and choosing a gentle method that refreshes your skin without irritation. Always check that your skin isn’t already sensitive or inflamed before exfoliating.
Often not. Body products tend to be more abrasive (coarser grains, harsher formulas), and facial skin is more delicate. If using a body exfoliant on your face, choose one with very fine particles, avoid harsh physical ingredients, and always patch test first.
Not necessarily. Some people prefer alternating between the two based on the type of skin concern (e.g., chemical for acne, physical for texture), while others do fine with just one. What matters most is choosing gentler options, giving your skin time to recover, and not combining strong physical + chemical products on the same day.
Itchiness, a raw feeling, flaky “dry plates,” increased oil production, rough texture, and skin that looks or feels “shiny” in a non-glowing way.
This Has Been About How to Exfoliate Skin Naturally at Home
Exfoliating your face at home doesn’t have to mean harsh scrubs or expensive products. With simple, natural ingredients and the proper techniques, you can refresh your skin, improve texture, and make your whole routine more effective. Pairing safe, natural exfoliation with plastic-free storage helps both your skin and the planet.
🗨️ What’s your go-to natural exfoliant — oatmeal, sugar, fruit enzymes, or something else? Share your favorite method in the comments!
📚 References
- American Academy of Dermatology. (n.d.). How to safely exfoliate at home. American Academy of Dermatology Association. https://www.aad.org/public/everyday-care/skin-care-secrets/routine/safely-exfoliate-at-home
- European Chemicals Agency. (2019). Intentionally added microplastics. European Chemicals Agency. https://echa.europa.eu/hot-topics/microplastics
- Microbead-Free Waters Act of 2015, H.R. 1321, 114th Cong. (2015). https://www.congress.gov/bill/114th-congress/house-bill/1321/text
- Harvard Health Publishing. (2024, May 20). Have you exfoliated lately? Harvard Medical School. https://www.health.harvard.edu/blog/have-you-exfoliated-lately-202405203042