Key Takeaways
- Spa-inspired salt and clay bars combine mineral-rich salts with detoxifying clays for a deep-clean feel without stripping skin.
- These handmade soap bars deliver luxury spa results at home using simple, beginner-friendly ingredient combinations.
- Salt and clay soaps are ideal for self-care, gifting, or small-batch crafting, with boutique-worthy textures and finishes.
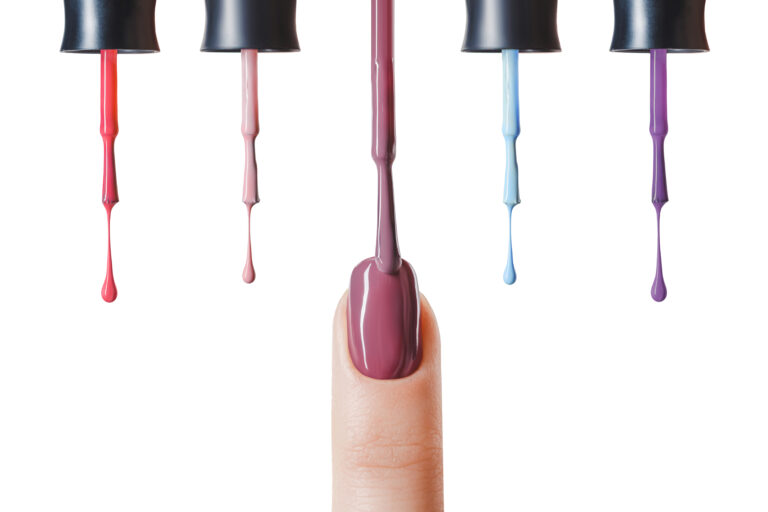
There’s something unmistakably indulgent about a good spa bar. The weight in your hand. The mineral-rich lather. The way your skin feels deeply clean but not stripped. Salt and clay soaps are a staple in high-end spas for a reason, and they’re surprisingly achievable to make at home.
Many conventional soaps rely on fragrance blends that can contain dozens to hundreds of individual chemicals, often grouped under a single label like “fragrance” or “parfum.” As more people start paying attention to ingredient transparency, salt and clay bars stand out for their simpler, mineral-focused formulations.
Spa-inspired salt and clay bars combine natural exfoliation with detoxifying clays to create soaps that feel both functional and luxurious. From creamy white kaolin to earthy French green clay and mineral-dense sea salts, these ingredients are prized for their ability to cleanse, balance, and elevate everyday skincare into a ritual.
In this guide, you’ll find 11 spa-inspired salt and clay soap ideas that look boutique-worthy and feel like a treat, whether you’re making soap for yourself, gifting, or small-batch crafting.
Benefits of Salt & Clay Soap Bars
Salt and clay soap bars are valued for more than their look or texture. These ingredients are commonly used in handmade soap because they bring functional benefits that support cleansing, balance, and skin feel. When combined thoughtfully, salts and clays create bars that perform well, age beautifully, and offer a more intentional alternative to conventional soaps.
Below are the key benefits that make salt and clay soap bars a favorite for at-home use, gifting, and small-batch crafting.
🧂 Deep Cleansing Without Harshness
Salt helps lift away dirt, excess oil, and buildup while supporting a thorough cleanse that doesn’t rely on synthetic detergents. When used in soap bars, fine salts gently exfoliate the skin’s surface, leaving it refreshed rather than stripped.
🪨 Detoxifying Support for Balanced Skin
Natural clays are known for their ability to absorb impurities and excess oil. Ingredients like kaolin, French green clay, and bentonite help draw out debris from pores while remaining gentle enough for regular use.
✨ Gentle Exfoliation for Smoother Texture
Salt provides mild physical exfoliation, helping smooth rough patches and encourage softer-looking skin. In well-formulated bars, the exfoliation feels effective but controlled, making these soaps suitable for hands, body, and occasional facial use depending on skin type.
🌿 Mineral-Rich Ingredients That Feel Grounding
Both salts and clays contain naturally occurring minerals that contribute to that clean, fresh feeling people associate with high-quality soap. These mineral-rich ingredients add weight, texture, and a sense of intention to handmade bars.
🧼 Ideal for Handmade, Small-Batch Soaps
Salt and clay soap bars hold their shape well, develop a dense lather, and age beautifully over time. This makes them especially popular for personal use, gifting, and small-batch projects where both performance and appearance matter.
Salt & Clay Ingredients Used in Handmade Soap
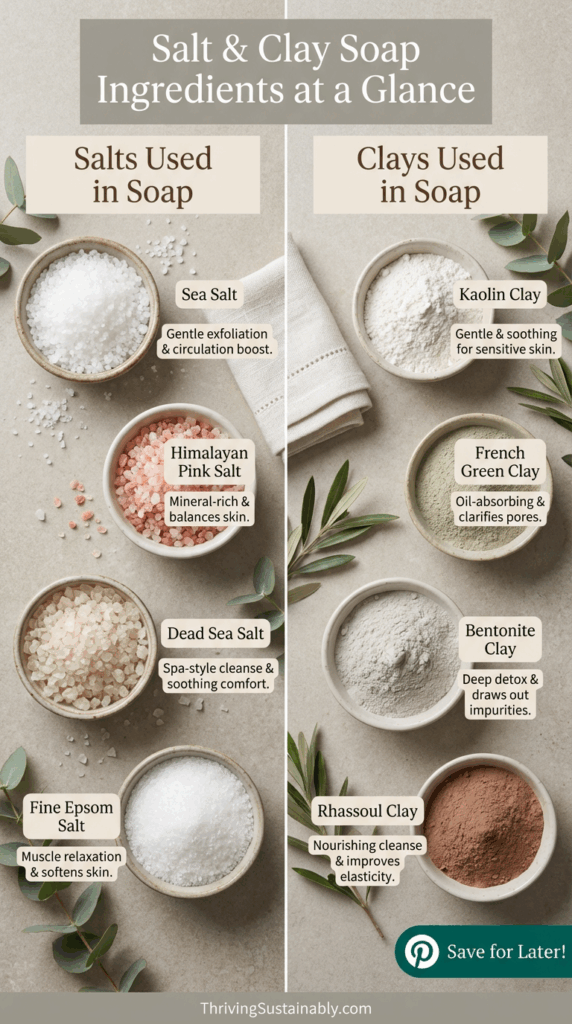
Salt and clay are foundational ingredients in many handmade soaps because they contribute both performance and texture. Different salts affect exfoliation, mineral content, and how a bar feels on the skin, while clays influence oil absorption, cleansing strength, and overall balance.
This visual guide highlights some of the most commonly used salts and clays in soap-making and what each is best known for. While individual recipes may vary in their ingredient combinations, these pairings provide a helpful reference point as you explore salt and clay bars throughout this guide.
11 Spa-Inspired Salt & Clay Soap Bar Recipes
These salt and clay soap bar recipes are inspired by the kinds of blends you’d find in luxury spas, but are designed to be practical for homemade soap making. Each recipe centers on a specific combination of mineral-rich salt and cleansing clay, chosen for how it looks, feels, and performs in a finished bar.
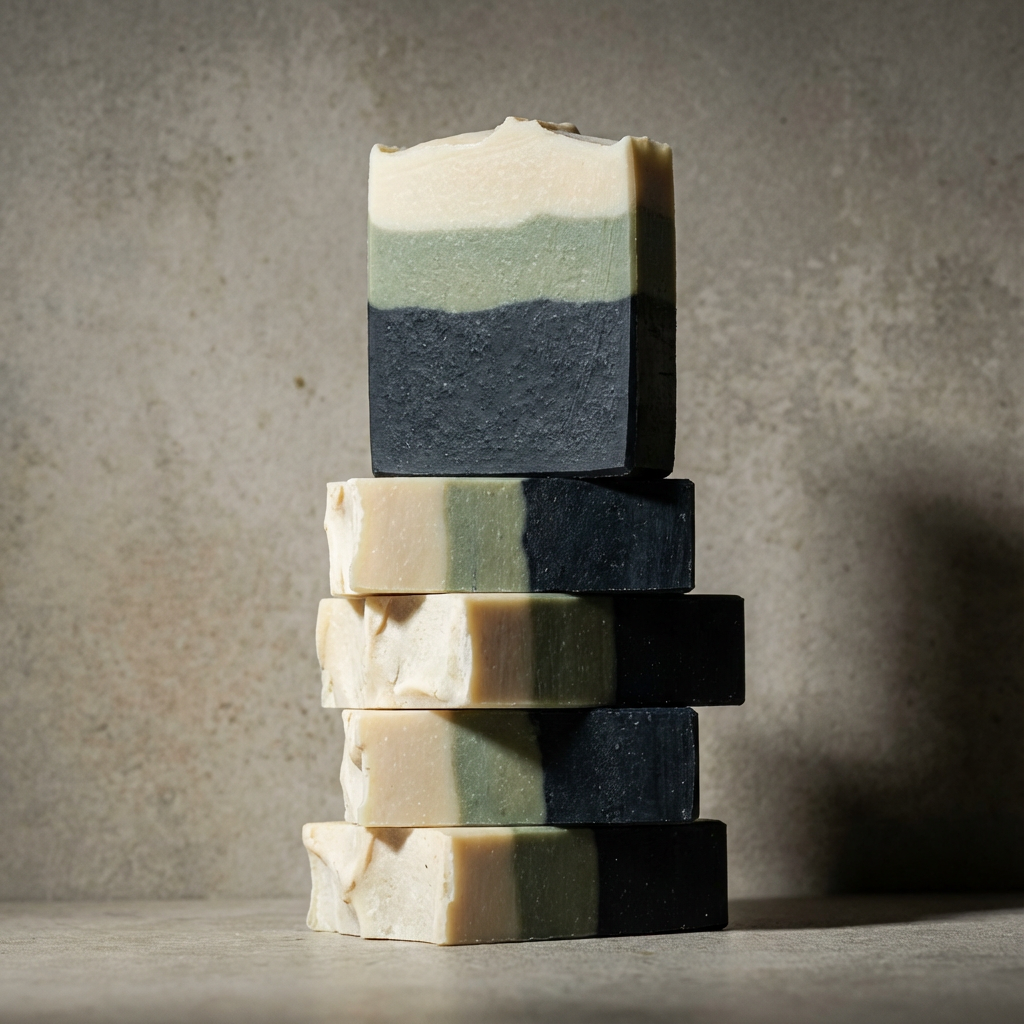
Layered Clay Detox Bar
This is the bar people save instantly. Clean layers, bold contrast, and that handcrafted-but-polished look that feels straight out of a boutique soap shop. By stacking white clay, French green clay, and activated charcoal, this bar turns simple ingredients into something that looks intentional and elevated.
Why You’ll Love This Bar
The layered design makes this bar visually striking without relying on botanicals or heavy scent. Each clay brings a slightly different cleansing feel, while the overall bar stays balanced and versatile. It’s ideal for gifting, markets, or anytime you want a handmade soap that looks special without being complicated.
Ingredients
- 1½ lbs melt-and-pour soap base (clear or shea butter base works well)
- 1 teaspoon white clay (kaolin)
- 1 teaspoon French green clay
- 1 teaspoon activated charcoal
- 20–30 drops essential oil (eucalyptus, cedarwood, or unscented, all work well)
- Rubbing alcohol (for bubbles)
- Silicone loaf mold or rectangular soap mold
How to Make It
- Melt the soap base, then divide it evenly among three heat-safe containers.
- Stir white clay into the first portion, green clay into the second, and activated charcoal into the third, mixing until smooth.
- Pour the first layer into your mold and allow it to set slightly until firm but still tacky.
- Lightly spritz the surface with rubbing alcohol, then pour the second layer gently over the back of a spoon.
- Repeat with the third layer, allowing each layer to set before adding the next.
- Let the soap cool completely, then unmold and slice to reveal the layered design.
How to Use
This bar works well for hands and body and is especially popular for those who enjoy a balanced, everyday cleanse. The layered design also makes it a favorite for display or gifting.
Dead Sea Salt + Activated Charcoal Detox Bar
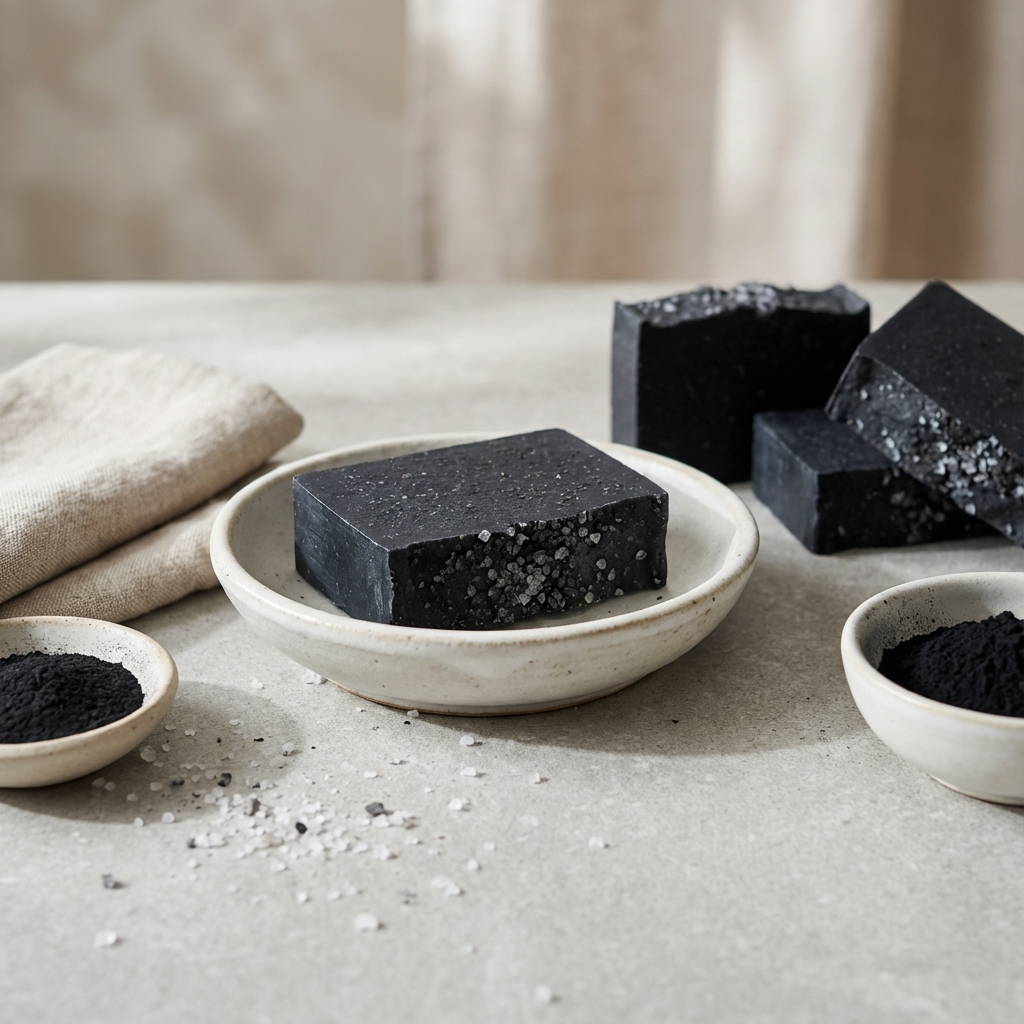
This is that bar. The dramatic black color. The creamy, dense lather. The kind of soap that looks straight out of a luxury spa but is surprisingly approachable to make at home. Dead Sea salt brings the mineral-rich feel, while activated charcoal gives this bar its deep-clean reputation and bold, modern look.
If you’re making homemade soap and want something that feels elevated without being complicated, this recipe is a favorite for a reason.
Why You’ll Love This Bar
This bar feels deeply cleansing without leaving skin tight or dry. The minimalist black color gives it a high-end look with minimal effort, making it ideal for gifting or small-batch projects. It’s also a recipe people tend to remake once they try it.
Ingredients
- 1 lb melt-and-pour soap base (shea butter or goat milk both work well)
- 1–2 teaspoons activated charcoal powder
- 1–2 tablespoons fine Dead Sea salt
- 20–30 drops essential oil (eucalyptus, tea tree, or lavender are popular choices)
- Rubbing alcohol (for bubbles)
- Silicone soap mold
How to Make It
- Cut the soap base into small cubes and melt slowly in a double boiler or in short bursts in the microwave, stirring between each until fully melted.
- Sprinkle in the activated charcoal and stir thoroughly until the color is smooth and evenly blended.
- Add the Dead Sea salt and gently mix just until combined. Avoid over-stirring so the salt stays suspended rather than sinking to the bottom.
- Stir in your essential oils, mixing just enough to distribute the scent evenly.
- Pour the mixture into your mold and lightly spritz the surface with rubbing alcohol to remove air bubbles.
- Allow the soap to harden completely, about 1–2 hours, then unmold carefully.
How to Use
This soap works exceptionally well for hands and body when you want a deep-clean feel. Because salt bars are naturally firm, they tend to last longer than standard handmade soaps and hold their shape beautifully over time.
Himalayan Pink Salt + Rose Clay Balance Bar
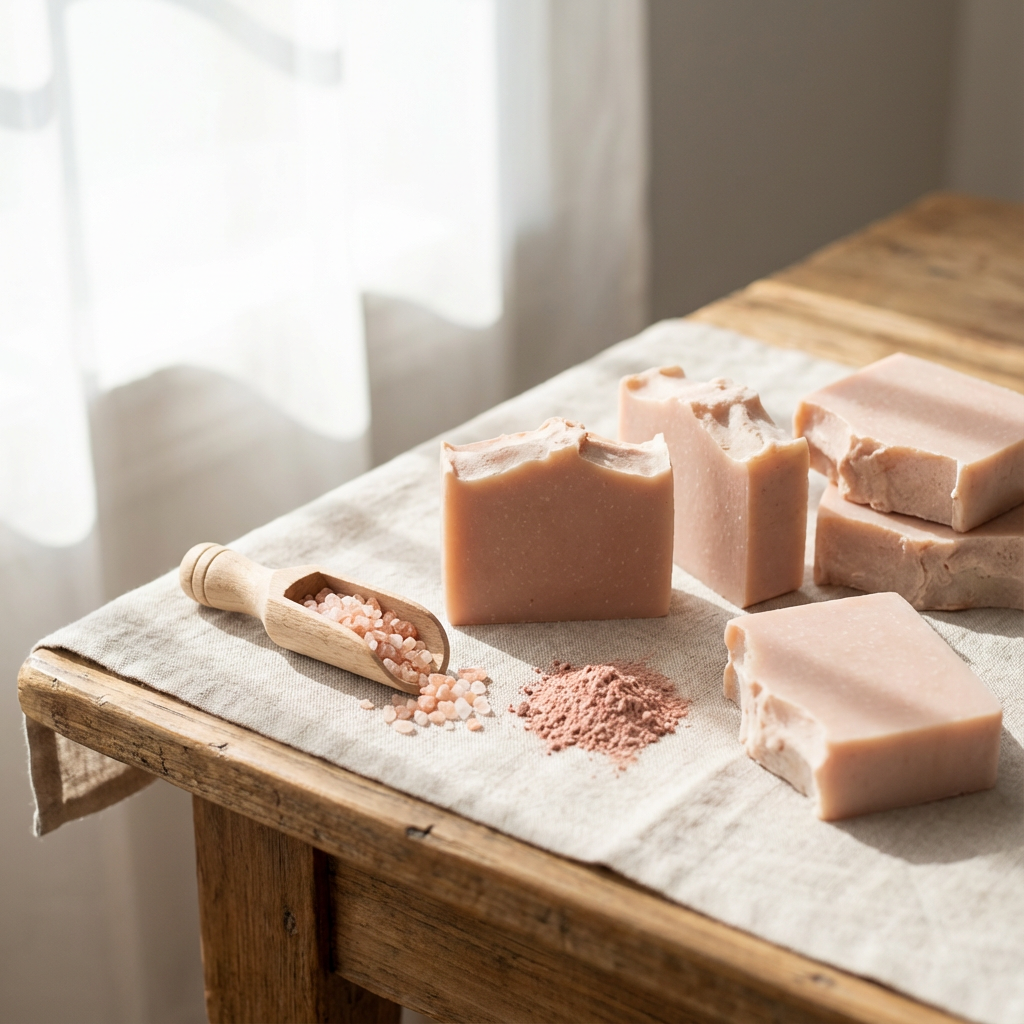
This one is all about soft luxury: the natural blush tone, the creamy lather, the gentle feel on skin. Himalayan pink salt and rose clay create a bar that feels refined and calming, making it a favorite for everyday use and gifting. It’s the kind of soap people leave out on the sink because it’s just as pretty as it is functional.
Why You’ll Love This Bar
This bar offers light exfoliation without feeling abrasive and is especially popular with those who prefer gentler soaps. The soft pink color comes naturally from the clay, so there’s no need for colorants. It’s simple, elegant, and very Pinterest-friendly.
Ingredients
- 1 lb melt-and-pour soap base (shea butter or goat milk works well here)
- 1–2 teaspoons rose clay
- 1–2 tablespoons finely ground Himalayan pink salt
- 20–30 drops essential oil (rose geranium, lavender, or sweet orange pair beautifully)
- Rubbing alcohol (for bubbles)
- Silicone soap mold
How to Make It
- Cut the soap base into small cubes and melt slowly in a double boiler or in short bursts in the microwave, stirring between each until fully melted.
- Add the rose clay and stir thoroughly until the color is smooth and evenly blended. The soap should take on a soft, natural blush tone.
- Gently mix in the finely ground Himalayan pink salt, stirring just enough to evenly distribute it.
- Add your essential oils and stir lightly to combine.
- Pour the mixture into your mold and spritz the surface with rubbing alcohol to eliminate bubbles.
- Let the soap set completely, about 1–2 hours, then unmold carefully.
How to Use
This bar is ideal for hands and body, and works exceptionally well for daily cleansing. It’s a great option if you love salt soaps but want something that feels softer and more balanced.
Sea Salt + French Green Clay Purifying Bar
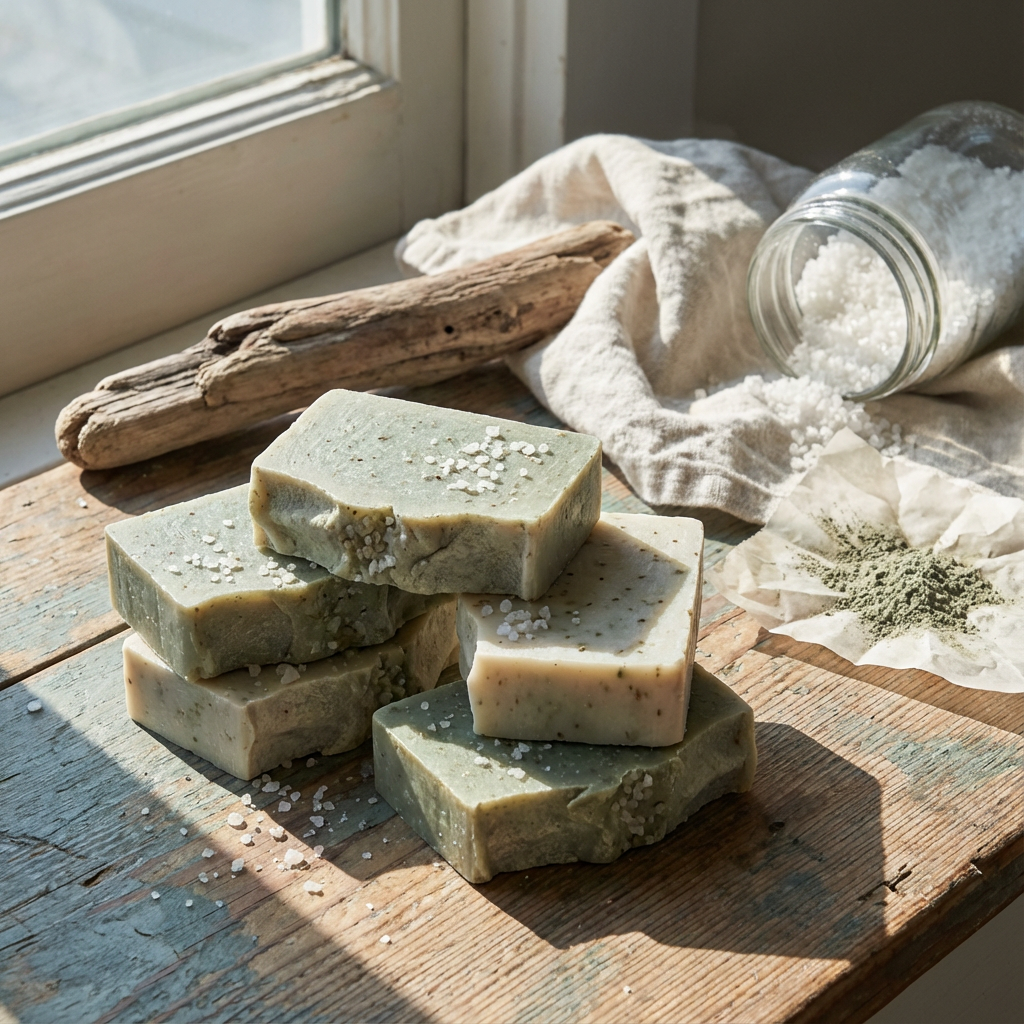
This is the kind of soap you’d expect to find in a coastal spa or tucked beside a stone sink in a minimalist bathroom. Sea salt and French green clay create a bar that feels clean, fresh, and quietly powerful. It’s less dramatic than charcoal, but incredibly satisfying to use.
This recipe is a favorite for anyone who loves that just-left-the-spa feeling without heavy scent or color.
Why You’ll Love This Bar
This bar delivers a balanced cleanse that feels refreshing rather than harsh. French green clay gives it that soft, natural green tone and helps absorb excess oil, while sea salt adds gentle exfoliation and structure. It’s simple, effective, and very easy to dress up or keep minimal.
Ingredients
- 1 lb melt-and-pour soap base (olive oil or shea butter base works especially well)
- 1–2 teaspoons French green clay
- 1–2 tablespoons fine sea salt
- 20–30 drops essential oil (rosemary, eucalyptus, or lemon work beautifully here)
- Rubbing alcohol (for bubbles)
- Silicone soap mold
How to Make It
- Cut the soap base into small cubes and melt slowly in a double boiler or in short bursts in the microwave, stirring between each until fully melted.
- Stir in the French green clay until the color is smooth and evenly distributed. The soap should turn a soft, natural green.
- Add the fine sea salt and gently mix just until combined. Avoid over-stirring so the salt stays evenly dispersed.
- Add your essential oils and stir lightly.
- Pour the soap into your mold and spritz the surface with rubbing alcohol to remove air bubbles.
- Let the soap harden completely, about 1–2 hours, then unmold.
How to Use
This bar works well for hands and body and is especially lovely for morning showers or after outdoor activities. It’s a great everyday soap that feels clean and grounding without being too intense.
✨ tip
Supplies & Ingredients
A simple shopping list is included at the end of this guide the soap recipes you plan to make.
Kaolin Clay + Oat Milk Gentle Cleanse Bar
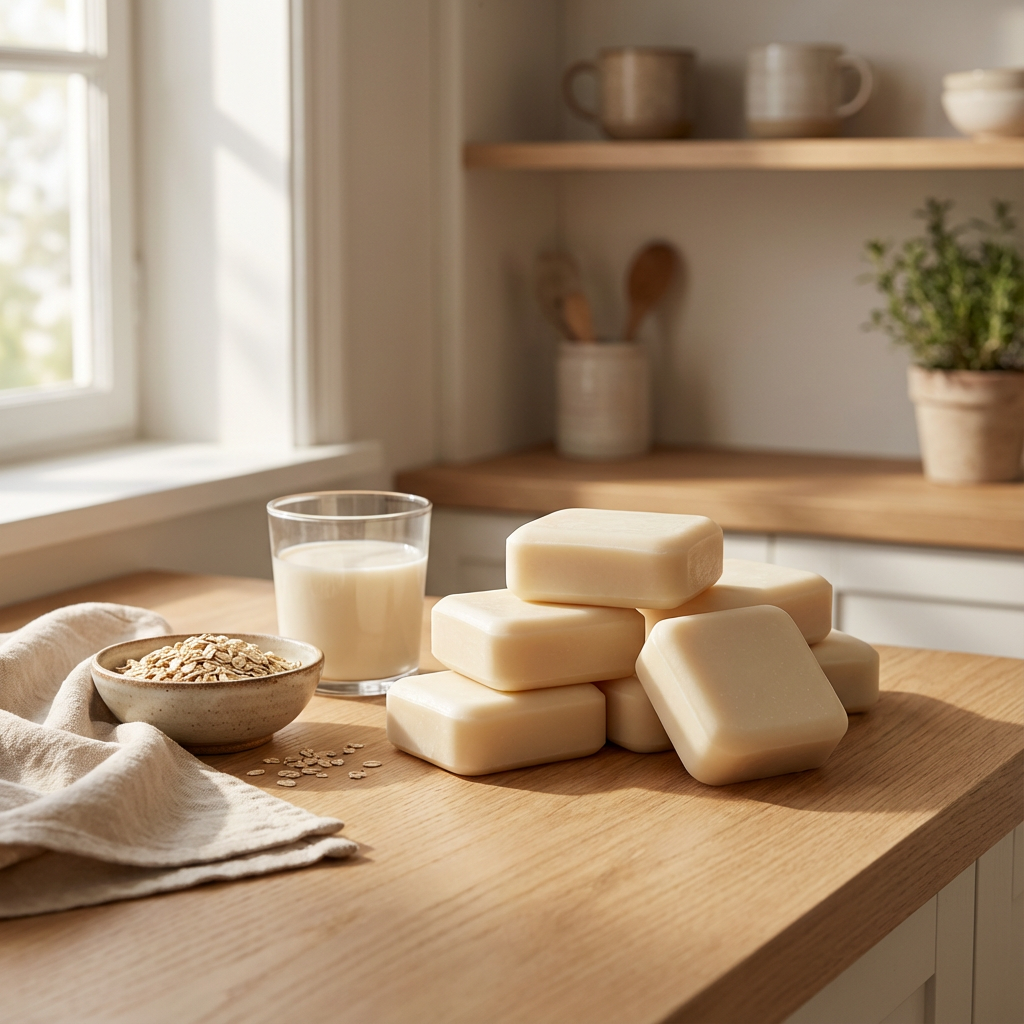
This is the bar people reach for when they want something calming and uncomplicated. Kaolin clay and oat milk create a soap that feels creamy, smooth, and comforting, with a simple yet quietly beautiful appearance. It’s especially popular with anyone who prefers a gentler cleanse or a more minimal, neutral aesthetic.
Why You’ll Love This Bar
This bar is known for its soft, non-drying feel and creamy lather. Kaolin clay is one of the mildest clays used in soap making, while oat milk adds a subtle richness that makes the bar feel nourishing without being heavy. It’s an easy favorite for everyday use and a safe choice when gifting.
Ingredients
- 1 lb melt-and-pour soap base (goat milk or oatmeal base works beautifully)
- 1–2 teaspoons kaolin clay
- 2–3 tablespoons oat milk (powdered or liquid, cooled)
- 15–25 drops essential oil (lavender, chamomile, or leave unscented for an actual minimalist bar)
- Rubbing alcohol (for bubbles)
- Silicone soap mold
How to Make It
- Cut the soap base into small cubes and melt slowly in a double boiler or in short bursts in the microwave, stirring between each until fully melted.
- Stir in the kaolin clay until the mixture is smooth and evenly blended.
- Add the oat milk and mix gently until incorporated.
- Add the essential oils, if using, and stir lightly to combine.
- Pour the soap into your mold and lightly spritz the surface with rubbing alcohol to remove bubbles.
- Allow the soap to set completely, about 1–2 hours, then unmold carefully.
How to Use
This bar works well for hands and body and is especially lovely for daily cleansing. Its gentle formulation makes it a popular choice for regular use when you want something simple and soothing.
Rhassoul Clay + Coconut Milk Nourishing Bar
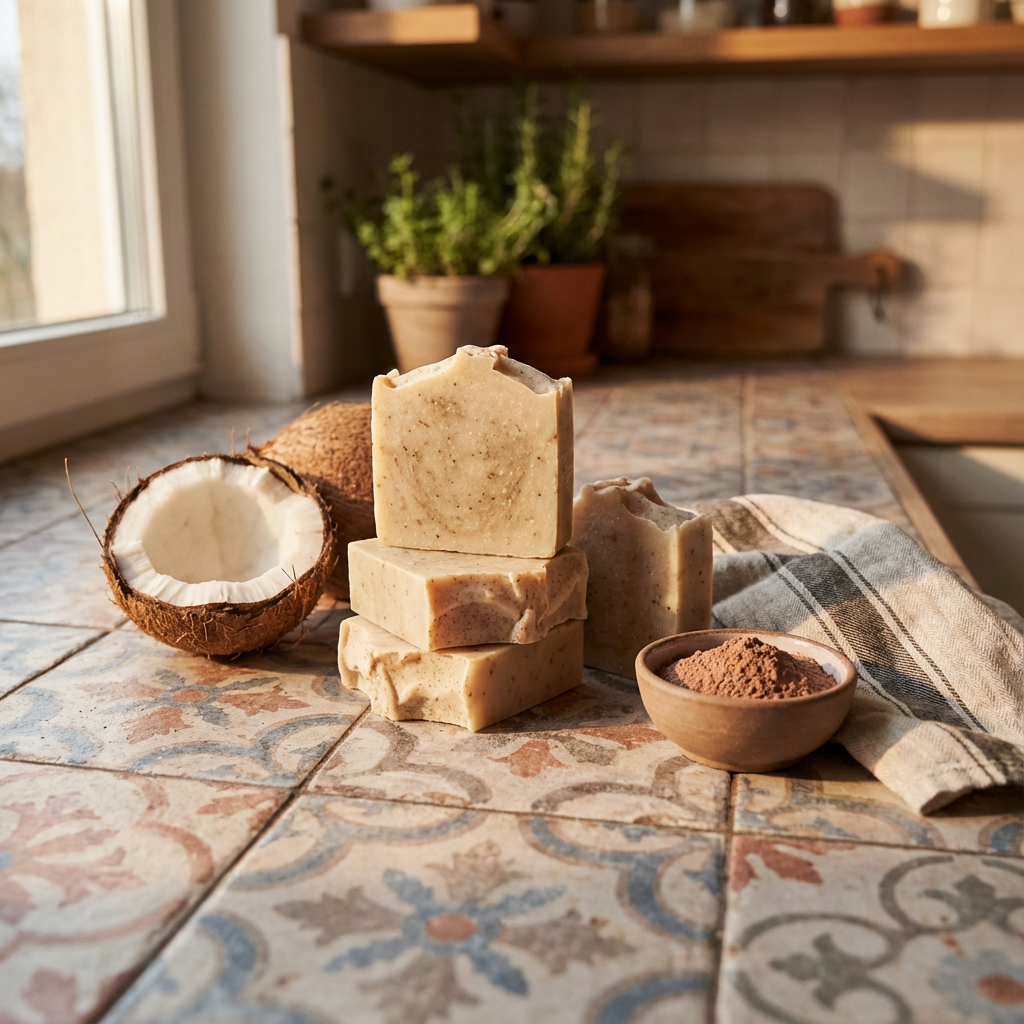
This bar has an entirely different energy. Rhassoul clay and coconut milk combine to create a soap that is creamy, earthy, and deeply nourishing. The natural beige tone and velvety texture give it a grounded, almost old-world feel, inspired by traditional clay cleansing rituals.
Why You’ll Love This Bar
Rhassoul clay is known for its ability to cleanse while still feeling gentle, and coconut milk adds richness and a soft, lotion-like lather. Together, they create a bar that feels substantial in the hand and luxurious on the skin, without needing heavy fragrance or color.
Ingredients (Melt-and-Pour Friendly)
- 1 lb melt-and-pour soap base (shea butter or coconut base works exceptionally well)
- 1–2 teaspoons rhassoul clay
- 2–3 tablespoons coconut milk (full-fat, cooled)
- 15–25 drops essential oil (frankincense, sandalwood, or vanilla-leaning blends pair beautifully)
- Rubbing alcohol (for bubbles)
- Silicone soap mold
How to Make It
- Cut the soap base into small cubes and melt slowly in a double boiler or in short bursts in the microwave, stirring between each until fully melted.
- Stir in the rhassoul clay until the mixture is smooth and evenly colored.
- Add the coconut milk and mix gently until fully incorporated.
- Add the essential oils, if using, and stir lightly.
- Pour the soap into your mold and spritz the surface with rubbing alcohol to remove bubbles.
- Let the soap set completely, about 1–2 hours, then unmold.
How to Use
This bar works well for hands and body and is especially lovely when skin feels dry or in need of extra care. Its creamy lather and soft finish make it a favorite for evening showers or slower self-care routines.
White Clay + Chamomile Calm Bar
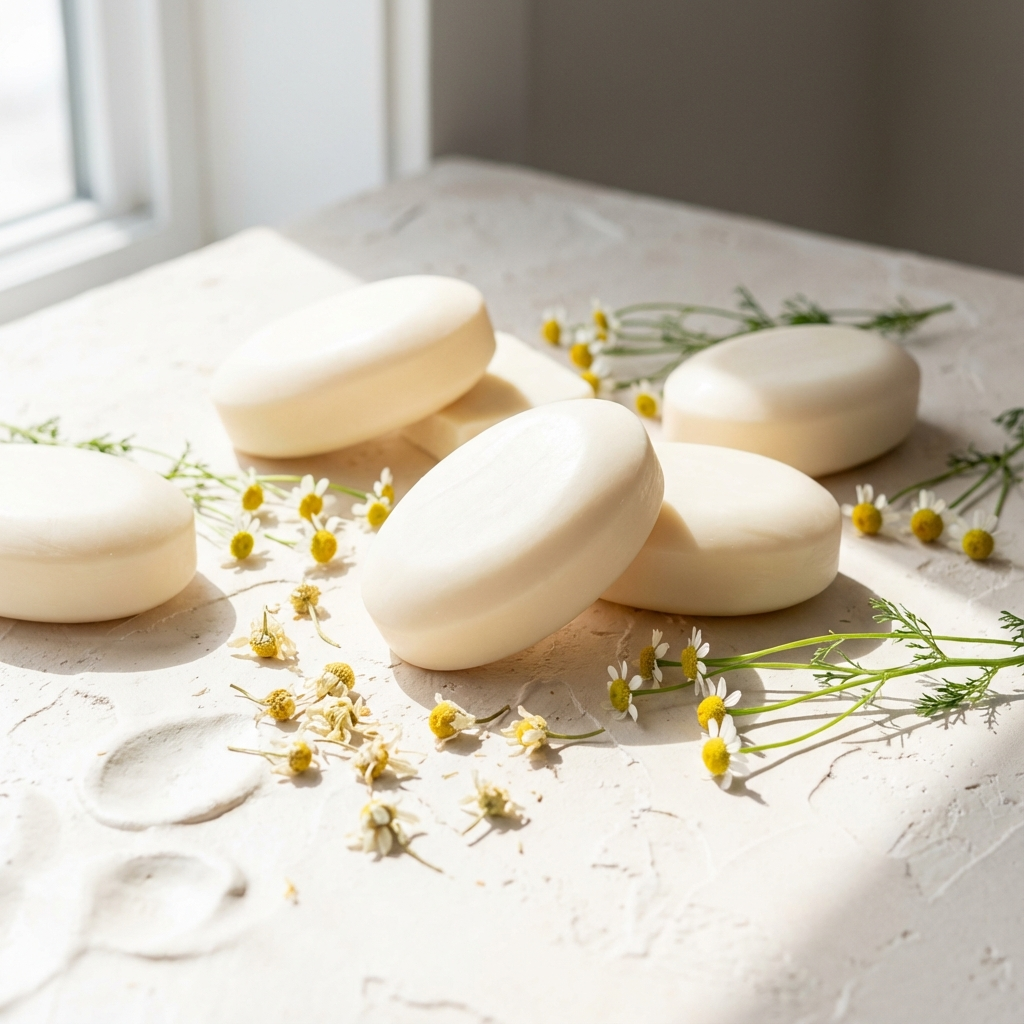
This bar feels like opening a window on a quiet afternoon. White clay and chamomile create a soap that looks clean and bright, with a soft, understated beauty that feels calming before you even use it. It’s simple, gentle, and one of those bars that fits effortlessly into any bathroom.
Why You’ll Love This Bar
White clay is known for its mild cleansing properties and smooth finish, while chamomile brings a soft, botanical touch that feels comforting rather than overpowering. The result is a bar that feels light and balanced, with a clean aesthetic that works for both personal use and gifting.
Ingredients
- 1 lb melt-and-pour soap base (clear or goat milk both work well)
- 1–2 teaspoons white clay (kaolin)
- 2–3 tablespoons strong chamomile tea, cooled
- 15–25 drops essential oil (chamomile, lavender, or bergamot pair well)
- Rubbing alcohol (for bubbles)
- Silicone soap mold
How to Make It
- Cut the soap base into small cubes and melt slowly in a double boiler or in short bursts in the microwave, stirring between each until fully melted.
- Stir in the white clay until the mixture is smooth and evenly blended.
- Add the cooled chamomile tea and mix gently until incorporated.
- Add the essential oils, if using, and stir lightly.
- Pour the soap into your mold and spritz the surface with rubbing alcohol to remove air bubbles.
- Let the soap set completely, about 1–2 hours, then unmold.
How to Use
This bar works well for hands and body and is a nice option when you want something light and uncomplicated. Its gentle look and feel make it a popular everyday soap that blends easily into any routine.
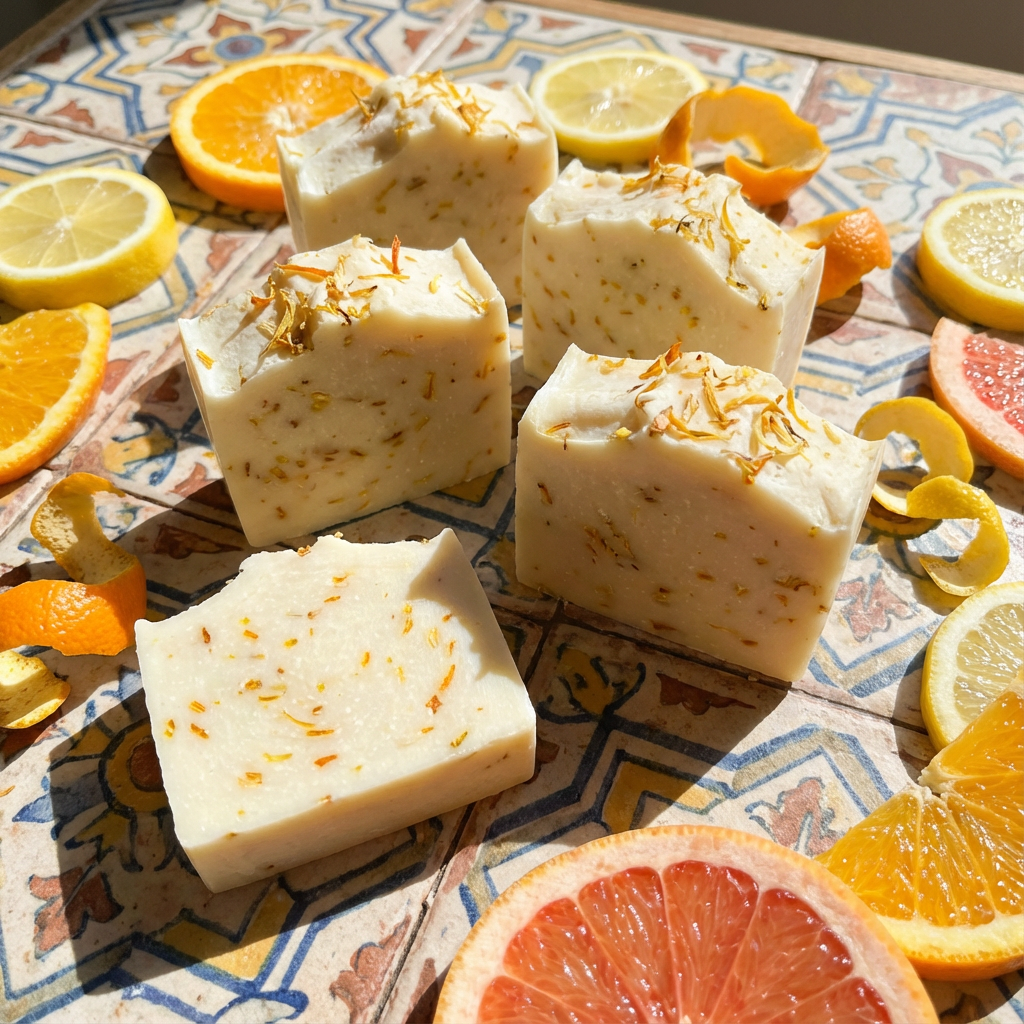
Pink Clay + Calendula Glow Bar
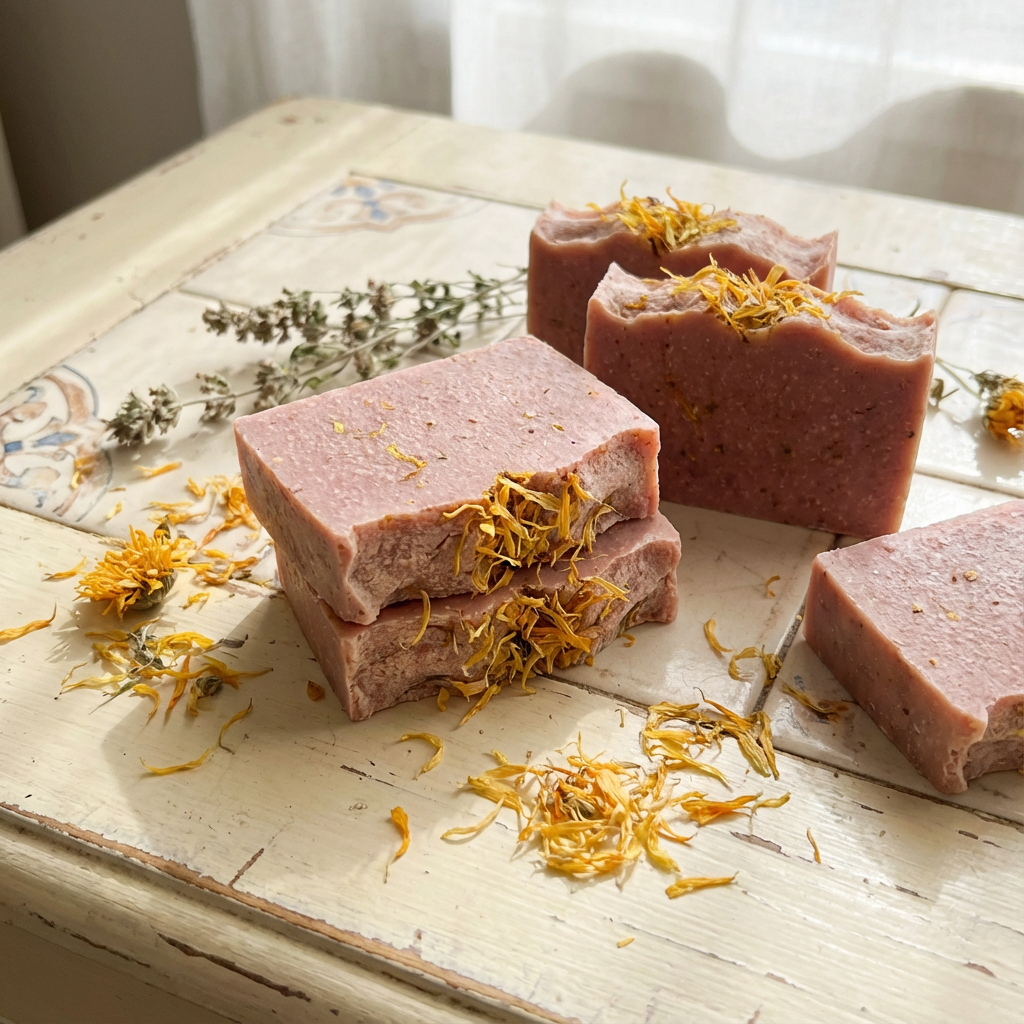
This bar is soft but cheerful. Pink clay gives it that naturally rosy tone, while calendula petals add subtle texture and a pop of warm color that instantly makes the bar feel special. It’s gentle, gift-worthy, and one of those soaps people comment on the moment they see it.
Why You’ll Love This Bar
Pink clay is known for its mild, balancing cleanse, and calendula brings a light botanical element that feels warm and inviting. The petals create visual interest without overwhelming the bar, making this recipe ideal for everyday use, spring gifting, or markets.
Ingredients
- 1 lb melt-and-pour soap base (clear or shea butter base works well)
- 1–2 teaspoons pink clay
- 1–2 tablespoons dried calendula petals
- 15–25 drops essential oil (sweet orange, geranium, or lavender work beautifully)
- Rubbing alcohol (for bubbles)
- Silicone soap mold
How to Make It
- Cut the soap base into small cubes and melt slowly in a double boiler or in short bursts in the microwave, stirring between each until fully melted.
- Stir in the pink clay until the color is smooth and evenly blended.
- Gently fold in the calendula petals, stirring just enough to distribute them without breaking them down.
- Add the essential oils, if using, and stir lightly.
- Pour the soap into your mold and spritz the surface with rubbing alcohol to remove bubbles.
- Allow the soap to set completely, about 1–2 hours, then unmold carefully.
How to Use
This bar works well for hands and body, and is a good recipe when you want something gentle that still feels uplifting. Its soft color and botanical detail also make it a favorite for gifting.
Dead Sea Salt + Aloe Refresh Bar
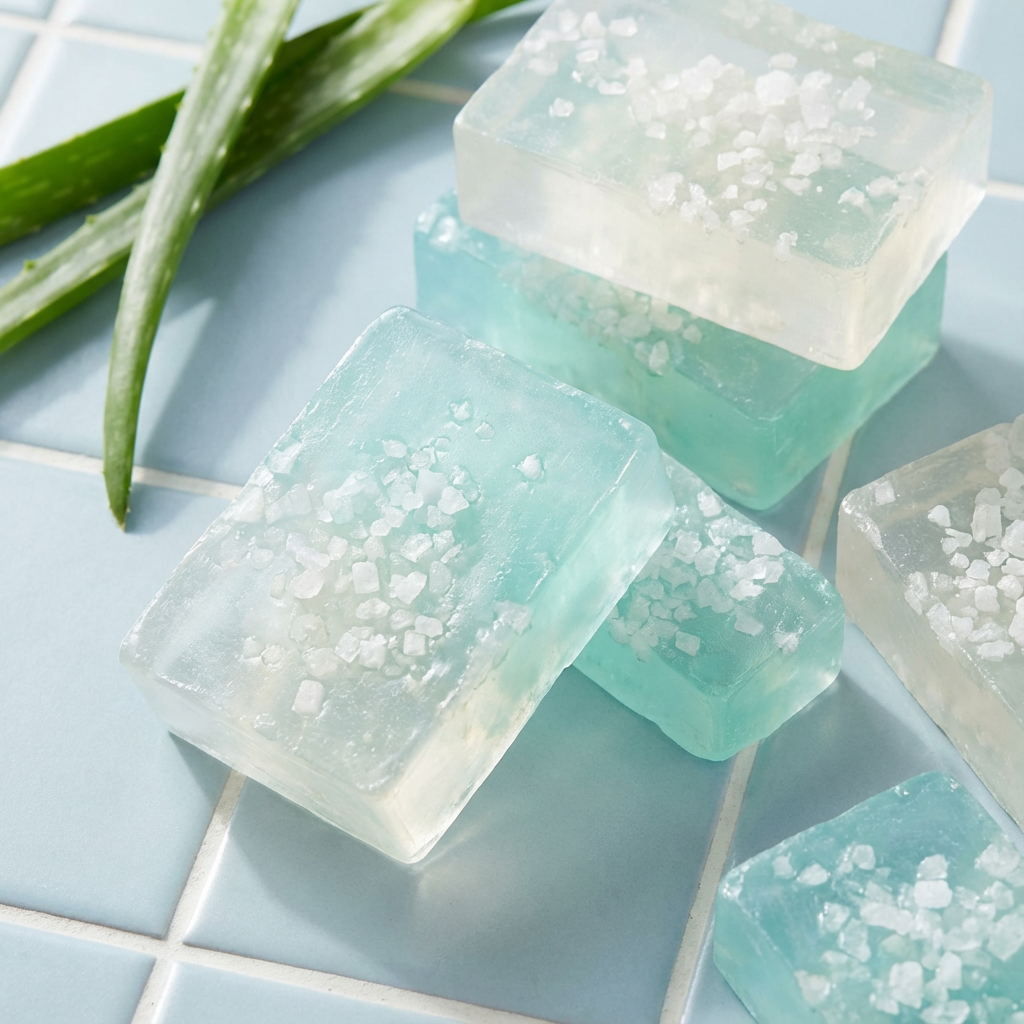
This bar feels like a reset. Dead Sea salt delivers a mineral-rich cleanse, while aloe adds a cooling, lightweight feel, making this soap especially refreshing. Visually, it’s clean and modern with subtle translucence, making it a great contrast to the softer, milkier bars earlier in the list.
Why You’ll Love This Bar
The combination of Dead Sea salt and aloe creates a bar that feels fresh and balanced. It’s especially popular for warmer weather, post-workout showers, or anyone who prefers a lighter, cleaner look without botanicals or heavy color.
Ingredients
- 1 lb melt-and-pour soap base (clear or aloe base works best)
- 1–2 tablespoons fine Dead Sea salt
- 2–3 tablespoons aloe vera gel (pure, unscented)
- 15–25 drops essential oil (spearmint, eucalyptus, or lemon works well)
- Rubbing alcohol (for bubbles)
- Silicone soap mold
How to Make It
- Cut the soap base into small cubes and melt slowly in a double boiler or in short bursts in the microwave, stirring between each until fully melted.
- Stir in the aloe vera gel until fully incorporated.
- Gently add the Dead Sea salt and mix just until evenly distributed.
- Add the essential oils, if using, and stir lightly.
- Pour the soap into your mold and spritz the surface with rubbing alcohol to remove bubbles.
- Let the soap set completely, about 1–2 hours, then unmold.
How to Use
This bar works well for hands and body, and when you want something that feels light and refreshing. It’s a great everyday soap that doesn’t feel heavy or overly rich.
Marble Swirl Sea Salt Soap with Gold Mica
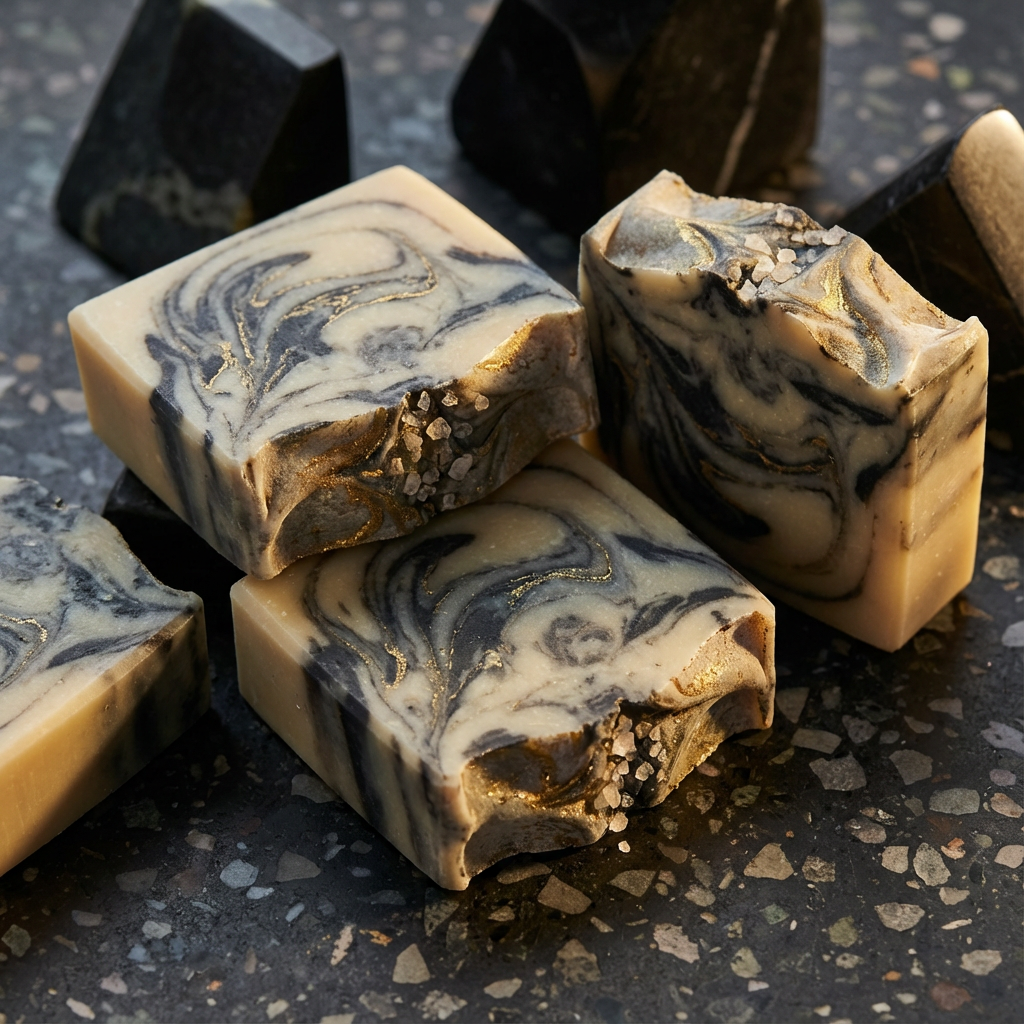
This is the bar that makes people stop scrolling. The soft marble swirl, the hint of gold catching the light, the kind of soap that looks like it belongs in a boutique display rather than a shower. Sea salt gives it structure and a clean feel, while gold mica adds just enough shimmer to elevate the design without overpowering it.
Why You’ll Love This Bar
This bar balances function with visual impact. Sea salt creates a firm, long-lasting soap, while the marble swirl technique keeps each bar one-of-a-kind. The gold mica adds a subtle, light-reflecting detail that feels indulgent without being flashy, making this a favorite for gifting and special occasions.
Ingredients
- 1½ lbs melt-and-pour soap base (clear base works best for swirl definition)
- 1–2 tablespoons fine sea salt
- Gold mica powder
- Black or charcoal mica (for contrast in the swirl)
- 20–30 drops essential oil (bergamot, sandalwood, or a light citrus blend works well)
- Rubbing alcohol (for bubbles)
- Silicone loaf mold or rectangular soap mold
How to Make It
- Melt the soap base and divide it into two containers.
- Leave one portion plain and mix black or charcoal mica into the second portion until evenly colored.
- Stir the fine sea salt into both portions, mixing gently.
- Pour alternating streams of each soap mixture into the mold to create a natural marble effect.
- Lightly dust the top with gold mica using a small brush or dry fingertip while the soap is still warm.
- Spritz the surface with rubbing alcohol and allow the soap to cool completely before unmolding and slicing.
How to Use
This bar works beautifully for hands and body and is often saved for guest bathrooms or gifting because of its appearance. It’s durable, long-lasting, and just as functional as it is beautiful.
Sea Salt + Citrus Peel Brightening Bar
This is the bar that wakes everything up. Sea salt provides structure and gentle exfoliation, while real citrus peel adds natural color, texture, and an instant mood boost. It feels bright, happy, and practical, making it a strong closer that balances all the richer, moodier bars earlier in the list.
Why You’ll Love This Bar
The combination of sea salt and citrus peel creates a soap that feels energizing without being harsh. The citrus peel adds visual interest and a naturally speckled look, while the scent leans clean and refreshing rather than sweet. It’s an easy favorite for kitchens, morning showers, and gifting.
Ingredients
- 1 lb melt-and-pour soap base (clear or shea butter base works well)
- 1–2 tablespoons fine sea salt
- 1–2 tablespoons dried citrus peel (orange, lemon, or grapefruit, finely chopped)
- 20–30 drops essential oil (sweet orange, lemon, or grapefruit work well)
- Rubbing alcohol (for bubbles)
- Silicone soap mold
How to Make It
- Cut the soap base into small cubes and melt slowly in a double boiler or in short bursts in the microwave, stirring between each until fully melted.
- Stir in the fine sea salt until evenly distributed.
- Gently fold in the dried citrus peel, mixing just enough to spread it throughout the soap.
- Add the essential oils, if using, and stir lightly to combine.
- Pour the soap into your mold and spritz the surface with rubbing alcohol to remove air bubbles.
- Allow the soap to set completely, about 1–2 hours, then unmold.
How to Use
This bar works well for hands and body, and is nice for morning routines or kitchen sinks. Its bright look and scent make it a popular everyday soap that feels cheerful without trying too hard.
🚨Using Botanicals in Soap Safely
Botanicals like dried flowers, herbs, and citrus peel are often used in handmade soap to add texture, color, and visual interest. When used correctly, they are safe, stable, and widely accepted for both melt-and-pour and cold-process soap making.
The key is understanding which botanicals to use, how to prepare them, and when they work best in finished bars.
Use Only Fully Dried Botanicals
Fresh flowers, fruit, or herbs contain moisture and natural sugars that are not suitable for soap. In contrast, thoroughly dried botanicals are shelf-stable and commonly used because finished soap bars do not retain the moisture needed for mold growth.
Popular dried botanicals used safely in soap include:
- Calendula petals
- Chamomile flowers
- Lavender buds
- Finely chopped dried citrus peel
As long as the botanicals are completely dry before use, they will not mold in soap.
Choose Fine Cuts Over Large Pieces
Smaller, finely chopped botanicals work better than whole flowers or thick peels. They distribute more evenly throughout the bar and are less likely to create rough edges or dark spots over time.
This is especially important for soaps used on hands or the body, where comfort matters just as much as appearance.
Understand How Botanicals Affect Appearance
Some botanicals keep their color well, while others naturally fade or darken once suspended in soap. This is normal and cosmetic, not a safety issue.
For example:
- Citrus peel often deepens slightly in color
- Calendula retains warm yellow tones
- Chamomile may soften to a pale tan
Knowing this ahead of time helps set realistic expectations for how the soap will look as it cures or sets.
Avoid Fresh Ingredients and Sugary Add-Ins
Fresh fruit, fresh herbs, and juices introduce excess moisture and sugars, which are better avoided unless a recipe is specifically formulated for them. When in doubt, opt for dried botanicals or properly strained infused liquids.
Less Is More
Botanicals are meant to complement a soap, not overwhelm it. Using small amounts keeps bars comfortable to use, visually balanced, and long-lasting.
When used thoughtfully, botanicals add character and warmth to handmade soap while remaining safe, stable, and practical for everyday use.
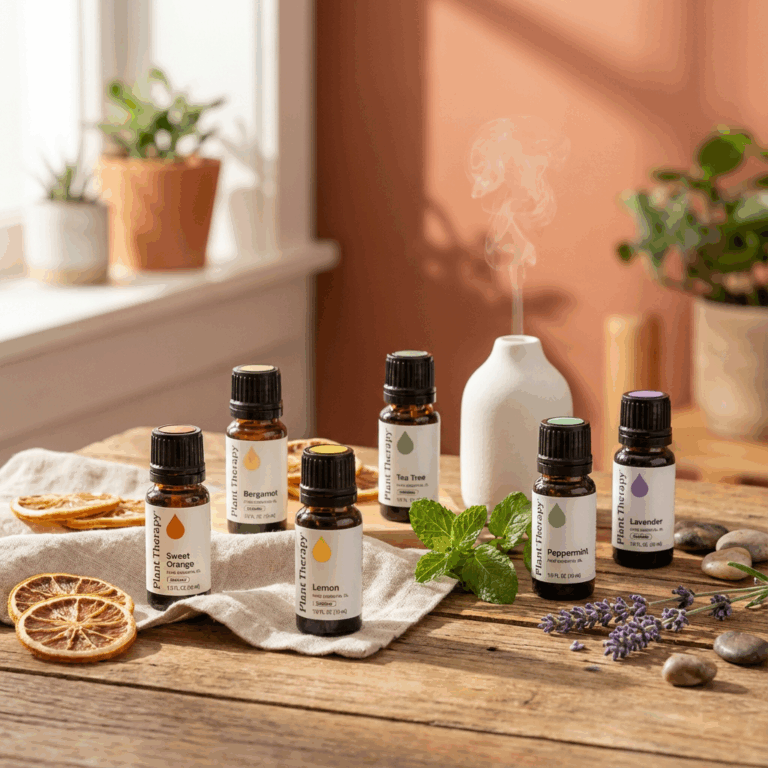
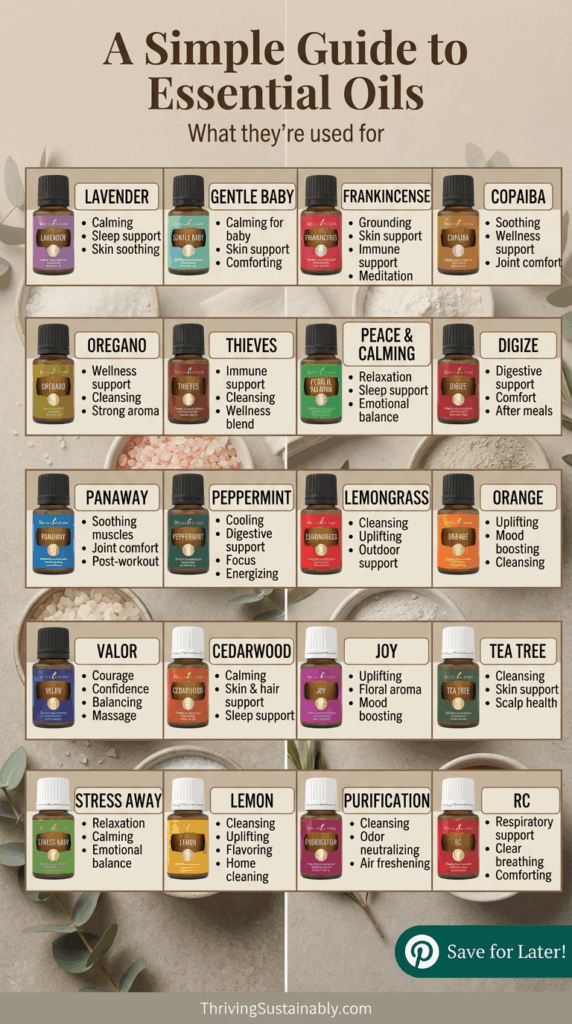
Essential Oils Used in Homemade Soap
Essential oils play a significant role in homemade soap, adding scent, character, and functional benefits to each bar. From calming florals to fresh citrus and grounding woods, the oils you choose can completely change how a soap feels to use.
In soap making, essential oils are typically used for fragrance and overall experience rather than direct skin treatment. Still, understanding which oils are commonly used, how they’re described, and what they’re best known for can help you choose blends that feel intentional and balanced.
Below is a quick visual overview of popular essential oils and what they’re commonly used for. If you’re interested in learning which oils are best for your skin and how to use them safely, we’ve put together a more in-depth guide.
⚠️ Essential Oil Safety for Soap Making
Essential oils are highly concentrated and should always be used thoughtfully in homemade soap. Stick to skin-safe usage rates, avoid applying undiluted oils directly to the skin, and note that some essential oils may not be suitable for children, pregnant women, or people with sensitive skin. When in doubt, choose gentle oils, use lower amounts, and follow established soap-making guidelines for safe dilution.
📝 What You’ll Need to Make These Homemade Soap Recipes (Depending on the Bar You Choose)
- Soap Bases – Melt-and-pour soap base (shea butter, goat milk, clear, or aloe)
- Salts – Choose from Fine, Himalayan Pink, or Dead Sea Salts
- Clays
- Botanicals
- Essential Oils
- Lavender
- Eucalyptus
- Tea tree
- Peppermint
- Citrus oils (lemon, orange, grapefruit)
- Tools & Supplies
FAQs About Homemade Soap Recipes
Yes. Most homemade soap recipes are flexible. You can swap salts, clays, or essential oils depending on availability and preference, as long as substitutions are skin-safe and used in appropriate amounts.
No, as long as botanicals and citrus peel are fully dried before use. Finished soap bars do not contain enough moisture to support mold growth, which is why dried botanicals are commonly used in soap making.
Melt-and-pour soap bars can last a year or longer when stored in a cool, dry place. Salt bars tend to be especially long-lasting because of their firm texture.
Many of these recipes use gentle ingredients like kaolin clay, oat milk, and chamomile. However, everyone’s skin is different. If you have sensitive skin, start with unscented or lightly scented bars and patch test before regular use.
Final Thoughts on Making Homemade Soap
Homemade soap doesn’t have to be complicated to feel special. With a few well-chosen ingredients like salt, clay, botanicals, and essential oils, you can create soap bars that look beautiful, feel intentional, and fit easily into everyday routines.
Whether you’re drawn to bold, layered designs or softer, botanical blends, the recipes in this guide are meant to be flexible and approachable. You don’t need to make every bar or buy every ingredient at once. Start with the soaps that speak to you, experiment at your own pace, and let the process be part of the enjoyment.
As you build confidence, you’ll likely find that homemade soap becomes more than a DIY project. It turns into a creative outlet, a thoughtful gift, or a small ritual that adds meaning to daily life. However you use it, making your own soap is a simple way to bring a little care and creativity back into something you use every day.
Don’t Miss: Plastic-Free Living 👉 Making your own soap is one small step toward reducing plastic use. This guide explains why reducing plastic is so important, how it affects the environment and our health, and what it means for the products we use every day. Read more →