Key Takeaways
- DIY beeswax paper is a reusable, low-waste replacement for plastic wrap made with cotton fabric, beeswax, and natural oils.
- It’s budget-friendly — making your own wraps costs far less than buying store-bought versions.
- The wraps mold easily around bowls and food, last for months, and help reduce single-use plastic in the kitchen.
Plastic wrap is one of those kitchen items we rarely think about… until we realize how much of it we go through. Most brands can’t be recycled, and once they land in the trash, they don’t break down. According to the U.S. EPA, plastic film and wrap are among the most common types of plastic waste, contributing millions of tons to landfills each year. All for something we use for just a few minutes at a time, and takes hundreds of years to decompose.
DIY beeswax wraps are one of the simplest, most satisfying swaps you can make. They’re reusable, smell amazing, look beautiful in your kitchen, and replace dozens of rolls of plastic wrap every year. Even better, they’re incredibly easy to make at home with just a few ingredients.
If you’ve been wanting to reduce kitchen waste without sacrificing convenience, beeswax wraps are a perfect place to start.
What Is Beeswax Paper?
Beeswax paper is a reusable, eco-friendly alternative to plastic wrap made by coating cotton fabric with melted beeswax, a little oil, and sometimes pine resin. Once the mixture cools, the fabric becomes flexible, slightly sticky, and easy to mold around bowls, jars, produce, sandwiches, and snacks, working much like traditional plastic wrap but without the waste.
Because beeswax paper warms with the heat of your hands, it gently softens and holds its shape as it cools, making it ideal for everyday food storage. It’s washable, lasts for months, and can be refreshed or composted at the end of its life.
Beeswax paper is one of the simplest low-waste swaps for your kitchen: it feels familiar, performs beautifully, and helps you cut down on single-use plastics without sacrificing convenience.
6 Benefits of Beeswax Paper 🐝
Beeswax paper isn’t just a creative craft project—it’s a genuinely helpful swap that transforms how you store food while cutting down on plastic waste. Here’s what makes it so effective:
1. It replaces single-use plastic wrap
Beeswax paper functions similarly to plastic wrap but can be reused for months. Instead of tearing off a piece, using it once, and throwing it away, you can reach for the same wrap over and over. This slight shift keeps plastic film (one of the most commonly landfilled plastics) out of the waste stream and saves you money in the long term.
2. It’s naturally antimicrobial
Beeswax has mild antimicrobial and water-resistant properties. When applied to cotton, it creates a breathable barrier that helps protect food without trapping excess moisture. This makes beeswax paper especially helpful for items like cheese, herbs, and produce that benefit from air circulation rather than being sealed in airtight plastic.
3. It molds easily with your hands
Beeswax softens with gentle heat. When you press beeswax paper around a bowl or piece of food, the warmth of your hands makes it flexible and slightly sticky. Once it cools, it firms up and holds its shape, creating a natural seal—no plastic needed.
4. It’s washable and long-lasting
With simple care, beeswax paper can last six months to a year. Just wash it in cool water with mild soap, then let it air-dry. Because the wax repels water, cleanup is quick. And if the coating wears off over time, you can refresh it by adding a new layer of melted wax.
5. It’s compostable at the end of its life
When beeswax paper reaches the end of its lifespan, you don’t have to throw it in the trash. If it’s 100% cotton coated with beeswax, oil, and resin, you can compost it or cut it into strips for fire starters. It naturally breaks down, leaving nothing behind.
6. It looks beautiful in your kitchen
Beeswax paper adds a warm, hand-crafted touch to everyday tasks. Whether you use floral prints, bold patterns, or whimsical designs, your wraps can feel like a small moment of joy every time you reach for them. It’s a sustainable swap that’s functional and aesthetically pleasing.
What You Need to Make Beeswax Paper
You only need a handful of simple, affordable ingredients to make beeswax paper at home. Most of them last through multiple batches, so one small set of supplies can create several wraps.
| Item | Why It Matters |
|---|---|
| 100% Cotton Fabric | Lightweight cotton like quilting cotton, muslin, or old sheets. Thinner fabric absorbs wax evenly and makes the beeswax paper flexible and easy to mold. |
| Beeswax Pellets or Grated Beeswax | The main coating that gives structure. Pellets melt quickly and evenly, but grated beeswax from a block also works. Natural, unbleached beeswax is ideal. |
| Jojoba Oil or Coconut Oil | A small amount of oil keeps the beeswax paper soft and prevents cracking. Jojoba oil is especially stable; coconut oil is a common, easy-to-find option. |
| Pine Resin (Optional) | Adds extra stickiness so the beeswax paper clings more like store-bought wraps. Optional but helpful if you want a stronger seal. |
| Parchment Paper | Protects your baking sheet or ironing surface and prevents melted wax from sticking. Essential for easy cleanup. |
| Baking Sheet or Iron | Use a baking sheet for the oven method or an iron for the no-oven method. Both work well to melt and set the wax coating on the fabric. |
| Silicone Brush | Helps spread melted wax evenly across the fabric so there are no dry spots or thick pools. |
| Scissors or Pinking Shears | Used to cut fabric to size. Pinking shears help reduce fraying and give your beeswax paper a neat, finished edge. |
How to Make Beeswax Paper
Making beeswax paper is simple, but the little details make a big difference in how smooth, durable, and flexible your wraps turn out. Here’s a deeper guide to each step.

Step 1: Cut Your Fabric
Cut 100% cotton fabric to your desired sizes—8×8 inches for snacks, 10×10 for sandwiches, and 12×12 for covering bowls. Thinner cotton (such as quilting cotton or muslin) absorbs wax more evenly, resulting in a softer, more flexible wrap.
Using pinking shears helps keep the edges from fraying over time, especially after repeated washing. If you’re reusing old fabric, make sure it’s clean and free of any fabric softener, which can repel wax.
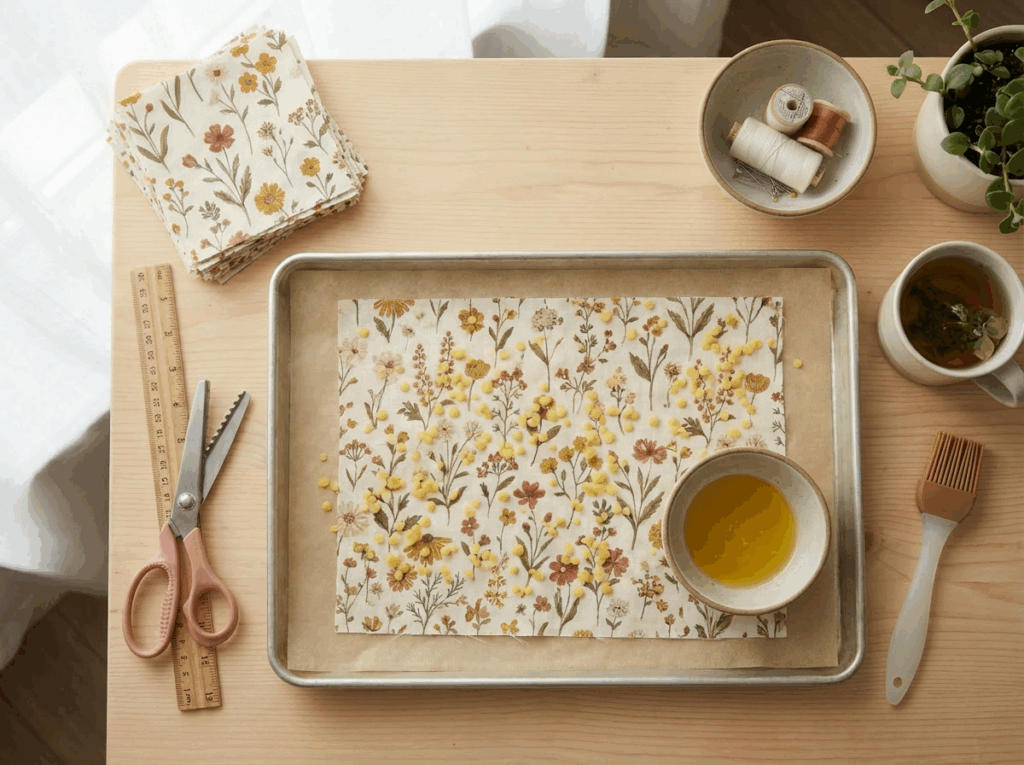
Step 2: Add the Beeswax Mixture
Place your fabric on a parchment-lined baking sheet. Sprinkle beeswax pellets across the entire surface in a thin, even layer. A little goes a long way—too much wax will make the wrap stiff or tacky.
If you’re adding jojoba or coconut oil, a light drizzle helps soften the coating. Pine resin (optional) makes the wrap slightly sticky, which helps it cling more like store-bought beeswax wraps.
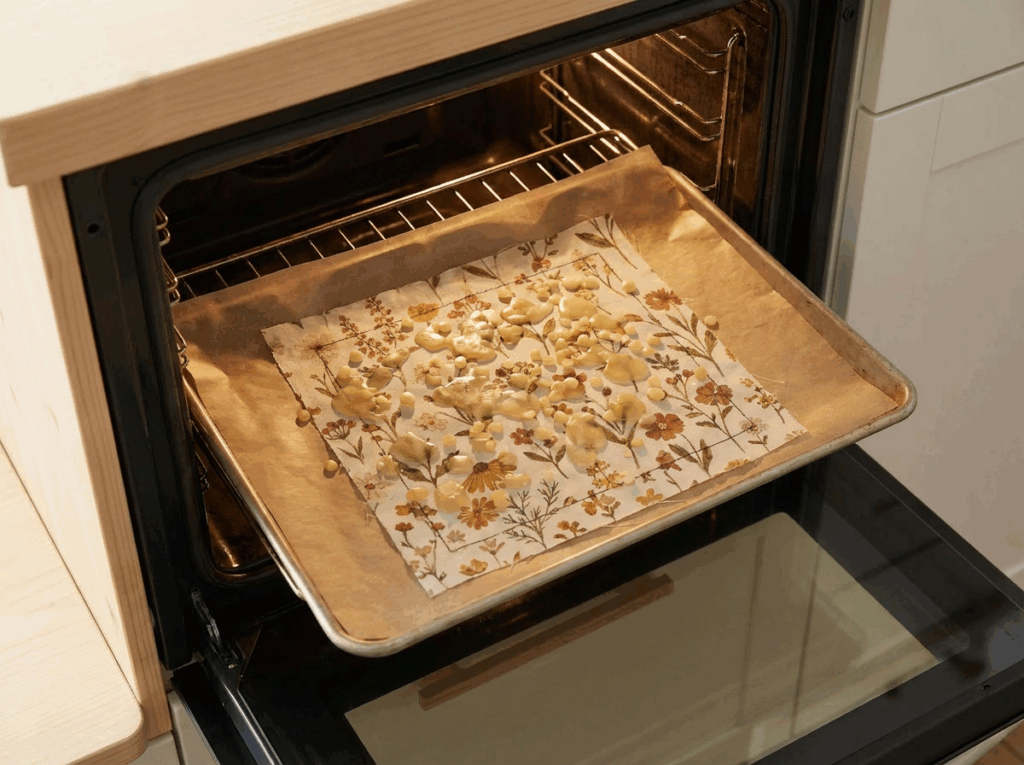
Step 3: Melt the Wax in the Oven
Slide the baking sheet into a 200–225°F (93–107°C) oven for 3–5 minutes. Watch it closely, the wax melts fast.
As it melts, you should see the fabric darken slightly and become fully saturated. If dry patches remain, don’t worry—Step 4 takes care of that.
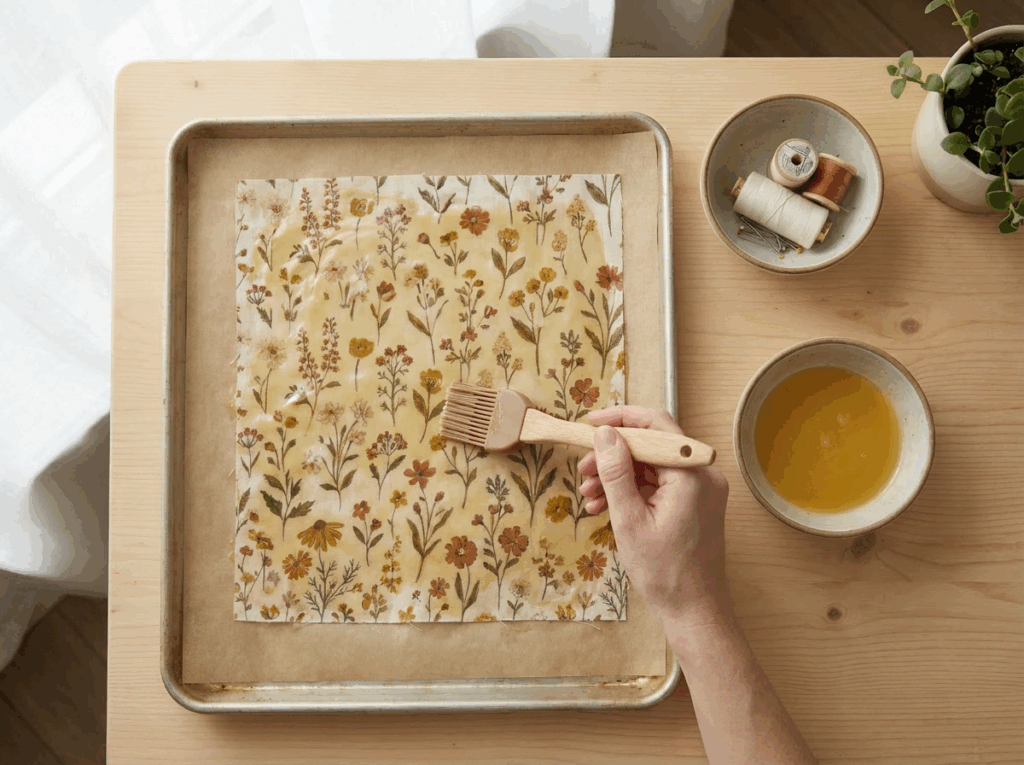
Step 4: Brush and Even Out the Wax
Remove the warm tray from the oven and use a silicone brush to spread the melted wax evenly from edge to edge. This step ensures the wrap has a smooth, balanced coating rather than areas that are too thin or too thick.
If you see spots where the wax absorbed quickly, add a few more pellets and pop it back in the oven for another minute.
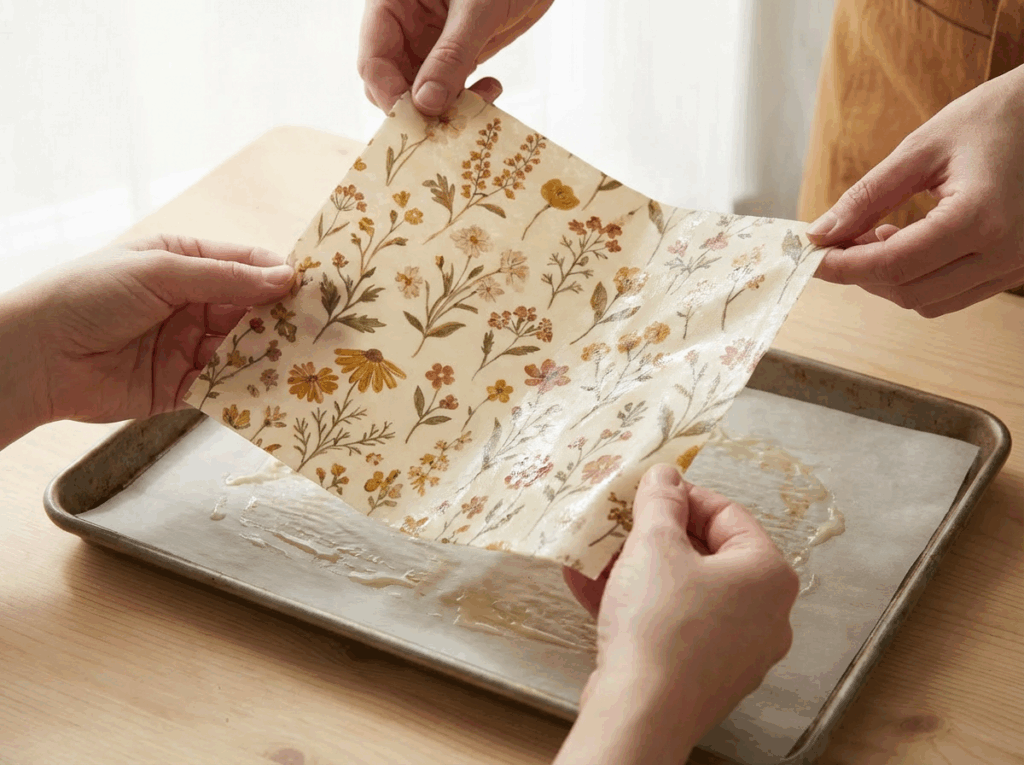
Step 5: Lift and Cool
Carefully lift the beeswax paper from two corners and gently wave it in the air for about 10–20 seconds. As it cools, the wrap will quickly change from glossy and soft to matte and slightly firm.
This cooling step helps set the coating so the wrap doesn’t pool or collect thick spots.
Troubleshooting tip: If the wrap feels greasy or too sticky after cooling, it likely has too much wax. Just reheat it and blot lightly with another piece of fabric or parchment.
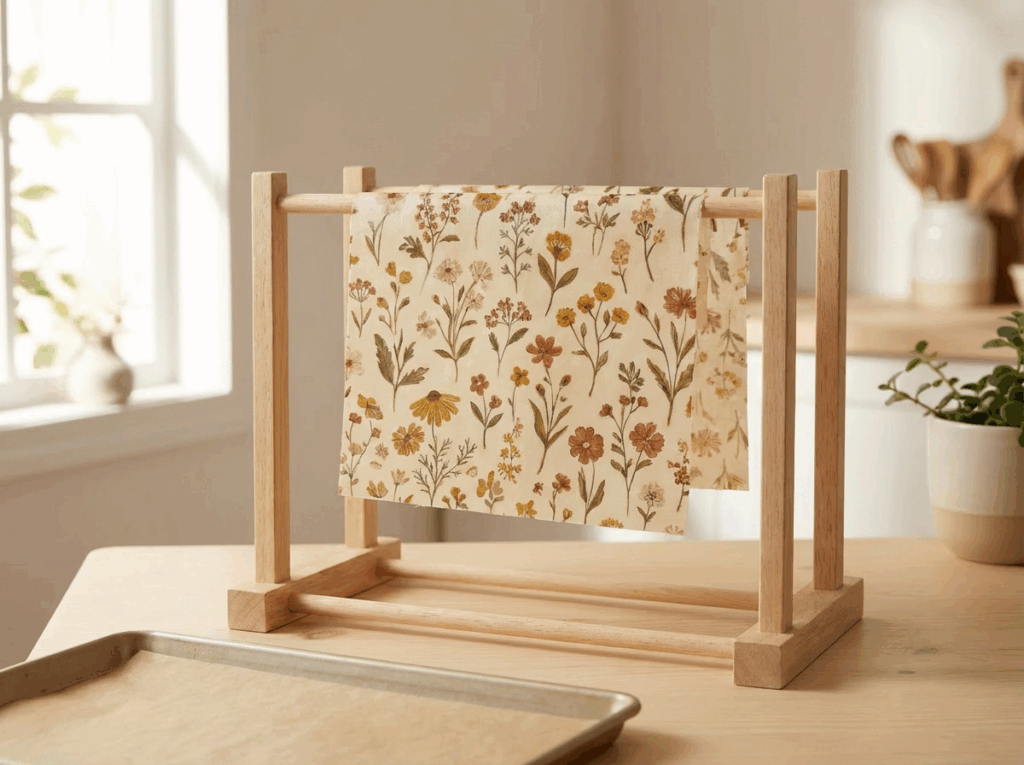
Step 6: Dry on a Rack
Lay or hang the beeswax paper on a cooling rack until it is fully dry and set. This prevents the surface from developing creases or pressure marks. Letting it cool flat also helps ensure the wax hardens evenly across the entire piece.

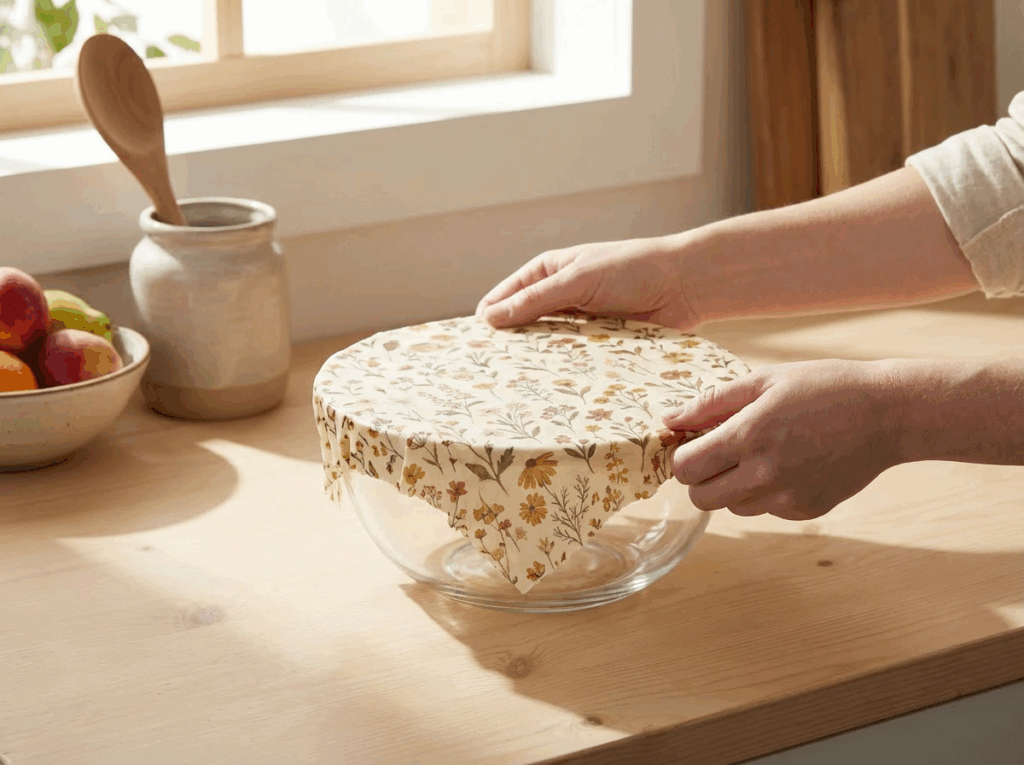
Step 7: Use Your Finished Beeswax Paper
Your beeswax paper is ready to use once it’s fully cooled. Simply press it around a bowl, jar, or piece of produce and use the warmth of your hands to soften the wax and mold it into place. It will hold its shape as it cools.
Beeswax paper works especially well for cheese, herbs, bread ends, nuts, and covering leftovers.
✨tip
Protect Your Coating
Avoid using beeswax wraps on raw meat or very hot foods, as heat can melt the coating.
How to Care for Beeswax Paper
A little care goes a long way in keeping your beeswax paper flexible, sticky, and long-lasting. With the right handling, a single wrap can last six months to a year.
- Wash With Cool Water Only: Heat softens wax, so always wash your beeswax paper in cool water. Add a small amount of mild dish soap and gently wipe it clean with your hands or a soft cloth.
- Let It Air Dry: Lay your wrap flat or drape it over a drying rack. Beeswax repels water, so it dries quickly without needing a towel.
- Store It Flat or Rolled: You can fold your wraps neatly in a drawer or roll them and tuck them into a jar. Avoid tight creasing, which can wear down the coating over time.
- Refresh When Needed: If your wrap starts to look dull or loses its tackiness, simply repeat the melting-and-brushing process from the tutorial. Adding a thin new layer of wax can make it feel brand new again.
Common Mistakes & How to Fix Them
Even simple DIY projects come with quirks. If your beeswax paper doesn’t look or feel quite right on the first try, these quick adjustments usually solve the problem instantly.
| Mistake | How to Fix It |
|---|---|
| Wrap Feels Too Sticky | This usually means there’s too much wax or pine resin. Warm the wrap in the oven for 1–2 minutes, then place a clean piece of cotton or parchment on top to absorb the excess coating. |
| Wrap Is Stiff or Cracking | A brittle wrap needs more oil. Add a tiny drizzle of jojoba or coconut oil, reheat briefly, and brush to distribute evenly until the texture softens. |
| Uneven Coating or Dry Spots | Some areas simply didn’t get enough melted wax. Sprinkle a few more pellets on the dull patches and return the wrap to the oven. Brush while warm to even out the coating. |
| Fabric Absorbed All the Wax | Thicker cottons can soak up wax quickly. Add a more generous layer of wax mixture and reheat. For future wraps, choose thinner cotton fabrics for more consistent results. |
| Edges Curl After Cooling | Curling happens when the edges don’t get enough wax. Brush additional melted wax around the perimeter and warm again briefly to help the edges lie flat. |
| Beeswax Smell Feels Strong | The natural beeswax scent fades with use. Air the wrap on the counter overnight or use it on produce for a day or two—this quickly softens the aroma. |
Creative Ways to Use Beeswax Paper
Beeswax paper is incredibly versatile. Once you have a few wraps on hand, you’ll start reaching for them constantly. Here are some creative, practical ways to put them to work:
🧀 Wrap Cheese the Right Way
Cheese needs airflow to stay fresh, and beeswax paper provides the perfect breathable barrier. It prevents drying without trapping moisture, making it ideal for cheddar blocks, parmesan wedges, and soft cheeses.
🥗 Cover Bowls or Glass Containers
Press beeswax paper around bowls, jars, or leftover containers. The warmth of your hands softens the wax so it clings naturally to the rim—no plastic wrap needed.
🌿 Keep Herbs Fresh Longer
Wrap delicate herbs like cilantro, parsley, or basil loosely. The breathable coating maintains moisture without suffocating the leaves, helping them stay crisp longer.
🥪 Make Snack or Sandwich Pouches
Beeswax paper folds beautifully. Turn a square into a reusable snack bag for nuts, crackers, berries, or lunchbox treats—lightweight, cute, and waste-free.
🍎 Cover Cut Produce
Use beeswax paper to cover half-cut fruits and veggies—apples, onions, cucumbers, avocados, and more. It slows browning and helps retain freshness.
🍞 Wrap Bread or Sourdough Ends
Covering the cut end of a loaf with beeswax paper protects the crumb from drying out while keeping the crust crisp. Perfect for homemade or artisan bread.
🧅 Reduce Refrigerator Odors
Because beeswax paper molds to shape, it can help contain more pungent smells like onions or cheese without needing an airtight plastic container.
🧼 Store Soap Bars for Travel
Beeswax paper is water-resistant, making it an excellent wrap for soaps or solid toiletries when you’re on the go. No mess, no plastic bag needed.
Want to Learn More on Why Reducing Plastic Matters? See how small swaps like beeswax paper fit into a bigger effort to cut plastic waste and make everyday choices more sustainable. Read more →FAQs on DIY Beeswax Paper
Beeswax paper works well for most foods like cheese, herbs, fruit, bread, and leftovers. Skip using it on raw meat, hot foods, or anything oily or acidic enough to break down the coating (like pineapple). Heat can melt the wax, and raw meat requires airtight storage for safety.
With proper care, beeswax paper typically lasts six months to a full year. Its lifespan depends on how often you use it, how gently you wash it, and the thickness of the wax coating. If it starts to look dull, you can refresh it easily.
Yes, beeswax paper can be used in the freezer for short-term storage. It works well for bread, baked goods, and cut produce. Just avoid using it for liquids or long-term freezing where airtight sealing is needed.
Yes—if your wrap is made with 100% cotton, beeswax, oil, and optional resin, you can compost it at the end of its life. Cut it into small strips to help it break down faster.
Final Thoughts on DIY Beeswax Paper
Small changes really do add up. Making your own beeswax paper is one of those simple, satisfying projects that save money, reduce waste, and replace a product most of us use without thinking. It’s a gentle reminder that sustainable living doesn’t have to be complicated. Sometimes, it’s as easy as choosing materials that last, making things with your own hands, and finding joy in the everyday routines of your kitchen.
If this DIY inspired you, try experimenting with different fabric patterns, sizes, or gift sets for friends. Every wrap you make is one less roll of plastic heading to the landfill and that’s a win worth celebrating.
More DIY Projects to Help Reduce Waste
If you enjoyed making beeswax paper, here are more simple DIY projects that cut down waste and help create a more sustainable home:
DIY Shower Steamers
https://thrivingsustainably.com/diy-shower-steamers/
Easy Oven Cleaning Hacks
https://thrivingsustainably.com/oven-cleaning-hacks
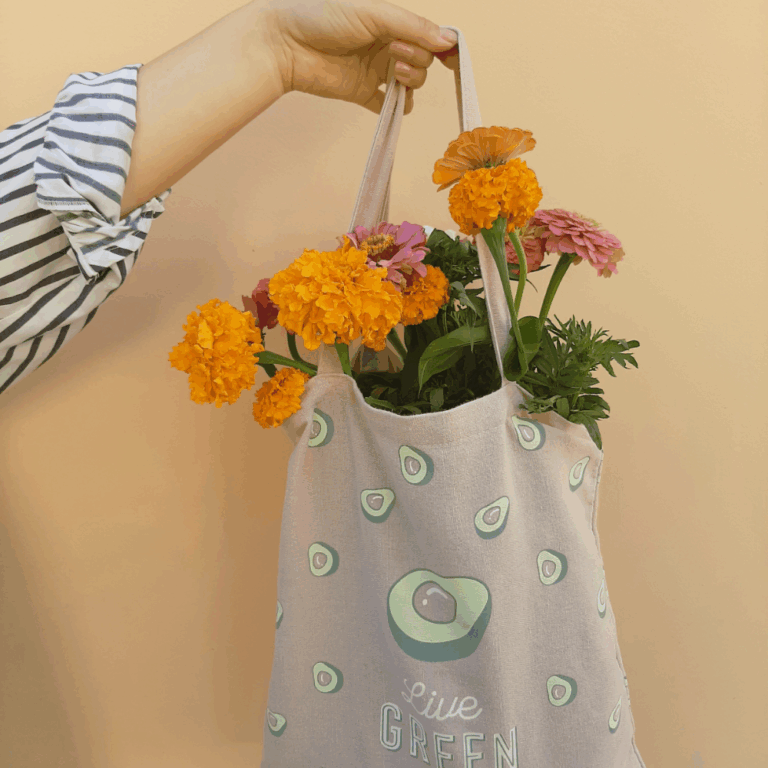
DIY Reusable Bags
https://thrivingsustainably.com/diy-bags
DIY Cleaning Products
https://thrivingsustainably.com/diy-cleaning-products
Homemade Laundry Powder Detergent
https://thrivingsustainably.com/homemade-laundry-powder-detergent