
Key Takeaways
- Rising food costs have inspired more people to grow their own produce — vertical hydroponics offers a cost-effective, space-saving solution.
- These systems use water and nutrients efficiently, producing clean, soil-free food year-round with minimal waste.
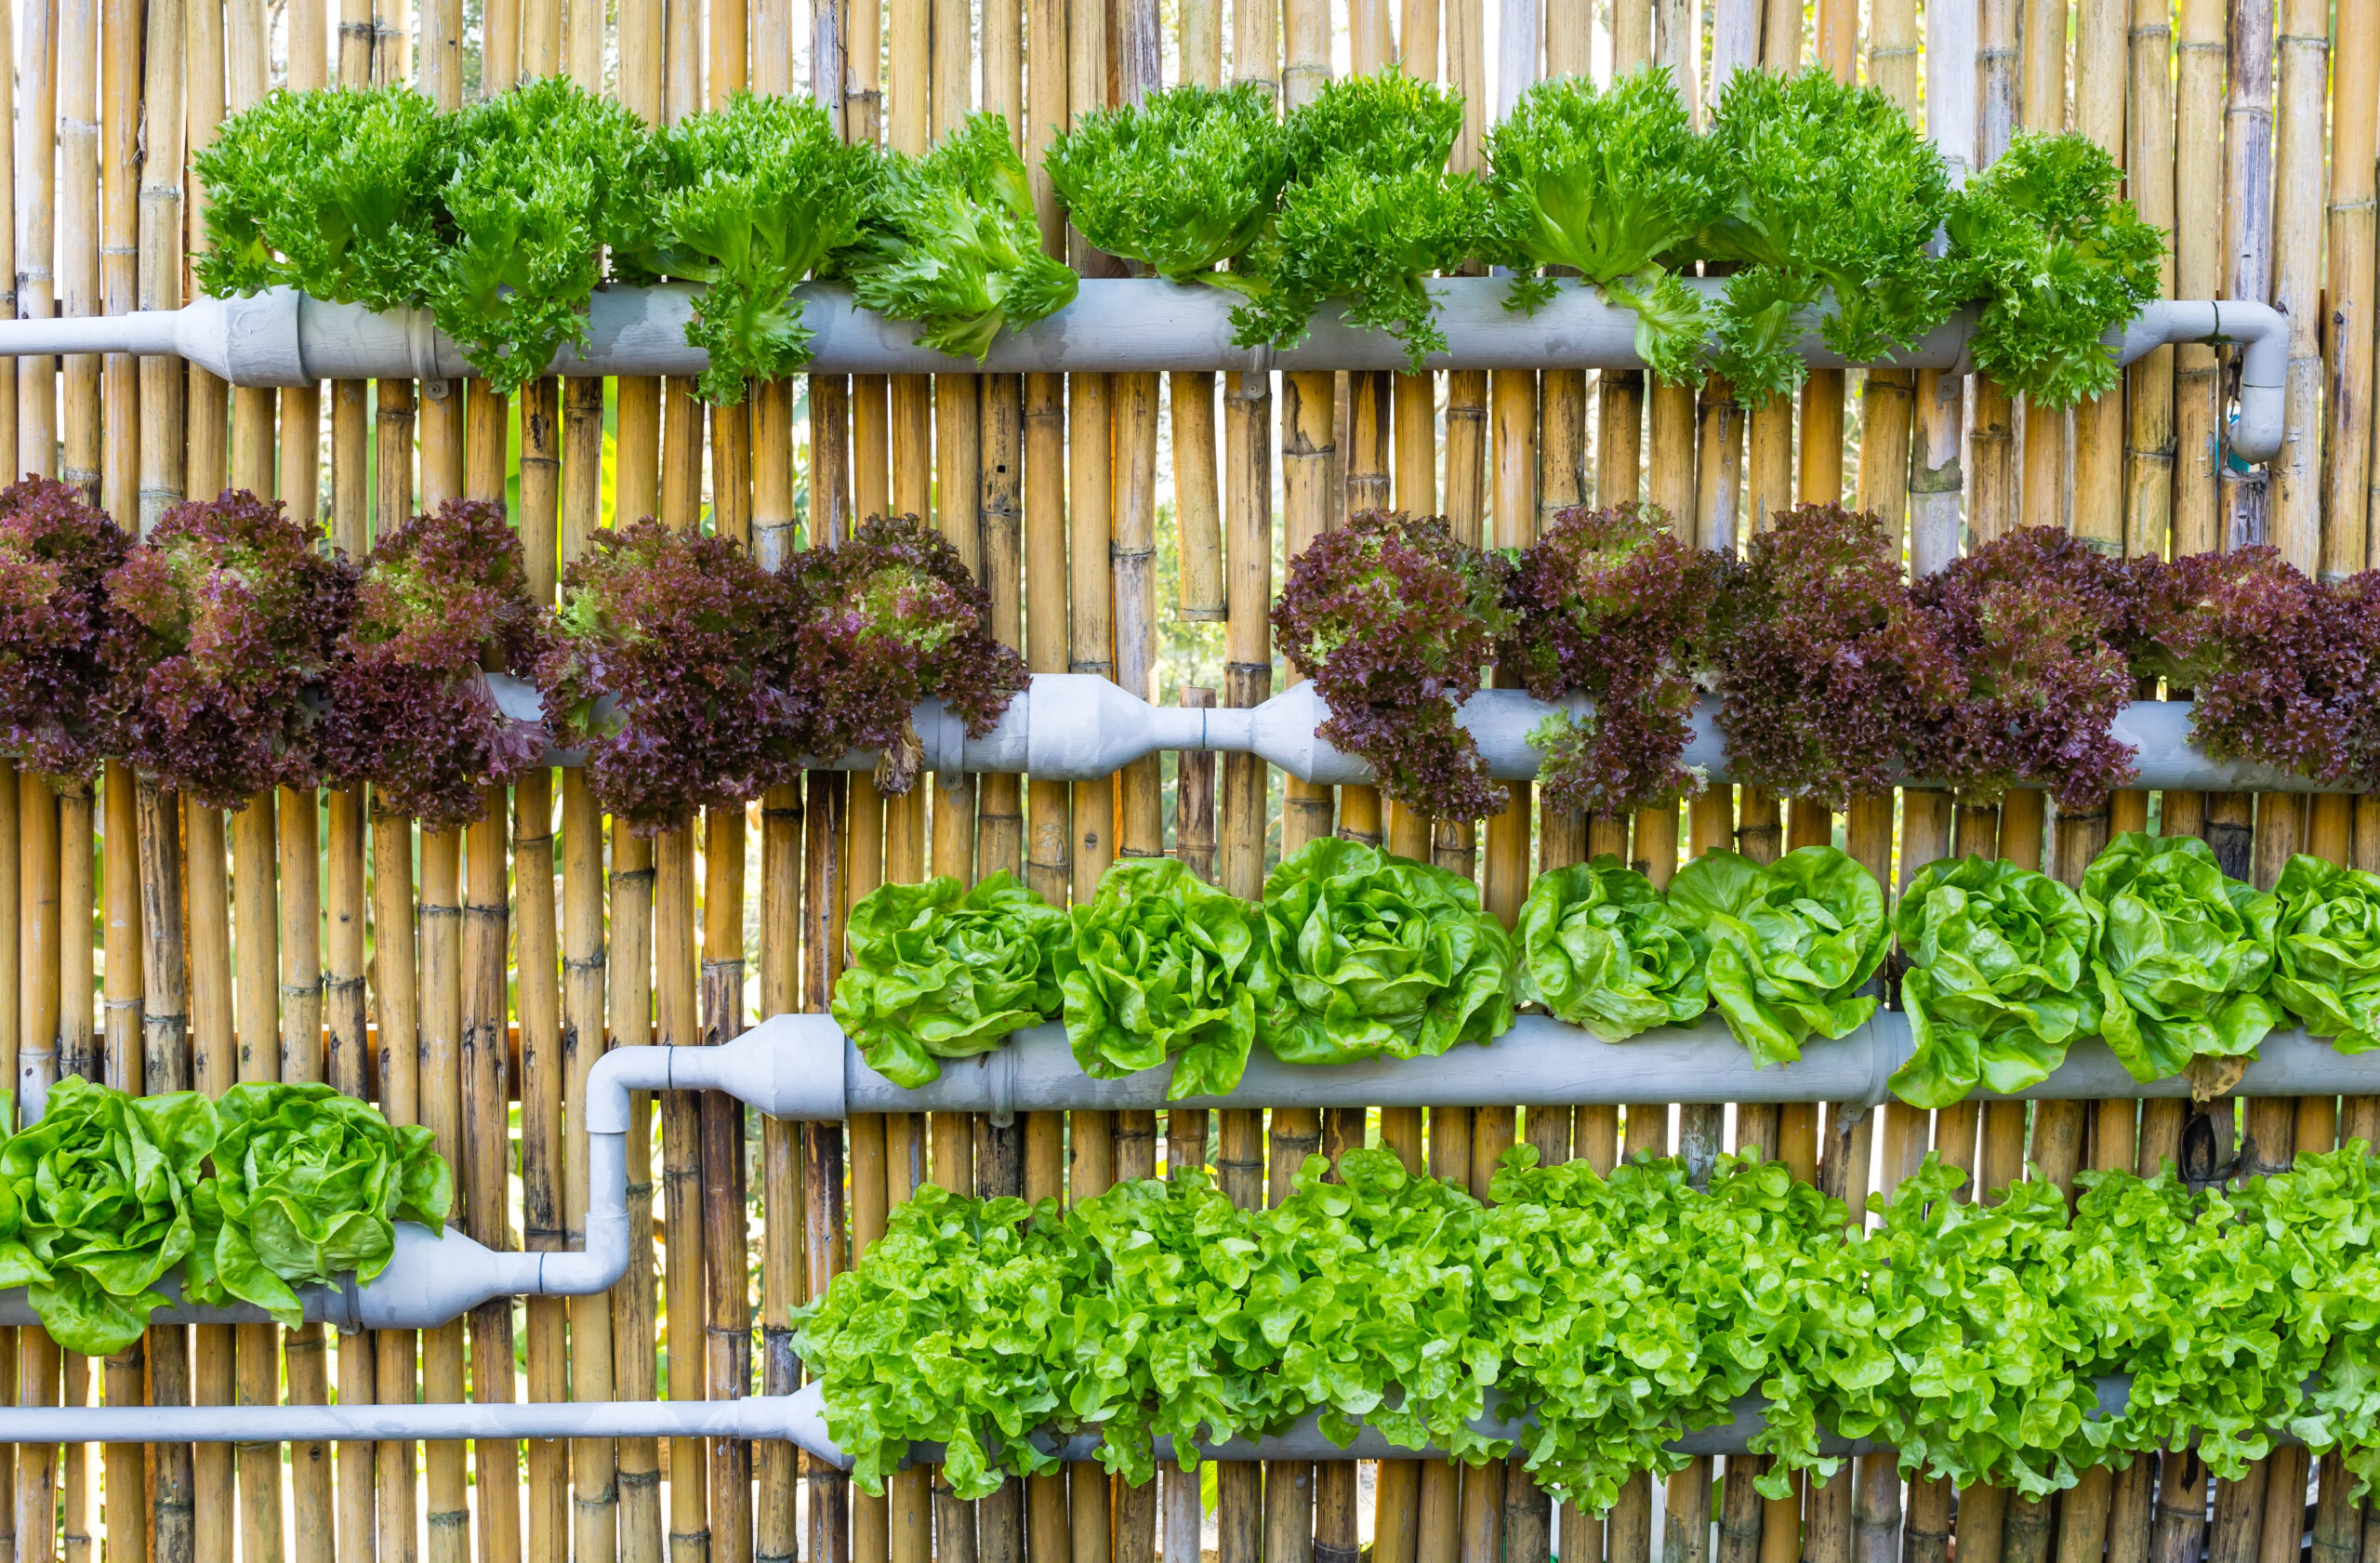
- Choosing sustainable materials like bamboo or stainless steel helps reduce plastic pollution and supports long-term eco-friendly living.
Imagine growing crisp lettuce and fragrant herbs at home while cutting your grocery bill over time. As food prices have risen 23.6% between 2020 and 2024, according to the U.S. Department of Agriculture’s Economic Research Service, more people are turning to hydroponics to take control of their food supply.
A vertical hydroponic garden is like a high-rise for plants. Instead of spreading across the ground, they grow upward in stacked layers, saving space, reducing waste, and eliminating the need for soil. It’s a clean, efficient way to enjoy fresh, homegrown produce year-round — even without a backyard.
In this guide, you’ll learn how to design, build, and maintain your own vertical hydroponic system. We’ll cover how to plan your space, choose sustainable materials, set up irrigation, and keep your plants thriving so you can grow food that’s fresh, affordable, and eco-friendly right at home.
What Is a Vertical Hydroponic Garden?
A vertical hydroponic garden is like a high-rise apartment for plants. Instead of spreading out in a big backyard, your veggies grow upward in stacked layers, which saves space and makes it easy to grow food without any soil. Everything the plants need comes from a water-based system that delivers nutrients right to their roots.
In regular gardening, roots must dig through soil to find water and nutrients. With hydroponics, the plants don’t have to search for nutrients; they come directly to them. Depending on the setup, roots may sit in nutrient-rich water, be misted with minerals, or grow in a soil-free medium, such as coconut coir or clay pebbles.
The best part? Vertical hydroponic gardens use about 75–90% less water than traditional gardening, don’t rely on chemical pesticides, and can grow fresh produce year-round. That means you can have a thriving garden even in a small apartment with little sunlight.
Why Choose a Vertical Hydroponic Garden?
A vertical hydroponic garden isn’t just about growing plants upward instead of outward — it’s about changing how we think about growing food. Instead of using soil, these gardens feed plants directly through water filled with nutrients.
That means you can grow more food in less space, save water, skip the chemicals, and enjoy fresh produce all year long. Whether you live in a small apartment or have plenty of outdoor space, hydroponics makes growing your own food rewarding and straightforward.
🌱 Big Yields in Small Spaces
One of the best things about going vertical is how much you can grow in a tiny area. Instead of spreading plants across the ground, you stack them in layers like a living wall of greens. This design can produce three to ten times more food than a regular soil garden in the same amount of space.
✨ Example: A single 6-foot hydroponic tower can grow about 30 heads of lettuce, the same as a garden bed that takes up 20 square feet! It’s perfect for balconies, patios, or even sunny kitchen corners. Plus, you don’t have to bend, kneel, or weed — harvest at eye level and enjoy.
💧 Major Water Savings
Hydroponics is famous for how little water it uses, and NASA helped prove it. While studying ways to grow food in space, NASA found that hydroponic systems can grow plants using up to 90% less water than soil-based gardening. The reason is simple: instead of losing moisture to evaporation or runoff, these systems recycle the same nutrient-rich water repeatedly.
That makes hydroponics a wise choice for anyone who wants to conserve water or live more sustainably, whether you’re gardening in a desert climate or just trying to reduce household water use.
🌿 Cleaner, More Sustainable Growing
Because hydroponic gardens don’t use soil, you don’t have to worry about weeds, pests, or diseases that hide in the dirt. That means fewer pesticides and healthier plants.
At Thriving Sustainably, we always encourage using eco-friendly materials like bamboo, stainless steel, or recycled parts instead of PVC pipes, which can break down over time and release microplastics. These swaps make your system safer for your plants and better for the planet.
🌞 Year-Round Freshness
With vertical hydroponics, you can enjoy crisp lettuce, basil, or strawberries any time of year. Indoors, LED grow lights can replace sunlight; outdoors, you can protect your setup with a simple greenhouse cover in colder months.
You can even change your nutrients with the seasons, more nitrogen for leafy greens in spring, more potassium for fruiting plants in summer. Once everything’s running, your garden practically takes care of itself, giving you fresh food whenever you need it.
Plan and Design a Vertical Hydroponic Garden
Ready to grow your food, even without a backyard? A vertical hydroponic garden is the perfect way to maximize space and enjoy fresh, homegrown produce. While materials like PVC pipes are commonly used, you can explore more sustainable options, like food-grade stainless steel, bamboo, or recycled materials, to reduce plastic usage. Here’s how to get started:
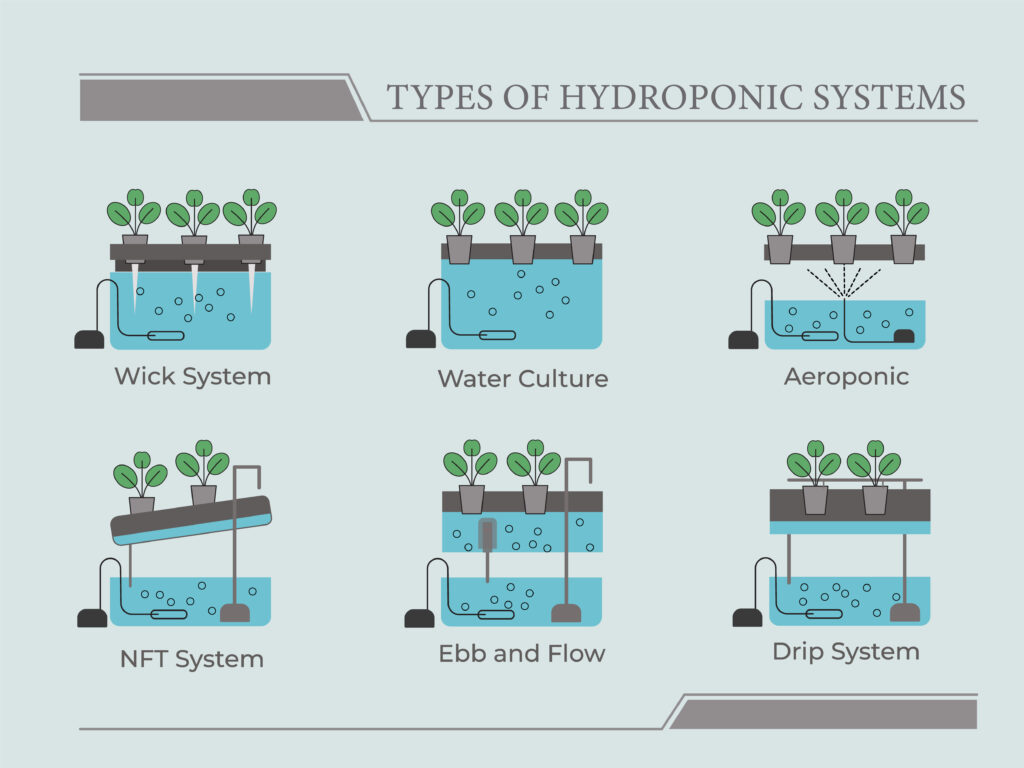
Which System Works Best for You
Not all hydroponic gardens work the same way, and choosing the correct setup can make all the difference. Each system moves water and nutrients to your plants a little differently, offering unique benefits depending on your space, budget, and how hands-on you want to be.
Some are simple enough for beginners and small spaces, while others use precise timers and pumps for serious growers looking to maximize yield. The chart below breaks down the most popular hydroponic systems so you can find the best match for your home or garden.
| System Type | Pros | Cons |
|---|---|---|
| Wick System | Simple to set up, no pumps or electricity required, great for beginners. | Limited to small plants; slower nutrient delivery; not ideal for large gardens. |
| Water Culture | Low cost, provides constant nutrient access to roots, fast growth for leafy greens. | Harder to adapt for vertical setups; roots may suffocate without proper oxygenation. |
| Aeroponic System | Uses minimal water, delivers high oxygen to roots, excellent growth rates. | More expensive; needs precise timers and regular maintenance to prevent clogs. |
| Nutrient Film Technique (NFT) | Efficient water use, continuous nutrient flow, ideal for vertical gardens. | Requires stable power and pump; roots can dry quickly if water flow stops. |
| Ebb and Flow (Flood & Drain) | Great for larger plants, allows root oxygenation between cycles. | Needs careful drainage design; heavier and less suited for tight spaces. |
| Drip System | Very efficient with water and nutrients; scalable for large gardens. | Drip lines can clog; more components to maintain; slightly higher setup cost. |
Now that you know the pros and cons of each setup, you’re ready to plan your own vertical garden. In this guide, we’ll focus on building a Nutrient Film Technique (NFT) system — one of the most efficient and beginner-friendly options for vertical hydroponics. It’s simple to assemble, easy to maintain, and delivers excellent results for leafy greens and herbs.
Don’t Miss: Plastic-Free Living Made Simple Want to reduce plastic in your next project? Explore easy swaps and creative ideas for building a more sustainable, low-waste lifestyle. Read more →Materials Needed for Your Vertical Hydroponic Garden
Essential Components
- 4″ PVC pipes (length based on your wall space) or food-grade stainless steel pipes (for a plastic-free option)
- PVC end caps and T-joints or metal connectors (if using stainless steel pipes)
- 45° PVC elbows for proper water flow or eco-friendly angle brackets (for non-plastic setups)
- PVC cement and primer (or use eco-friendly adhesives if opting for non-plastic materials)
Growing Supplies
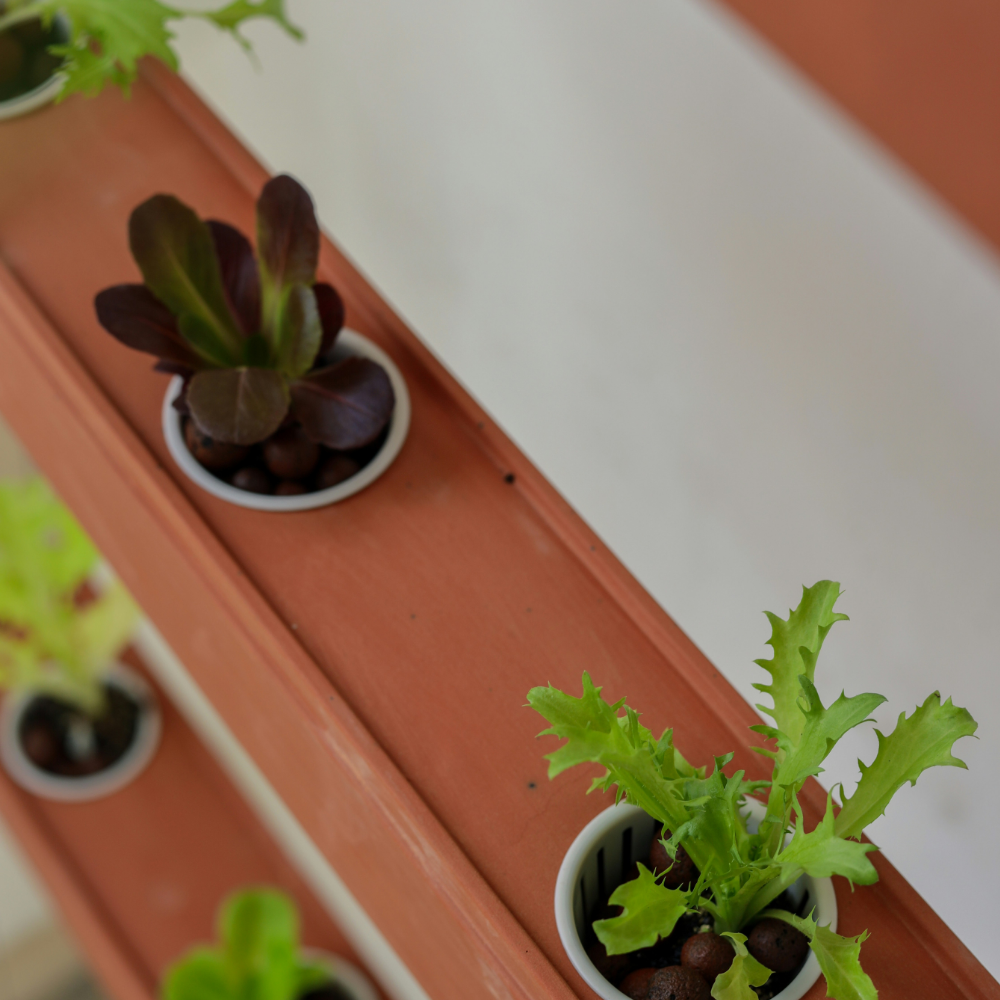
- 2″ net pots (1 per plant)
- Clay pebbles (LECA) or rockwool cubes
- Water pump (400 GPH minimum)
- 1/2″ irrigation tubing
- Reservoir (20+ gallon capacity)
Nutrients & Monitoring
- Hydroponic nutrient solution (primary, micro)
- pH testing kit
- pH up/down solutions
- TDS/EC meter
Tools
- Hole saw (2″ for net pots)
- Drill
- Level
- Measuring tape
- Pipe cutter/hacksaw
- Mounting brackets
- Safety gear (goggles, gloves)
Each component plays a crucial role in your system’s success. Quality materials, especially for the pump and nutrients, will save money long-term.
✨tip
Choose the Right Spot
Even though hydroponics doesn’t need soil, location still matters. Place your system in an area that receives consistent light or where you can easily add LED grow lights. Easy access to water and electricity will also simplify upkeep.
📝 Step 1: Planning and Design Your Vertical Hydroponic Garden
Space Requirements
A successful vertical NFT system requires careful space planning. Your wall should provide at least 4′ width by 6′ height of mounting space, with a 12″ clearance from the wall for maintenance access. The reservoir needs a 24″ square footprint at the base. Consider your wall’s load-bearing capacity – it must support at least 20 pounds per square foot when the system is fully loaded with water and mature plants.
Light Considerations
Proper lighting determines your garden’s success. A south or southeast-facing window provides ideal natural light. If using artificial lighting, LED grow lights should be positioned 6-12″ from plants and run 14-16 hours daily. Monitor temperature and install ventilation to manage heat from lights. The light placement should allow easy access to plants without creating shadows or cold spots.
Plant Selection
Best performers in NFT:
- Leafy greens: Lettuce, spinach, kale
- Herbs: Basil, mint, parsley
- Small fruits: Strawberries
- Avoid: Root vegetables, large fruiting plants
🛠️ Step 2: Building the Structure
Now that you’ve chosen your hydroponic system, it’s time to build the framework that will support your plants. Whether you’re using pipes, repurposed shelves, or a pre-made vertical hydroponic kit, the goal is to create a sturdy, well-balanced structure that allows water and nutrients to flow efficiently.
Cutting Pipes
If you’re going the DIY route with pipes, you must cut them to the appropriate length to fit your space. Standard sizes range from 2 to 4 feet tall, depending on how much you want to grow. Use a pipe cutter or a hacksaw for clean cuts. If you stack multiple layers, ensure each pipe is evenly sized to keep your system stable.
Creating Growing Holes
Next, you’ll need to drill holes in your pipes or selected structures to hold your plants. These holes should be spaced 6 to 8 inches apart to give plants room to grow. A hole saw drill bit (usually 2 to 3 inches in diameter) works well for this. If using net pots, check their size beforehand so they fit snugly. For deeper-rooted plants, you may want to adjust the spacing to prevent overcrowding.
Assembling the Frame
Once your pipes or structure are prepped, it’s time to assemble everything into a vertical design. Here are some common methods:
- Freestanding Frame – Connect pipes with elbow joints and T-joints to create a standing structure. Secure the base so it doesn’t tip over.
- Wall-Mounted System – Attach the pipes or vertical trays to a wall or fence for extra support, perfect for small spaces.
- Stacked Shelf System – If using shelves, ensure they’re waterproof and positioned at an angle to allow water to flow downward.
Regardless of your setup, test the balance and stability before moving forward—hydroponic systems get heavier once filled with water.
Installing a Support System
Since vertical gardens rely on upward growth, having a sturdy support system is key, especially for larger plants. Depending on your design, you may need:
- Brackets or wall anchors to keep a wall-mounted system secure.
- Additional piping or wooden framing for freestanding units.
- String, trellises, or stakes for vining plants like tomatoes or cucumbers.
Make sure everything is securely fastened before adding water, nutrients, or plants. A wobbly system now will only become more unstable once it’s in use. Once your structure is in place, you’re ready for the next step—setting up the water and nutrient flow.
💧 Step 3: Setting Up Irrigation
In a Nutrient Film Technique (NFT) system, a thin stream of nutrient-rich water continuously flows over plant roots, providing them with hydration and oxygen without submerging them entirely. This constant circulation reduces water waste and ensures optimal nutrient absorption. Proper irrigation setup is key to keeping your system running efficiently.
Pump Installation
The water pump is the heart of your NFT system, responsible for delivering nutrient solution from the reservoir (the container holding the water and nutrients) up to the growing channels.
- Choosing the Right Pump: Look for a submersible pump with a flow rate suited to your system size. Most NFT setups do well with a 150–400 GPH (gallons per hour) pump to ensure steady but gentle water movement.
- Placement: The pump should sit at the bottom of the reservoir, fully submerged, to ensure continuous water flow.
- Power Supply: Plug the pump into a GFCI outlet for safety, especially for indoor systems. Using a timer is optional but can help control flow rates if needed.
Plumbing Configuration
Once your pump is installed, it’s time to set up the tubing and water distribution system.
- Connecting the Main Water Line: Attach a pipe or flexible tubing from the pump outlet to the top of your growing channels.
- Distributing Water Evenly: The main water line should have small openings or feeder tubes directing the nutrient solution into each growing channel. The flow should be slow and steady, allowing water to spread evenly across all plants.
- Ensuring Proper Channel Slope: NFT systems rely on gravity to move water, so the channels should be angled at a 1–3% slope (about 1–3 inches of drop per 8–10 feet of length). This allows the water to flow gently while keeping plant roots moist without water pooling.
Testing Water Flow
Before adding plants, run a test cycle to ensure everything flows correctly. Here’s what to check:
- Consistent Water Flow: The nutrient solution should move smoothly through each channel without drying out or flooding certain sections.
- Even Coverage: All plant roots should receive a thin, continuous film of water. Adjust tubing or slope if some areas get too much or too little.
- Pump Efficiency: The pump should run quietly and consistently without overheating or causing sudden surges in water flow.
- No Leaks: Inspect all tubing and connections for drips. If you find leaks, use clamps or waterproof tape to seal them.
Drainage System Setup
Since NFT systems recirculate water, you need a reliable way to return excess solution back to the reservoir.
- Install a Drainpipe: Place an outlet pipe or hole leading back to the reservoir at the lowest end of each growing channel.
- Prevent Clogs: Use a filter or mesh screen over the drain to keep plant debris from blocking the flow.
- Maintain Water Levels: Ensure the reservoir doesn’t overflow and that water is recirculating efficiently.
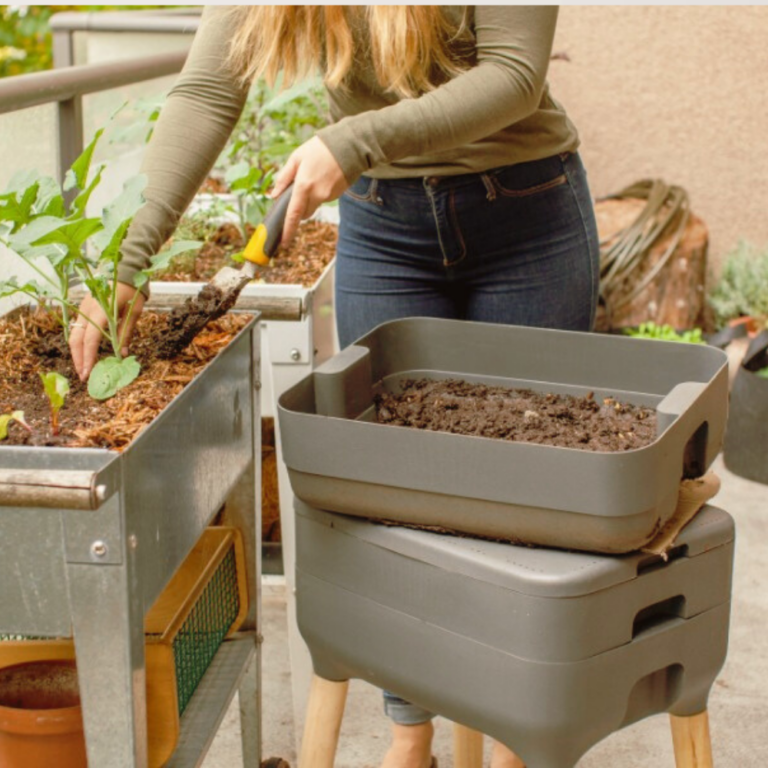
Ongoing Care and Use of Your Vertical Hydroponic Garden
Once your system is up and running, a little daily and weekly attention will keep it thriving. Checking water flow, maintaining nutrient balance, and providing plants with sufficient space to grow are simple yet effective habits that make a significant difference. Regular care not only prevents problems but also helps you get bigger, healthier harvests.
Daily Care
A few minutes a day keeps major problems away! Check that water flows smoothly through all channels and that your plants look healthy—no wilting, discoloration, or signs of distress. Take a quick look at the reservoir to ensure water levels are where they should be, and scan for any leaks or blockages in the irrigation lines. This simple five-minute routine can catch small issues before they turn into bigger headaches.
Weekly Maintenance
To keep your plants thriving, swap out the nutrient solution every 7–10 days. Before refilling, give the reservoir a good clean to prevent buildup that could throw off the nutrient balance. While you’re at it, test the electrical conductivity (EC) to ensure your plants get the right nutrients. If the EC is too high, dilute it with fresh water; add more nutrients if it’s too low. Keeping these levels in check means healthier, faster-growing plants.
pH Management
Plants can only absorb nutrients effectively if the pH stays between 5.5 and 6.5, so daily testing is a must. Use a reliable pH meter and make adjustments as needed—but do it gradually to avoid shocking your plants. If the pH drifts too high, bring it back down with phosphoric acid (pH Down); if it’s too low, raise it with potassium hydroxide (pH Up). Consistent pH management is one of the easiest ways to keep your hydroponic system running smoothly.
Plant Care
Give your plants some attention beyond just the nutrients and water flow. Trim off any dead or yellowing leaves to keep the system clean and prevent disease. Watch for signs of nutrient deficiencies or pests and adjust accordingly. Proper spacing is also key overcrowding can block airflow, leading to moisture buildup and potential fungal issues. If you’re growing larger plants like tomatoes or peppers, provide support to keep them upright and prevent strain on your system.
6 Troubleshooting Common Issues
Even well-built hydroponic systems can encounter issues along the way. Issues such as uneven water flow, algae, or root rot are common but typically easy to address once you recognize the signs. By identifying problems early and making minor adjustments, you can keep your garden running smoothly and avoid more significant setbacks.
- Slow or Uneven Water Flow
- Possible Causes: Clogged tubing, pump failure, or improper channel slope.
- Solution: Check for debris, clean tubing regularly, and ensure channels are angled correctly (1–3% slope).
- Nutrient Deficiencies (Yellowing or Stunted Growth)
- Possible Causes: Improper nutrient mix, pH imbalance, or inconsistent water flow.
- Solution: Test EC levels, adjust pH, and refresh nutrients weekly.
- Root Rot (Slimy, Brown Roots)
- Possible Causes: Poor oxygenation, stagnant water, or high temperatures.
- Solution: Improve aeration by adding an air stone to the reservoir, keep temperatures below 75°F (24°C), and ensure proper drainage.
- Algae Growth in Channels or Reservoir
- Possible Causes: Exposure to light in the nutrient solution.
- Solution: Cover channels and the reservoir with opaque materials to block light and prevent algae buildup.
- Pests (Aphids, Whiteflies, Fungus Gnats)
- Possible Causes: Infestation from outdoor sources, poor airflow, or excess moisture.
- Solution: Use yellow sticky traps, encourage natural predators like ladybugs, and maintain good ventilation.
- Pump or Power Failure
- Possible Causes: Electrical issues, clogged pump, or mechanical failure.
- Solution: Keep a backup pump on hand, clean the pump regularly, and consider using a battery backup in case of power outages.
How Much Does It Cost to Build a Vertical Hydroponic Garden?
The cost of building a vertical hydroponic garden can vary depending on the size, materials, and additional features you choose to include. Some growers begin with a basic system for under $200, while others invest more for advanced lighting or monitoring. Breaking the costs into setup and monthly expenses makes it easier to budget and decide what’s right for your home.
Initial Setup
- Core components (frame, pump, reservoir): $150–$200
- Growing supplies (cups, eco-friendly medium): $50–$75
- Monitoring equipment (optional): $75–$100
- Grow lights (if no natural sunlight): $100–$200
Monthly Costs
- Nutrients: $10–$15
- Electricity: $5–$20
- Water: $2–$5
How Long Does It Take to See Results from a Vertical Hydroponic Garden?
Setting up a vertical hydroponic garden doesn’t take forever, but it does happen in stages. From assembly to your first harvest, each step builds on the last. Knowing what to expect week by week helps you stay motivated and understand when you’ll start enjoying fresh food from your system.
| Week | What to Expect |
|---|---|
| Weeks 1–2 | Assemble the system, test water flow, and make sure everything runs smoothly before planting. |
| Week 3 | Move seedlings into the system to start growing. |
| Weeks 4–6 | Harvest fast growers like lettuce and herbs for your first taste of success. |
| Week 8 | The system is fully operational, producing a steady supply of fresh greens. |
| 3 Months | Fine-tuned system with consistent, reliable harvests. |
FAQs About DIY Vertical Hydroponic Gardens
One of the most affordable options is to use simple, natural, or upcycled materials. Many people repurpose wooden frames, metal shelving, or food-safe containers they already own. By starting small and adding on over time, you can keep costs low while avoiding plastic-heavy kits.
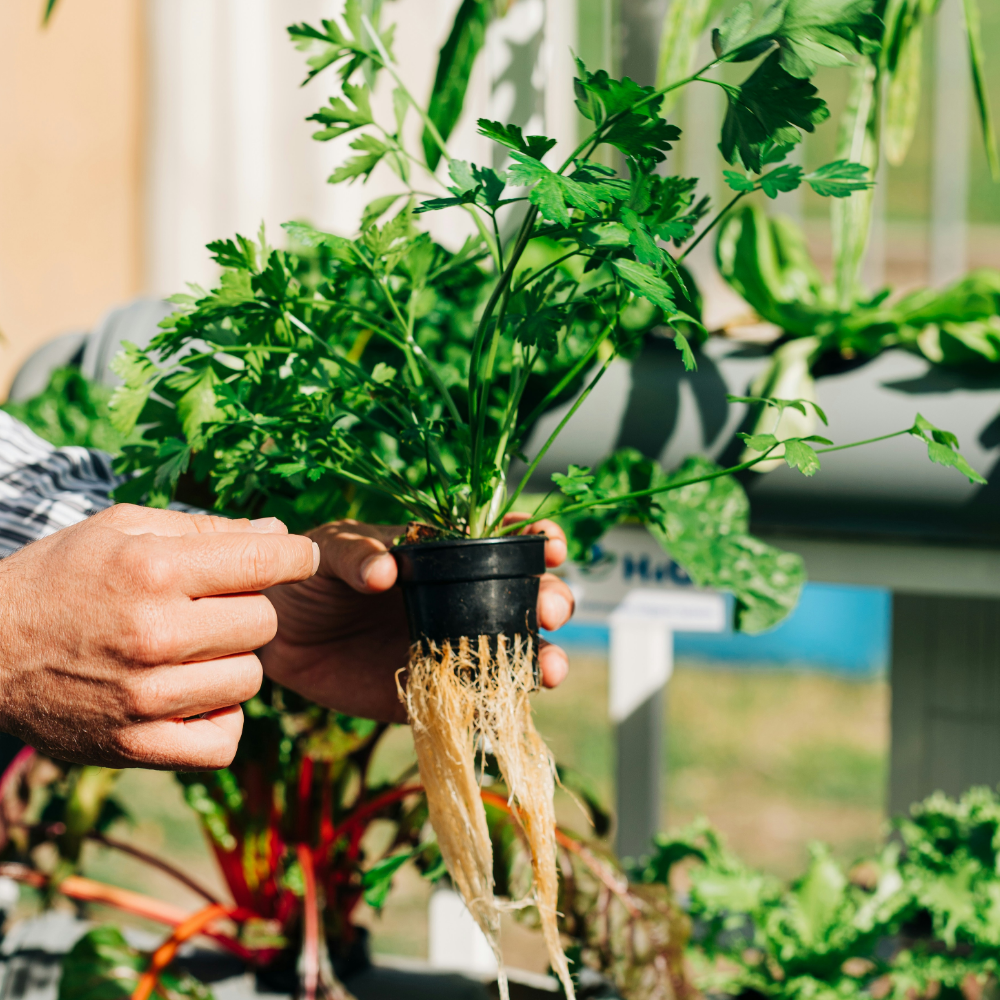
Leafy greens and herbs are ideal for vertical systems because they’re lightweight and fast-growing. Lettuce, kale, spinach, basil, mint, and cilantro all perform well. Some fruiting plants, like strawberries or peppers, can also succeed if your system provides enough support and light.
Absolutely. Indoor hydroponic gardens can grow beautifully under full-spectrum LED grow lights, which mimic natural sunlight. By putting your lights on a timer (12–16 hours per day), you can create a healthy growth cycle for your plants — even in spaces without windows.
Yes, a bit of pH drift is entirely normal in hydroponic systems. As plants absorb different nutrients, the water’s balance naturally shifts. You can minimize this by checking pH daily and making minor, gradual adjustments — about 0.1 at a time — rather than big corrections. Consistency is key. If your levels change rapidly or often, clean your reservoir and refresh the nutrient solution to reset stability.
Brown, slimy, or foul-smelling roots are a clear sign of root rot, usually caused by low oxygen or high water temperature. Healthy roots should look light beige or white and smell fresh. To fix the issue, rinse roots gently, replace the nutrient solution, and increase aeration with an air stone. Keep water temperatures below 75°F (24°C) to prevent rot from returning.
Final Thoughts on Building a DIY Vertical Hydroponic Garden
Creating a vertical hydroponic garden isn’t just about growing food; it’s about building a more sustainable and self-reliant lifestyle. While the setup takes some planning and effort, the payoff is a steady supply of fresh, homegrown produce that’s both cost-effective and convenient. Along the way, you gain the satisfaction of knowing exactly where your food comes from and the joy of tending a system that supports healthier eating and a lighter environmental footprint.
📚References
- Savvas, D., & Gruda, N. (2018). Application of soilless culture technologies in the modern greenhouse industry—A review. European Journal of Horticultural Science, 83(5), 280–293. https://doi.org/10.17660/eJHS.2018/83.5.2
- NASA. (2008). NASA technology grows fresh produce for Earth. NASA Spinoff. https://spinoff.nasa.gov/Spinoff2008/ch_3.html
- Oregon State University Extension Service. (2025). Hydro-hints: What Is Hydroponics? OSU Extension. https://extension.oregonstate.edu/catalog/em-9453-hydro-hints-what-hydroponics
- U.S. Department of Agriculture, Economic Research Service. (2024, July 25). Food prices rose 23.6 percent from 2020 to 2024. USDA ERS Chart Gallery. https://www.ers.usda.gov/data-products/chart-gallery/chart-detail/?chartId=58350