Key Takeaways
- Composting 101 turns food scraps and yard waste into nutrient-rich soil, helping reduce landfill waste and methane emissions.
- A healthy compost system relies on a simple balance of “greens” (nitrogen) and “browns” (carbon) to keep decomposition moving smoothly.
- Even small composting setups — indoors or outdoors — make a meaningful impact on soil health, sustainability, and climate change.
Composting is one of the easiest ways to cut household waste, enrich your garden soil, and shrink your environmental footprint all at the same time. And whether you have a sprawling backyard or a studio apartment, you can start today.
This beginner’s guide covers everything you need to know: what composting is, why it matters, and exactly how to set up your first system step by step. No experience needed.
By the end, you’ll know how to turn everyday kitchen scraps into nutrient-rich soil that your plants will love.
What Is Composting?
At its core, composting is the natural process of recycling organic waste—like food scraps, leaves, and garden trimmings—into a nutrient-rich soil amendment. Instead of tossing these materials into the trash, composting lets nature break them down with the help of microorganisms, oxygen, and moisture. The result is a dark, crumbly, earthy-smelling material gardeners often call black gold.
If you’ve ever walked through a forest and noticed how fallen leaves slowly turn into rich soil underfoot, you’ve already seen composting in action. The process mimics nature’s own cycle of growth, decay, and renewal. By recreating these conditions at home, you can turn kitchen scraps and yard waste into something that feeds plants instead of landfills.
And the benefits go far beyond your garden. Composting reduces the amount of organic waste sent to landfills, where it would otherwise produce methane, a greenhouse gas far more potent than carbon dioxide. It also creates healthier soil that holds water better, supports thriving plants, and reduces the need for synthetic fertilizers.
Why Compost? (Benefits of Composting)
🌍 Reduces Landfill Waste & Methane Emissions
When food and yard scraps are tossed in the trash, they end up in landfills where they decompose without oxygen. This process creates methane, a greenhouse gas more than 25 times stronger than carbon dioxide at trapping heat. By composting at home, you keep organic waste out of landfills and help lower greenhouse gas emissions.
🌱 Improves Soil Health & Fertility
Compost adds valuable organic matter back into the soil. It improves soil structure, making it lighter and more nutrient-rich, while also boosting populations of beneficial microbes. Healthier soil means stronger root systems, better yields for your garden, and less need for synthetic fertilizers.
💧 Conserves Water & Helps Plants Thrive
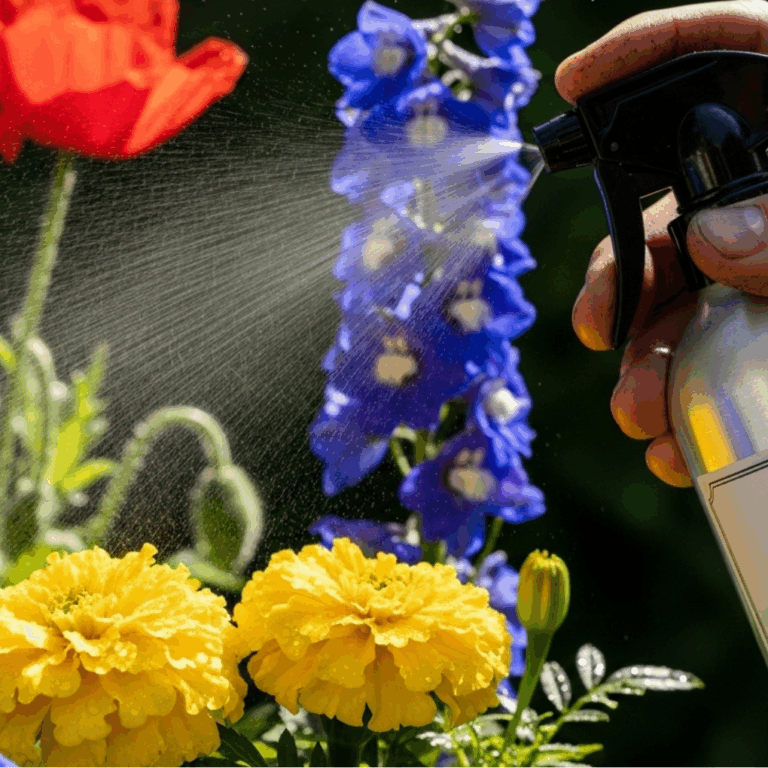
Soil enriched with compost holds onto water like a sponge, keeping moisture available for longer. That means less watering for you and more resilience for your plants during hot, dry spells. Compost also helps prevent soil erosion, keeping nutrients where your plants need them most.
🥕 Reduces Personal Food Waste
Instead of seeing kitchen scraps as trash, composting turns them into a valuable resource. Over time, this habit helps you cut down on food waste, reduce garbage output, and even save money on fertilizers and soil amendments.
How Does Composting Work?
Composting is nature’s way of recycling organic materials. When you combine food scraps, yard waste, and other natural materials, tiny living organisms get to work turning them into nutrient-rich soil.
The main workers are microorganisms like bacteria and fungi, along with helpful critters such as worms and insects. Think of your compost pile as a buffet for these organisms—they eat the waste you add, breaking it down into simpler materials.
To do their job well, they need four things:
- Carbon from “browns” like dry leaves and cardboard
- Nitrogen from “greens” like food scraps and grass clippings
- Moisture to keep everything damp (like a wrung-out sponge)
- Oxygen to keep the process aerobic and odor-free
As the microbes feast, they generate heat. That warmth not only speeds up decomposition but also helps destroy weed seeds and harmful bacteria. Over time, the pile goes through stages: it heats up, breaks down quickly while microbes are most active, and then gradually cools as the process slows.
After a few weeks or months, depending on your setup, the raw scraps you started with transform into dark, crumbly compost that smells earthy and fresh. It’s a natural cycle you see in forests every day—fallen leaves and plants slowly becoming fertile soil—only this time, you’re recreating it at home to turn waste into something useful.
Essential Ingredients for Successful Composting
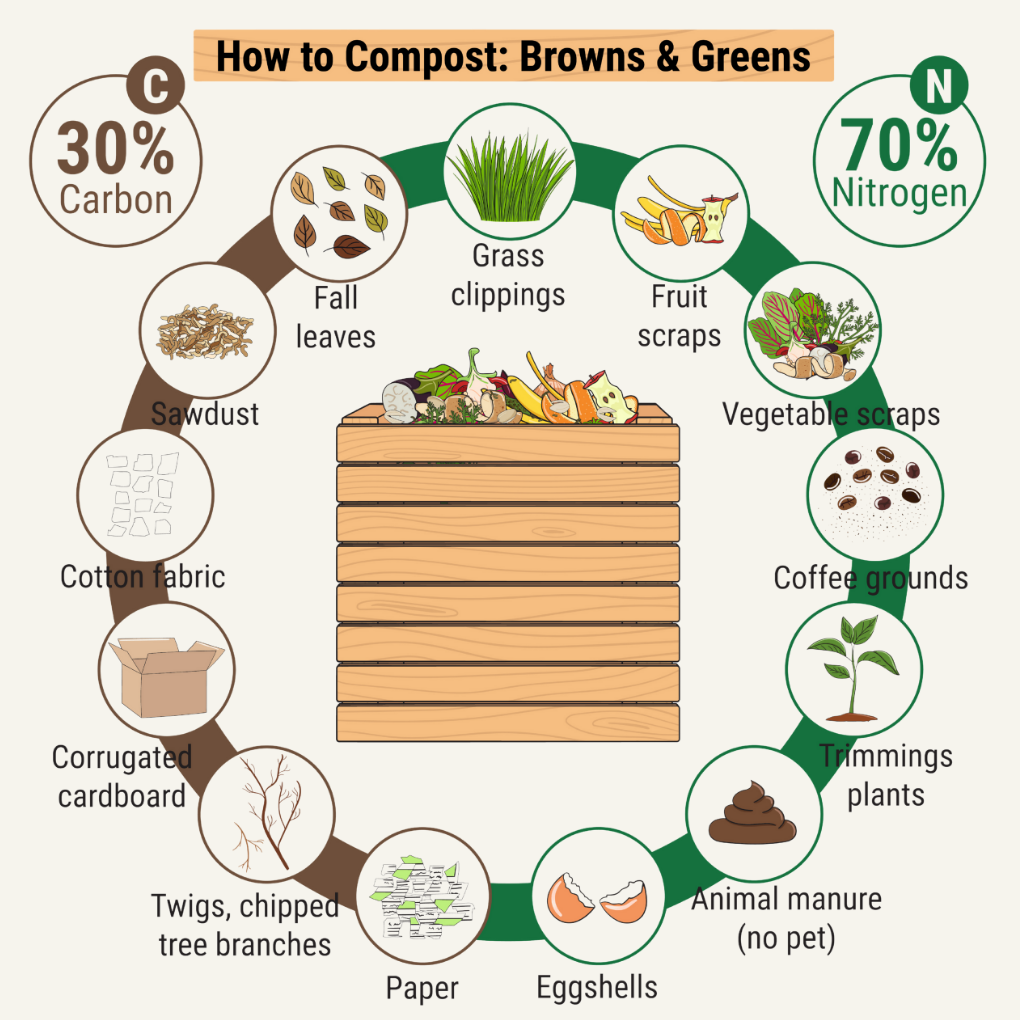
Composting isn’t just about tossing scraps into a pile and waiting for magic to happen—it’s about balance. A healthy compost system needs the right mix of greens (nitrogen-rich materials) and browns (carbon-rich materials). Without that balance, the pile can stall out or turn into a smelly mess. Here’s what you need to know.
The “Green” Team: Nitrogen-Rich Materials
Greens are the fresh, moist items that provide nitrogen, the fuel microbes use to power decomposition. You can think of greens as the energy boosters for your compost pile. Common examples include:
- Fruit and vegetable scraps (like peels, cores, and trimmings)
- Coffee grounds and tea leaves
- Fresh grass clippings
- Plant cuttings or garden trimmings
- Herbivore manure (from rabbits, chickens, cows—never from cats or dogs)
Greens are essential, but too many at once can make your compost soggy and smelly. That’s why they always need to be balanced with browns.
The “Brown” Team: Carbon-Rich Materials
Browns provide carbon, which gives compost structure and helps absorb excess moisture. These materials are dry, fibrous, and help keep the pile aerated. Some good choices are:
- Dry leaves
- Shredded cardboard or newspaper (avoid glossy or coated paper)
- Straw or hay
- Sawdust or wood shavings (from untreated wood)
- Cornstalks or dried plant matter
Without enough browns, the pile can turn slimy or foul-smelling. But if you have too many browns and not enough greens, decomposition will slow to a crawl.
The Golden Rule: Carbon-to-Nitrogen Ratio
If composting has a secret formula, it’s this: aim for about three parts browns to one part greens by volume. In technical terms, that’s a carbon-to-nitrogen ratio of roughly 30:1. Don’t worry about doing exact math—focus on layering your browns and greens instead of dumping in big piles of one or the other.
Moisture and Oxygen: The Unsung Heroes
Even with the perfect balance of greens and browns, compost needs two other essentials: water and air.
- Moisture: Your pile should feel like a wrung-out sponge—damp but not dripping. Too dry? Add greens or a splash of water. Too wet? Mix in more browns to absorb the excess.
- Oxygen: Composting is an aerobic process, which means microbes need oxygen to work efficiently. Turning the pile every week or so introduces fresh air, prevents odors, and keeps the breakdown moving along.
When you get this balance right, composting becomes almost effortless. No bad smells, no fruit fly invasions—just rich, crumbly compost that’s ready to nourish your plants.
What Can and Can’t Be Composted?
Once you understand the basics of greens and browns, the next question is simple: what actually goes in the pile? Most kitchen and yard waste can be composted, but a few items are best left out to keep your system safe and effective.
✅ Compostable Materials
Here are some common greens and browns you can safely add to your compost pile:
Greens (nitrogen-rich):
- Fruit and vegetable scraps
- Coffee grounds and filters, tea leaves and bags (non-plastic)
- Fresh grass clippings
- Plant cuttings and trimmings
- Herbivore manure (chickens, cows, rabbits, horses)
Browns (carbon-rich):
- Dry leaves, twigs, and pine needles
- Shredded newspaper, plain cardboard, paper bags (avoid glossy finishes)
- Straw, hay, or corn stalks
- Sawdust or wood shavings (from untreated wood)
- Dryer lint and vacuum dust (natural fibers only)
❌ What to Avoid
Not everything breaks down safely in a home compost system. Skip these items to prevent odors, pests, or contamination:
- Meat, fish, and bones (they attract animals and create strong odors)
- Dairy products and oily foods (slow to break down, smell unpleasant)
- Pet waste from cats and dogs can carry harmful pathogens.
- Glossy or coated paper (magazines, receipts, wrapping paper)
- Treated wood or sawdust from pressure-treated lumber
- Synthetic materials like plastic, metal, or glass
✨Tips
Safe and Effective Composting
- Chop large pieces: Smaller scraps decompose faster.
- Bury food waste: Cover fresh greens with a layer of browns to reduce odors and fruit flies.
- Balance is key: Keep roughly three parts browns to one part greens.
- Stick to natural fibers: Paper towels, napkins, and cotton fabrics are fine—as long as they’re unbleached and chemical-free.
By sticking to these simple rules, you’ll keep your compost pile healthy, pest-free, and working efficiently—all while turning everyday waste into a resource for your garden.
Setting Up Your Composting System
So, you’re ready to start composting, but where does all that future black gold actually go? There’s no one-size-fits-all approach. Whether you have a sprawling backyard or just a tiny kitchen corner, there’s a method that can fit your space and lifestyle. Let’s explore the options, pick the setup that works best for you, and get your first compost pile (or bin) started.
Choosing Your Composting Method
Different systems come with their own benefits and trade-offs. Here are the five most popular methods:
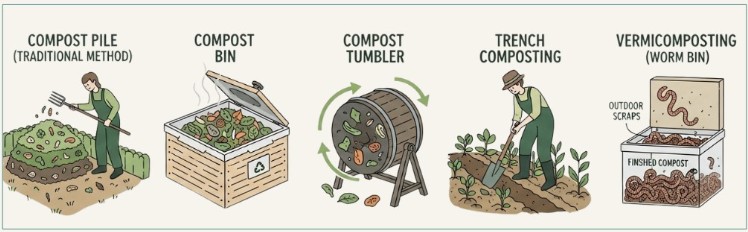
Compost Pile (Traditional Method)
The classic approach: layer greens and browns in a heap on the ground. It’s budget-friendly and low-tech, but it does require space and regular turning to keep it aerated.
Compost Bin
A contained version of the pile that keeps things tidier and discourages pests. Bins can be DIY projects (like repurposed pallets) or store-bought (plastic, wood, or metal). They retain heat and moisture better than open piles, speeding up decomposition.
Compost Tumbler
An enclosed bin that spins to mix and aerate the contents. Tumblers are convenient and break materials down quickly, but their limited size means you may need more than one if you produce a lot of scraps.
Trench Composting
Great for gardeners, this method involves digging a trench or hole in the garden, burying food scraps directly in the soil, and letting them decompose underground. It requires less maintenance, but you need open soil space and patience while the materials break down.
Indoor Composting (Bokashi & Vermicomposting)
Perfect for small spaces or apartments. Bokashi uses a fermentation process to handle almost all food waste (including meat and dairy), which is then buried to finish breaking down. Vermicomposting uses worms to process scraps into nutrient-rich castings, ideal for indoor bins or balconies.
Don’t Miss: Worm Composting Bin DIY 🪱Ready to take composting to the next level? Learn how to build your own worm composting bin and create nutrient-packed worm castings for your garden. Read more →Pros and Cons at a Glance
Composting Methods
- Pile: Free, simple, but less tidy and requires outdoor space.
- Bin: Contained, critter-resistant, but still requires manual turning.
- Tumbler: Fast and easy, but more expensive and limited capacity.
- Trench: Low effort once buried, but tied to specific garden spots.
- Bokashi/Vermicomposting: Apartment-friendly, efficient, but requires some setup and ongoing care.
Picking the Perfect Compost Spot
If you’re composting outdoors, choose a spot with good drainage, partial sunlight, and easy access. Too much sun can dry out your pile, while too much shade might slow decomposition. A slightly hidden corner of your yard works well, close enough for convenience but not right up against your house.
For indoor composting, look for a discreet, well-ventilated spot such as under the sink, in a pantry, or on a balcony. You’ll want it out of sight but easy to reach for daily use. I use a small hanging bin that attaches inside the cabinet under my sink—it keeps scraps handy but hidden.
Essential Tools and Equipment
You don’t need fancy gear to compost, but a few tools make the job smoother:
- Aerator or pitchfork: For turning the pile and keeping air circulating.
- Compost thermometer (optional): Fun for tracking how hot your pile gets.
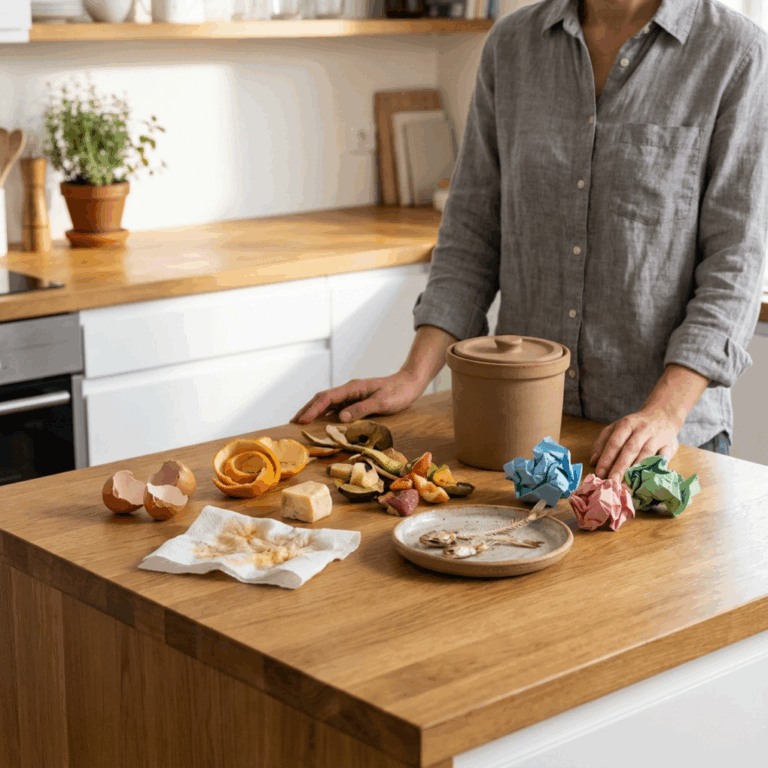
- Kitchen compost bucket: A countertop or under-sink bin for collecting scraps before moving them outdoors.
- Gloves and a garden fork: For handling material comfortably and cleanly.
How to Build and Maintain Your Compost Pile
Once you’ve picked your method and set up your system, it’s time to start building. Think of it like cooking: when you follow the recipe, the results are almost guaranteed.
Step 1: Start with a Brown Base
Begin with a thick layer (about 4–6 inches) of browns such as shredded cardboard, straw, or dry leaves. This foundation improves drainage and airflow, keeping the pile from getting soggy.
Step 2: Add a Layer of Greens
On top of the browns, add a thinner layer (2–3 inches) of nitrogen-rich materials like fruit and veggie scraps, coffee grounds, or grass clippings. Chop large items into smaller pieces, such as banana peels, corn cobs, or stems, so that microbes can break them down faster.
Step 3: Keep Layering
Continue alternating layers of browns and greens, like making a compost “lasagna.” For best results, aim for roughly three parts browns to one part greens by volume. Always finish with a layer of browns on top to help control odors and discourage pests.
Step 4: Check Moisture
Your compost should feel like a wrung-out sponge, moist but not dripping. To test, grab a handful and squeeze:
- If water drips out, it’s too wet; add more browns.
- If it falls apart like dust, it’s too dry. Add greens or sprinkle with water.
Step 5: Let It Breathe
Microorganisms need oxygen to thrive. Turn the pile every week or two with a pitchfork or aerator to introduce fresh air. If you’re using a tumbler, give it a few spins every few days. Mixing also redistributes materials, so everything breaks down evenly.
Troubleshooting Common Composting Problems
Even the best compost piles run into hiccups. Here’s how to solve them:
Quick Compost Troubleshooting Guide
| Problem | Likely Cause | Easy Fix |
|---|---|---|
| Bad smells | Too many greens or excess moisture | Add more browns (leaves, cardboard), turn pile to improve airflow |
| Pile not breaking down | Too dry, too many browns, or low nitrogen | Add water to moisten, mix in more greens (food scraps, grass clippings) |
| Fruit flies or pests | Food scraps exposed or wrong items added | Bury food under browns, avoid meat, dairy, and oily foods |
| Compost too cold | Pile too small or lacking nitrogen | Add more greens, make pile larger, insulate with browns |
| Pile too wet/slimy | Excess moisture or too many greens | Mix in dry browns like shredded paper or straw, and turn pile regularly |
| Pile too dry | Not enough moisture or too many browns | Sprinkle with water and add more greens to re-activate decomposition |
How to Use Your Finished Compost
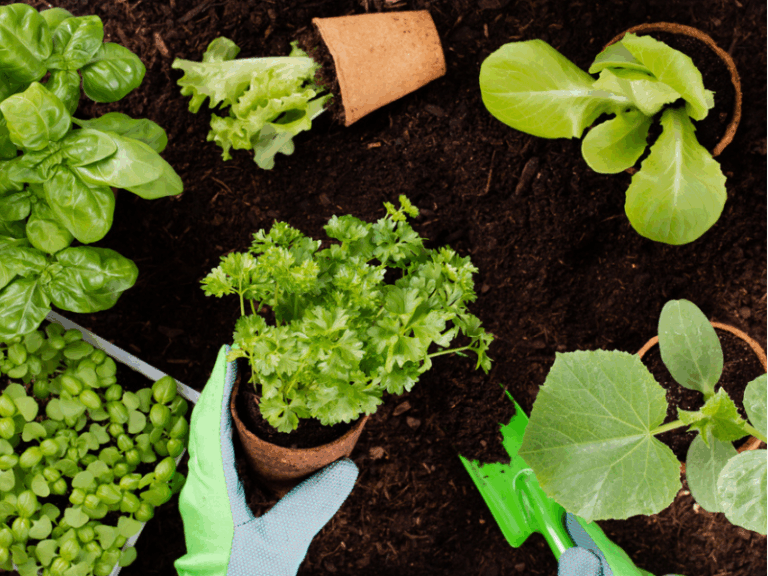
Once your compost is dark, crumbly, and smells earthy, it’s ready to give back to your garden. Think of it as a natural fertilizer and soil booster rolled into one. Here are some of the best ways to put your compost to work:
In the Garden
- Mix into soil before planting: Work a few inches of compost into garden beds or vegetable patches to improve fertility and soil structure.
- Top-dress around plants: Sprinkle compost around flowers, shrubs, and vegetables to give them a slow-release nutrient boost throughout the season.
For Houseplants
Blend compost into potting soil or use a thin layer on top of containers. It adds nutrients and improves moisture retention—especially helpful for indoor plants that dry out quickly.
On the Lawn and Around Trees
- Lawn care: Spread a thin layer of compost over your grass (about ¼ inch). It enriches the soil, encourages thicker turf, and reduces the need for synthetic fertilizers.
- Trees and shrubs: Apply compost in a ring around the base, leaving a little space near the trunk. This helps retain water and feeds the roots.
Creative Uses Beyond Gardening
- Compost tea: Steep compost in water for a day or two, strain it, and use the nutrient-rich liquid to water your plants.
- Erosion control: Spread compost on slopes or bare patches of ground to help hold soil in place.
- Wildlife-friendly landscaping: Add compost to native plant gardens to support pollinators and healthy ecosystems.
Wherever you use it, compost improves soil health, reduces the need for chemical inputs, and closes the loop by turning waste into something truly valuable.
Community Composting
Not everyone has the space, time, or setup to compost at home, and that’s where community composting programs step in. These initiatives make it easy to keep food scraps and other organic waste out of the landfill while supporting zero-waste strategies in your neighborhood.
Depending on where you live, you might find:
- Drop-off sites or a municipal composting site where residents bring kitchen scraps.
- Curbside collection or pickup services that operate similarly to trash or recycling services.
- Local compost keepers and compost tumblers are set up for shared use.
- Partnerships with large-scale composting facilities that process community waste into rich soil.
Organizations like the Institute for Local Self-Reliance – Community Composting (a leading group supporting community-scale efforts) are proving how powerful these programs can be in reducing waste and building healthier soils.
If your town doesn’t yet offer a composting program, consider starting a small initiative with neighbors, a community garden, or even your child’s school. Community-led efforts often inspire bigger municipal action.
Food Waste and Climate Change
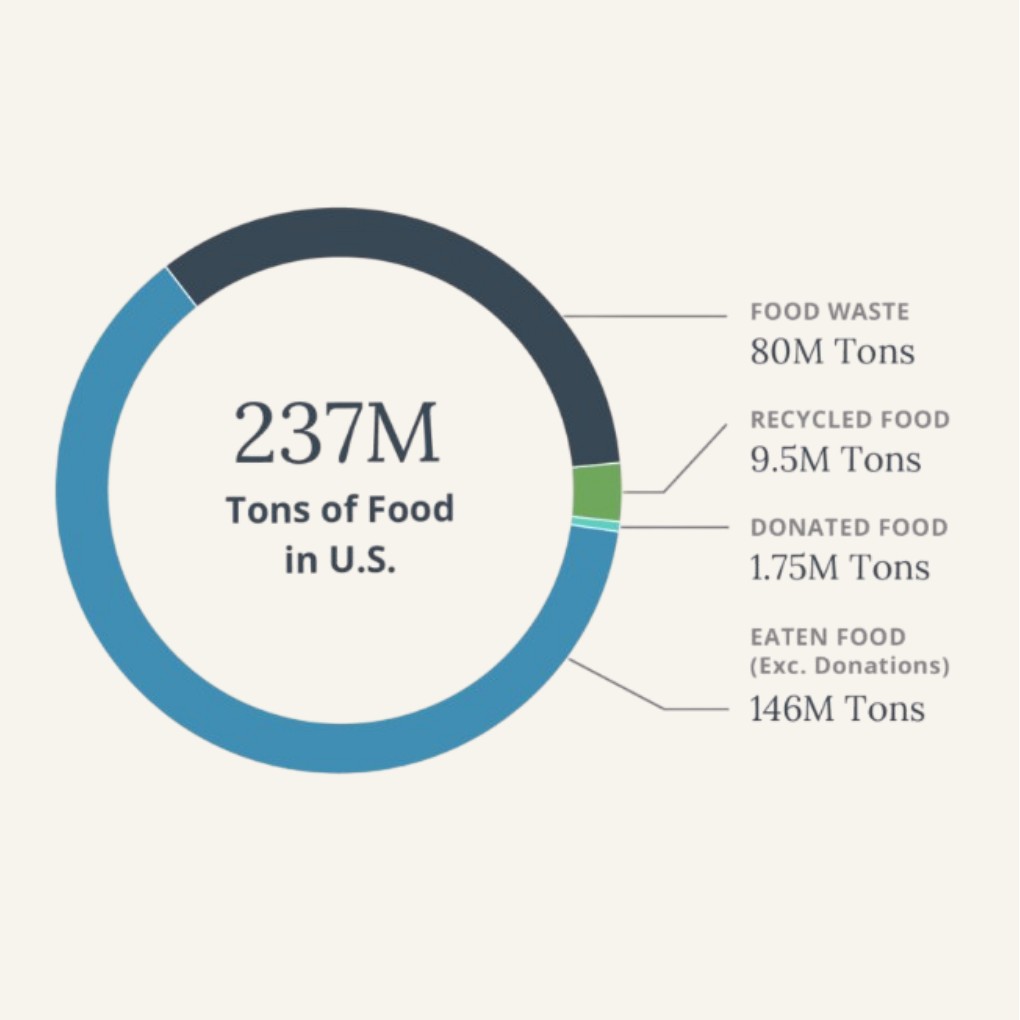
Food waste is one of the biggest environmental challenges we face today. Globally, more than 1 billion tonnes of food go to waste every year, with households as the most significant contributors. In the United States, ReFED’s Food Waste Monitor reports that in 2023, about 237 million tons of food were wasted—nearly 40% of all food produced.
Most of this food doesn’t get recycled—it gets thrown into landfills. Once there, it breaks down without oxygen and releases methane, a greenhouse gas far more potent than carbon dioxide. According to the EPA, only about 5% of wasted food is composted, which means we’re missing a huge opportunity.
That’s where composting comes in. Instead of being wasted, your kitchen scraps and yard trimmings can be transformed into nutrient-rich compost that strengthens soil, helps plants grow, and reduces the need for synthetic fertilizers. Every bucket of food scraps you compost is a small step away from methane-producing landfills and a step toward a healthier planet.
The numbers may be significant, but the action is simple: if more households started composting, we could divert millions of tons of food waste from landfills every year.
Don’t Miss: Microplastics: Health Risks, Sources, and How to Reduce Exposure Composting cuts down on food waste—but plastics are another big piece of the puzzle. Learn how microplastics affect our health and simple steps you can take to reduce exposure. Read more →FAQs About Composting 101
The biggest mistake is forgetting to balance “greens” and “browns.” Too many food scraps without enough dry material leads to a smelly, soggy pile, while too many browns slow decomposition. Aim for roughly three parts browns to one-part greens, and your compost will stay healthy.
Yes. Outdoor piles may slow down in cold weather, but decomposition will pick up again in spring. You can also use insulated bins, tumblers, or indoor systems to keep composting year-round.
Yes. Indoor methods like Bokashi bins and worm composting (vermicomposting) make it possible to compost food scraps in small spaces without odors. These systems are perfect for apartments or homes without outdoor space. You can also explore modern options like the Lomi Composter, which is perfect for small spaces—read our full article to see if it’s the right fit for you.
It depends on your method and how often you maintain the pile. A well-managed tumbler can make compost in 2–3 months, while a backyard pile may take 6 months to a year. Compost is ready when it looks dark, crumbly, and smells earthy.
Composting is the natural process of recycling food scraps, yard waste, and other organic materials into nutrient-rich soil. It keeps waste out of landfills, reduces methane emissions, and creates healthy soil for growing plants.
Final Thoughts on Composting 101
Composting isn’t about perfection — it’s about progress. Whether you’re just starting or you’ve been at it for years, every composter hits a few bumps along the way. The trick is to see those challenges as part of the learning curve, not as failures. With a bit of troubleshooting and some practical tweaks, most problems are quick to fix and even more straightforward to prevent the next time around.
Patience and curiosity are your best tools. Maybe your pile doesn’t heat up right away, or a few fruit flies decide to move in; that’s all part of the process. Adjust, observe, and keep going. Each batch of compost has something new to teach you.
By staying flexible and not sweating the small stuff, you’ll soon be turning food scraps and yard waste into nutrient-rich compost that boosts your garden and keeps more waste out of landfills. Roll up your sleeves, trust the process, and enjoy knowing that every pile you build helps grow healthier plants and a healthier planet.
📚References
- ReFED. (n.d.). Food Waste Data—Causes & Impacts. ReFED. https://refed.org/food-waste/the-problem/.
- U.S. Environmental Protection Agency. (n.d.). Composting basics. EPA. https://www.epa.gov/recycle/composting-home